はじめに
今回は、Power Automate for Desktop(PAD)で、URLを指定してWEBサイトを開く方法を解説します。
PADの説明や導入方法はこちらで解説。
WEBサイトを開く
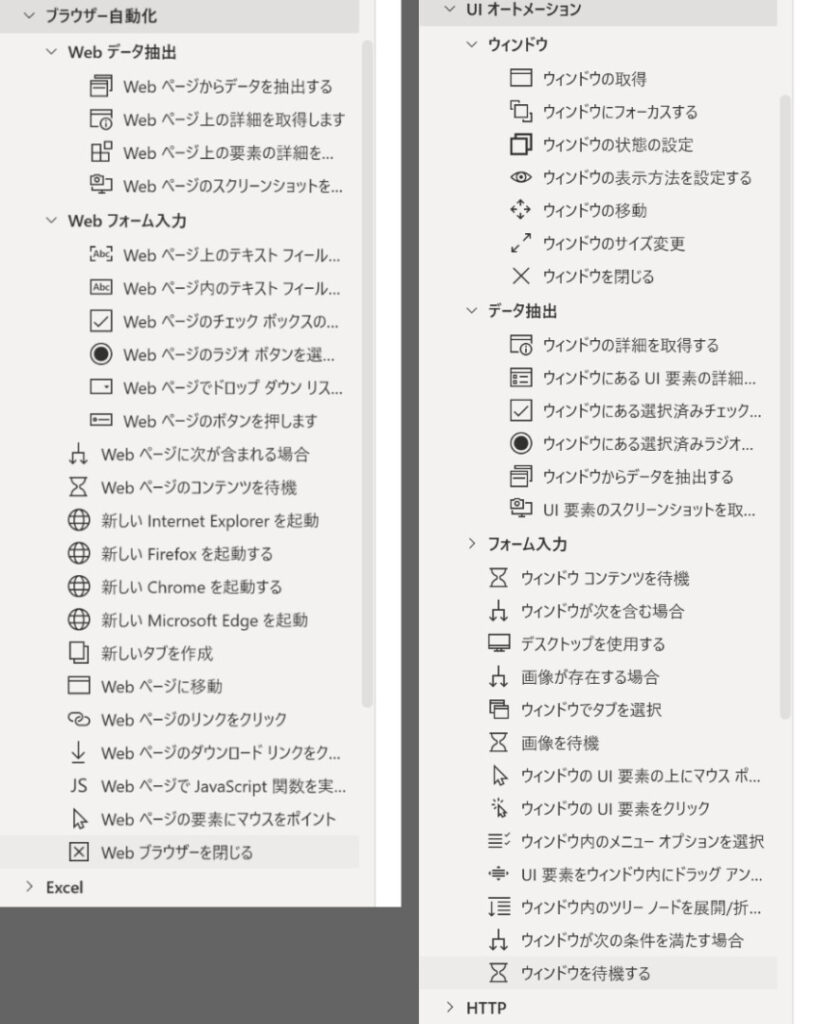
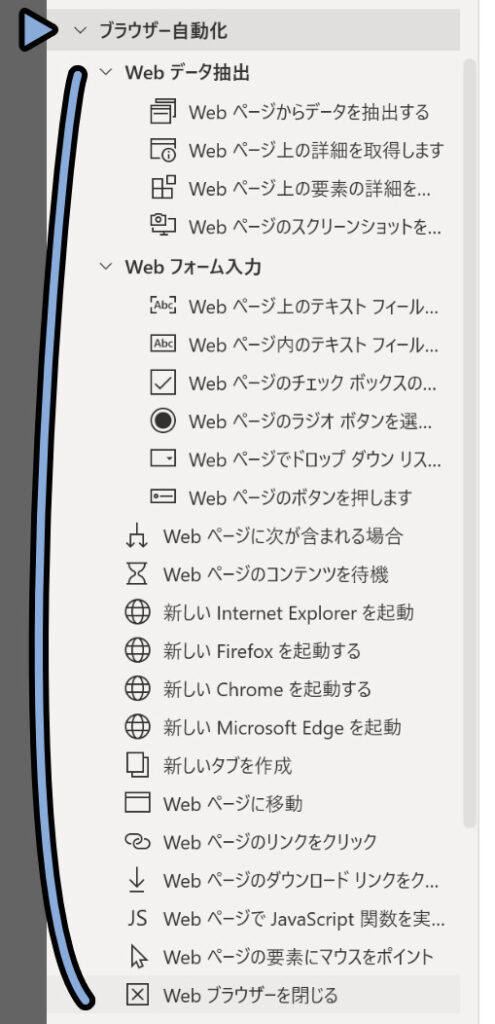
左側のブラウザー自動化 → Webフォーム入力を開きます。
ここで「新しい ○○ を起動する」をダブルクリックで選択。
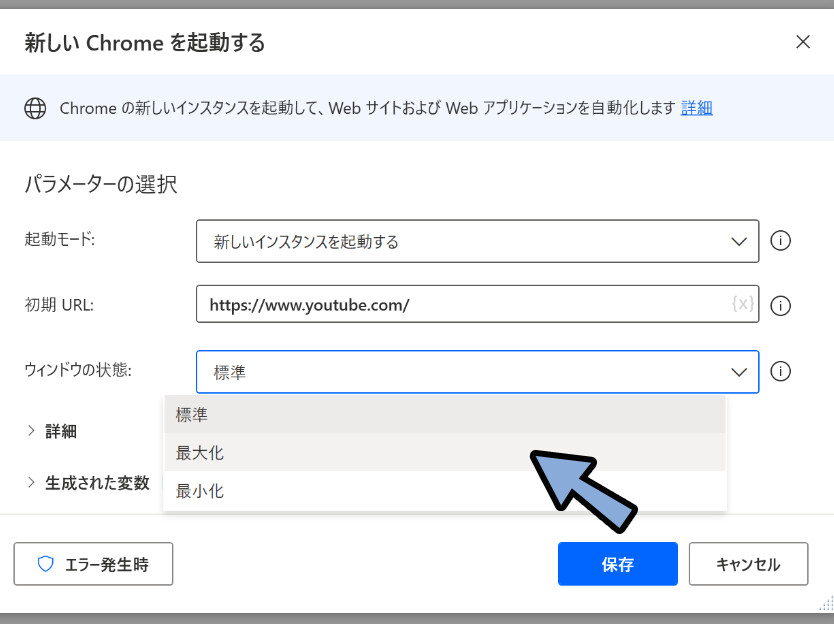
すると、4種類のブラウザでWEBサイトを開くことができます。
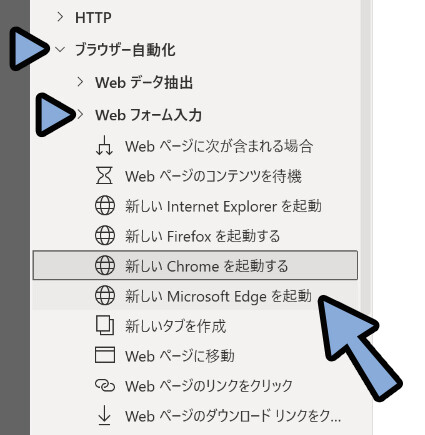
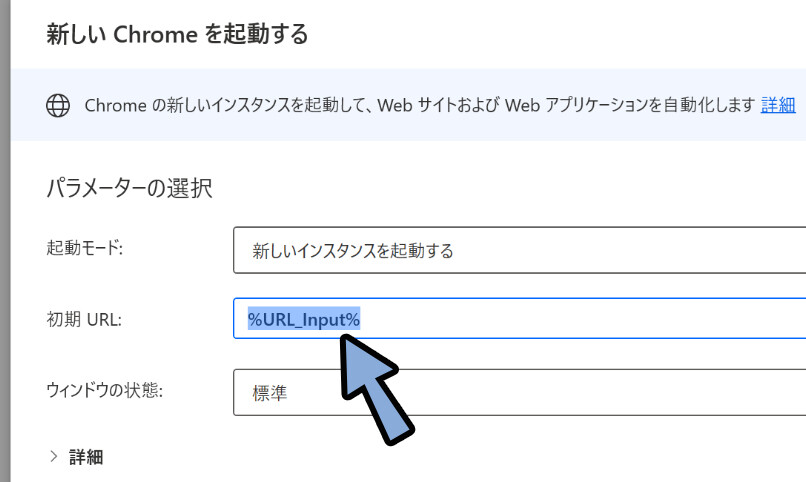
ここでは「新しいChromeを起動する」をダブルクリックで選びました。
そして、初期URLに開きたいWEBサイトのURLを入力。
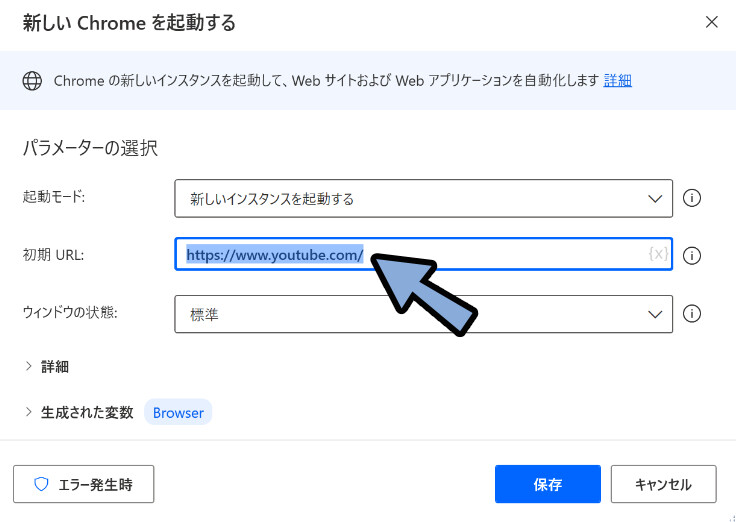
ウインドウの状態:は「最大化」で使う事をおすすめします。
理由は標準だと、凄く小さな画面で生成されることがあり、処理が見えないからです。
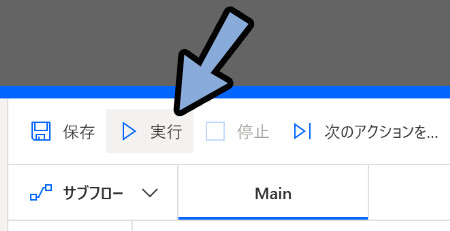
設定が終わりましたら、右下の所で「保存」
そして、左上の「実行」を選択。
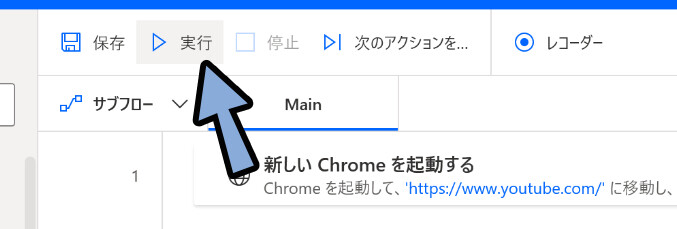
すると、WEBサイトが立ち上がります。

以上が、PADでWebサイトを開く方法です。
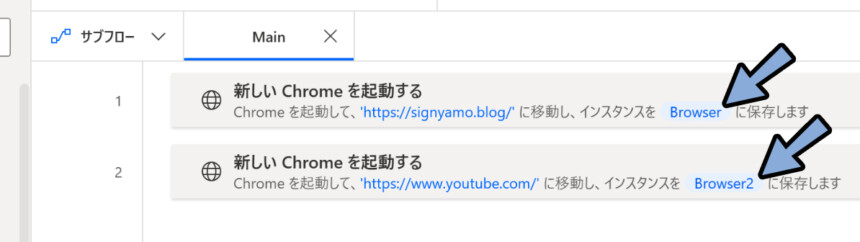
2つ以上のWEBサイト同時に開く
下図のような処理をすれば、WEBサイトは2つ以上同時に開けます。
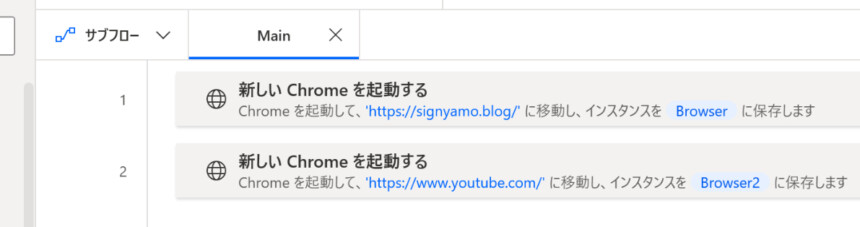
2つ以上開いた場合「生成された変数」の中にある、%Browser%や%Browser2%といった名前が重要になります。
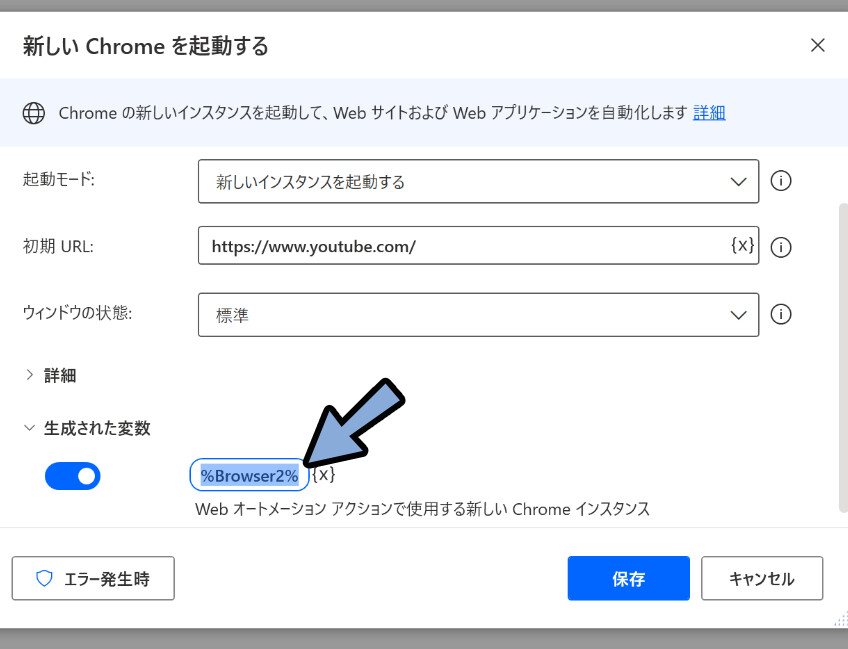
これは… 開いたWEBサイトの「名前」もしくは「番号」のようなモノです。
今は、開いたWEBサイトに、このような番号が割り振られる事を「認識」してください。
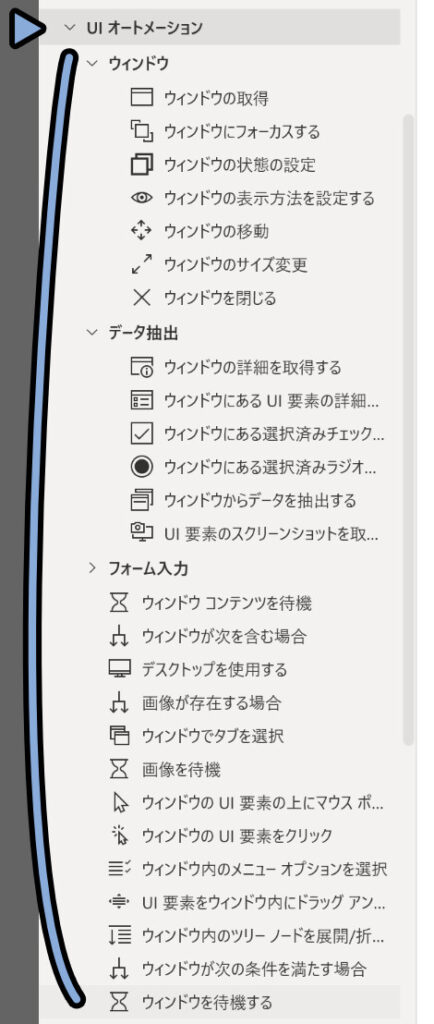
「ブラウザー自動化」と「UIオートメーション」の違い
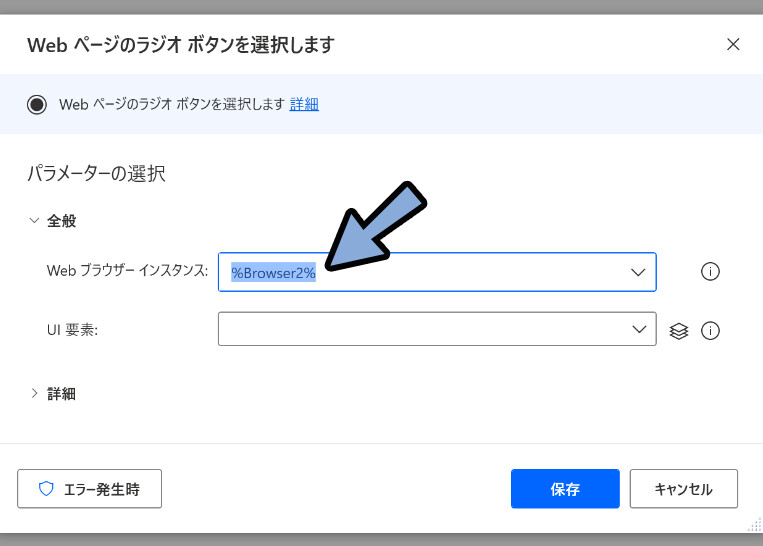
「ブラウザー自動化」は開いたWEBサイトの画面に操作を入れる処理です。
「UIオートメーション」は開いたUIやウインドウに操作を入れる処理です。
この2つの違いは、WEBサイトの変数が設定できるかどうかです。
つまり「ブラウザー自動化」系の処理は、開いたWEBサイトの番号を指定できます。
1つ目のWEBサイトに○○を実行。
その後、2つ目のWEBサイトに○○を実行という処理ができます。
このように、ブラウザー自動化系の処理は「Web ブラウザー インスタンス:」でどのWEBサイトに処理を入れるかを設定できます。
UIオートメーションは、この指定ができません。
基本的に「一番手前に開かれたウインドウ」に対して処理が入ります。
このように、「Web ブラウザー インスタンス:」を指定する場所が無いです。
なので…
WEBサイトを操作する処理は、基本「ブラウザー自動化」の中のモノを使ってください。
以上が2つ以上のWEBサイトを同時に開く方法です。
…
…
…この記事は、初心者向けに書いてます。
なので「おまけ1と2」で、もう少し便利にWEBサイトを開く方法。
さらに、練習にちょうど良さそうな機能の設定方法を解説します。
Webサイトを開く処理自体はこれで完了です。
これ以降はPADを使いこなすための「練習課題」だと思ってください。
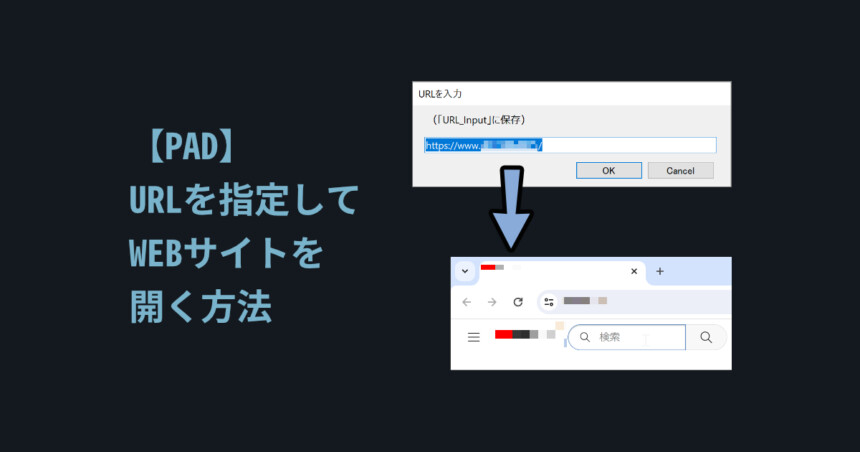
おまけ1:URLを入力するウインドウを表示する
おまけ1では、下図のような画面でURLを打ち込めるようにします。
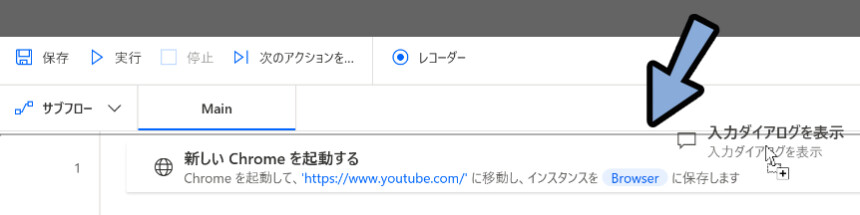
左側の所でメッセージボックス → 「入力ダイアログを表示」をクリック。
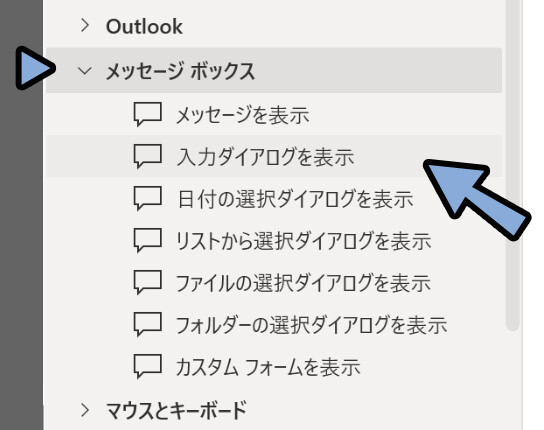
クリックしたまま… 「新しいChromeを起動する」の上にドラッグ&ドロップ。
そして、下記のような内容を登録します。
重要なのは「入力ダイアログを常に手前に表示する」にチェックを入れる事です。

それぞれの情報は、下図の位置に対応します。
入力の種類を変えると「パスワード風入力」や「複数行」入力ができます。(あまり使わない)

文章は適当に入れてください。
コメント的なモノで、処理に影響を与えません。
(流石に、何万字や何億字のような入力をすると壊れますが…)
「生成された変数」をクリックして開きます。
この上の部分の名前を「%URL_Input%」に設定。
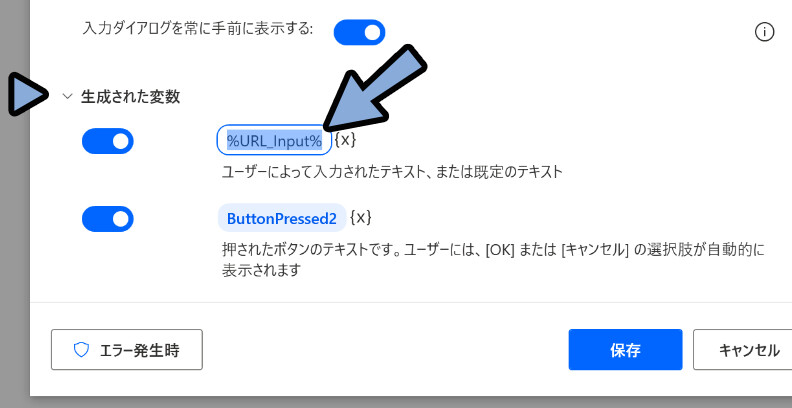
※「%Input%」の名前では、変数を登録できないので注意。
原因は何故か分かりませんが… 「Input」単体の名前は避けてください。
%~%の表記は、情報を入れるための入れ物と思ってください。
この箱、入れ物の事を「変数」と呼びます。
今回の場合「%URL_Input%」という名前の箱(変数)に…
ユーザーが入力したテキストの内容が格納されます。
↓変数について、より詳しく知りたい方はこちらをご覧ください
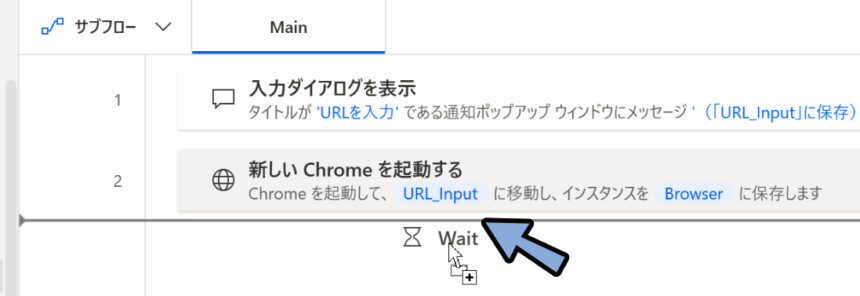
そしたら、「新しい Chrome を起動する」をクリックで選択。
色が変わった状態で「Enterキー」で編集。
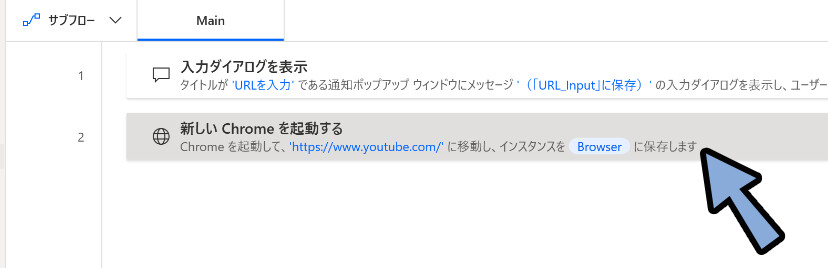
そして、初期URLの所に「%URL_Input%」を打ち込み。
これで、入力された情報が、「新しい Chrome を起動する」の初期URLに割り当てられます。

これで、入力の所でWEBサイトのURLが入力されれば…
そのURLのWEBサイトを開けます。
URL以外の適当な文字を入れるとエラーが出るので注意。
あとは、左上の「実行」を選択。
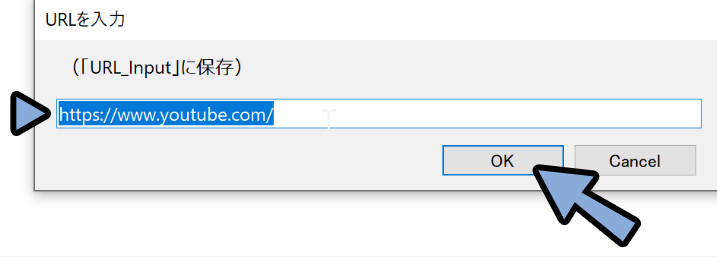
適用なURLを打ち込み。
OKで実行。
これで、入力されたURLのWEBサイトを開けます。
以上が、URLを入力するウインドウを表示する方法です。
おまけ2:10秒後にWEBサイトを閉じる
次は、開いたWEBサイトを10秒待機後に自動で閉じる方法を解説します。
Gifだと分かりにくいですが… 下図のような操作になります。

ここでは下記の2つに分けて、設定方法を解説します。
・10秒間、処理を待つ
・WEBサイトを閉じる
10秒間、処理を待つ
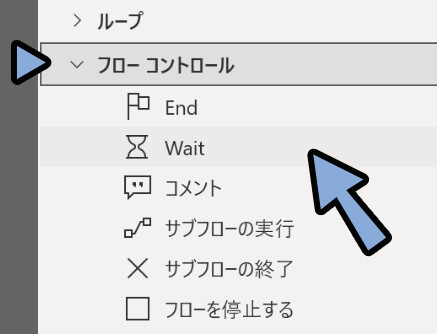
画面左側のフローコントロール → 「Wait」を選択。
このWaitが指定した秒数を待つための処理です。
自動入力を使ってると…
入力が速すぎてWEBサイトの更新処理などが追い付かない事があります。
このような時にWait=1秒のような、少し処理を遅らせるテクニックが必要になります。
こちらを、Chrome起動の下にドラッグ&ドロップ。
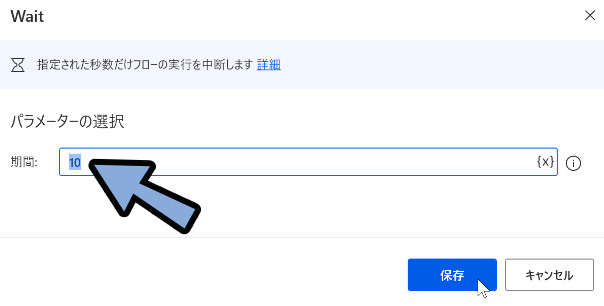
そして「期間:」に任意の数字を入力 → 保存。
すると「入力した数字 × 秒数」の待機時間が生成されます。
保存すると、下図のような表示になります。
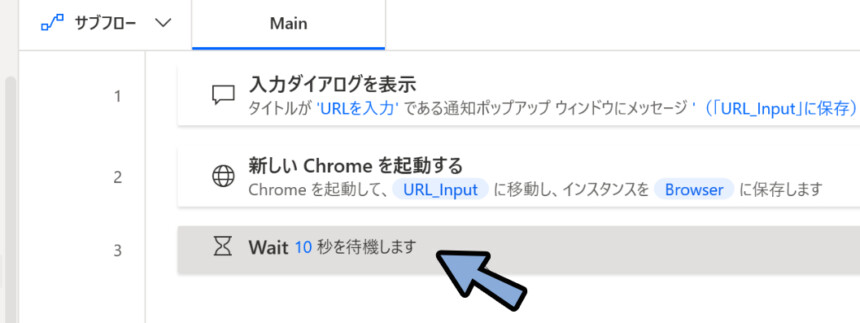
これで10秒間、処理を待つ設定が完了です。
WEBサイトを閉じる
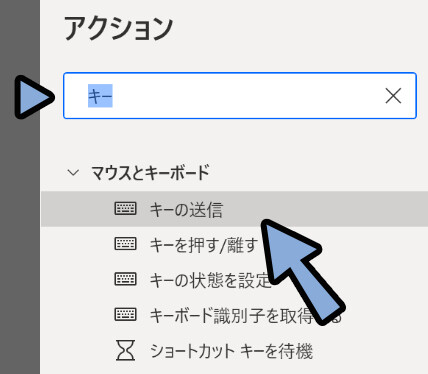
画面左上の所で「キー」と検索。
マウスとキーボード → 「キーの送信」をダブルクリック。
操作内容は、最終的には探したり、開いたりするのが面倒になるので…
「検索で出していく」スタイルに落ち着きました。
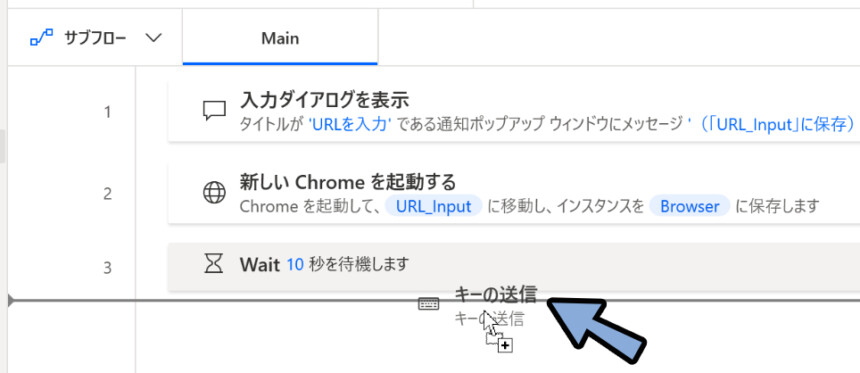
「キーの送信」をWait 10の下にドラッグ&ドロップ。
そして、WEBサイトなどを閉じるショートカットキーは下記の2つ。
・Ctrl+W(複数タブの場合、開いてるタブだけ閉じる)
・Alt+F4(複数タブの場合、全てのタブをまとめて閉じる)
下図のような、位置関係に対応してると考えてください。
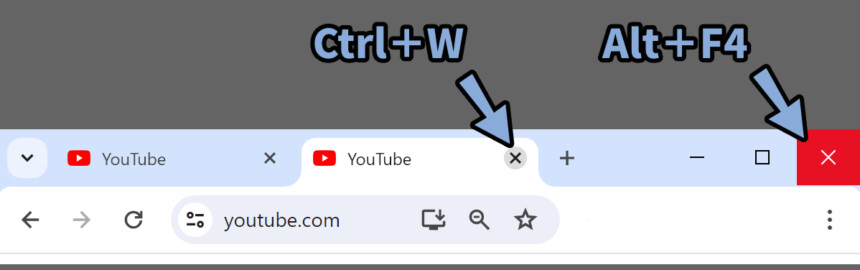
ここでは、Ctrl+Wキーを使ってWEBサイトを閉じます。
PADで使う場合、処理が紛らわしくなるので…
複数タブは開かず、1WEBサイトを起動 → 閉じる → 別のサイトを起動。
もしくは新しいウインドを起動 → 新しいウインドを起動のような…
1ウインドウ1タブの使い方がおすすめ。
(なので、Alt+F4は、基本使いません)
{Control}()と修飾キーの挿入 → 「Control」を選択。
すると、{Control}()という文字列が入力されます。
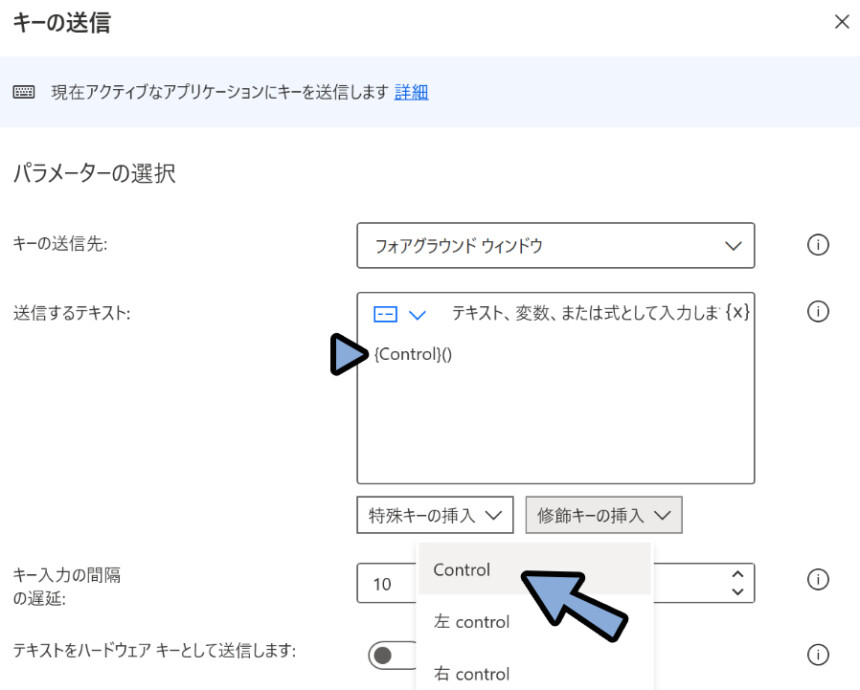
{Control}が Ctrlキーを押しますという意味。
(文字列としてControlを入れる場合の差別化のため{}で区切られてます。)
手間ですが…
「修飾キー」や「特殊キー」は”挿入”の所をクリックして入れるのが確実でおすすめ。
手打すると {Ctrl} や [Control}() などと打ち間違えやすいです。
これが、見つけにくいエラーの原因になります。
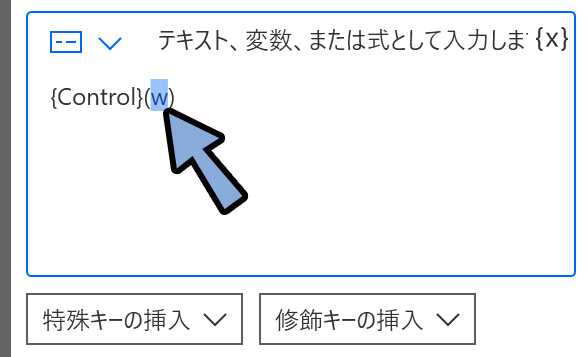
{Control}()の “()”の中は、その修飾キーと同時に入力するキーを表します。
文字の説明だけだと、分かりにくいので具体例を出すと下記。
・Ctrl+Fキー → {Control}(f)
・Ctrl+Tキー → {Control}(T)
・Ctrl+Tabキー → {Control}({Tab})
・Ctrl+Shift+Tキー → {Control}({Shift}(t))
・Ctrl+Shift+Alt+Sキー → {Control}({Shift}({Alt}(s)))
なので、Ctrl+Wキーの入力は「{Control}(w)」となります。
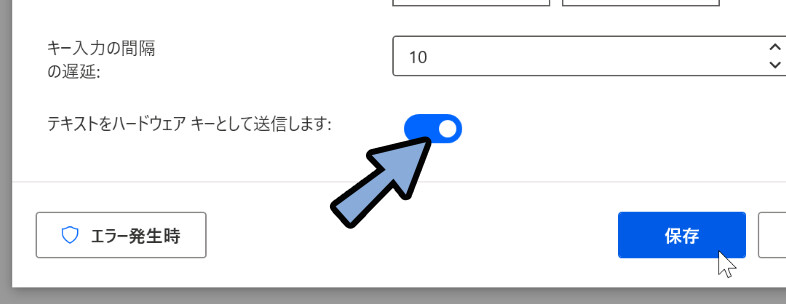
あとは、ショートカットキー入力の場合…
テキストを「ハードウェア―キーとして送信します:」にチェックを入れます。
やや難しい判定基準ですが…
ショートカットキーの入力する場合は、これを有効化した方が上手く行きやすいです。
逆に特定の枠にテキストを入れる場合は、これを無効化した方が上手く行きやすいです。
基本、有効化してて大丈夫ですが…
このあたりの違いは、実際に動かして動作を確認するのが早いです。
そしたら、下図のような4つの処理が完成しました。
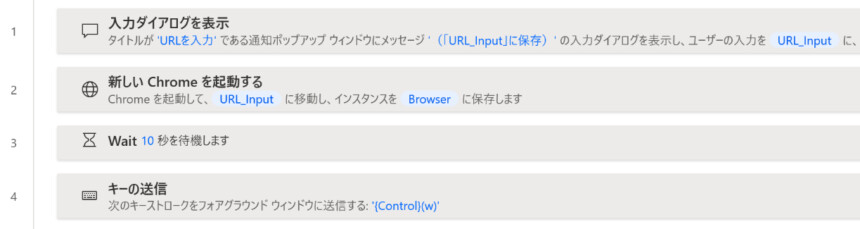
これを実行。
すると、指定したURLを開き、10秒待った後に、WEBサイトを閉じる処理が完成します。
以上が、10秒後にWEBサイトを閉じる処理です。
まとめ
今回はPADでURLを指定し、WEBサイトを開く方法を解説しました。
・WEBサイトは「新しい ○○ を起動する」で設定可能
・「新しい ○○ を起動する」はブラウザー自動化 → Webフォーム入力の所にある
・ブラウザはIE、Edge、Chrome、Firefoxに対応
・URLの打ち込みは、入力ダイアログを表示するで可能
・WEBサイトを閉じる処理は、キーを送信 → {Control}(w)で可能
また、他にもPAD関連の情報を発信してます。

ぜひ、こちらもご覧ください。

コメント