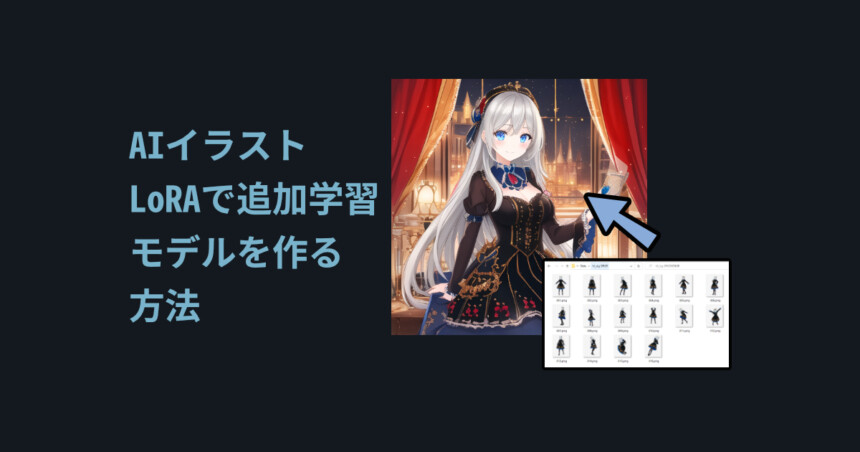
はじめに
今回はAUTOMATIC1111(WEB UI)で追加学習のモデルを使う方法を紹介します。
Web UIが使える事を前提に進めます。
使い方は、こちらをご覧ください。
※この記事では、生成物に大幅な加筆修正を入れてます。
これは、広告の規約的な問題が理由です。
判定がかなりシビアなので、ご了承ください。
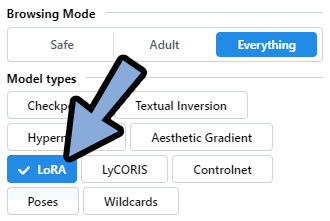
Civitaiの使い方
Civitaiという、WEBサイトがあります。
こちらは、AIイラストの追加学習モデルなどを配布してるサイトです。
モデル制作は一般の方が行ってます。
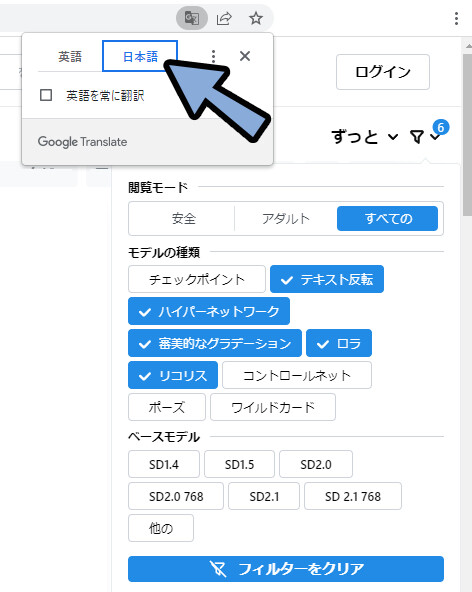
(…なので、使用は自己責任でお願いします)右上の「漏斗マーク」をクリック。
すると、配布物の一覧が見れます。
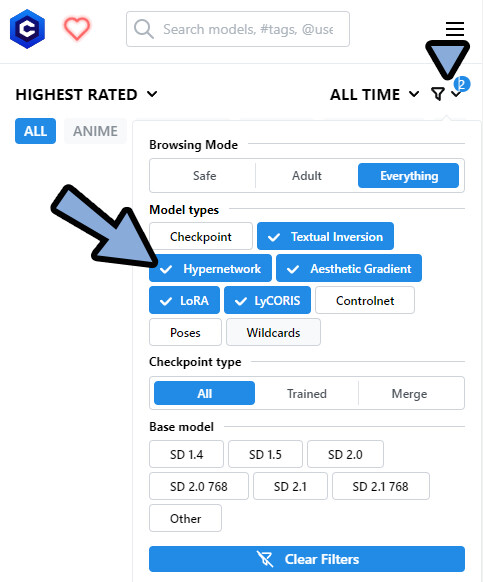
それぞれの意味は下記。
・Check point = 複数のモデルを混ぜたもの(マージモデル+Dream Boothの配布)
・Textual Inversion = 追加学習の方式1
・Hypernetwork = 追加学習の方式2
・Aesthetic Gradients = 追加学習の方式3
・LoRA = 追加学習の方式4
・LyCoRIS = 追加学習の方式5(LoRAの派生形、LoConやLoHAを意味する)
・Control net = 奥行きやポーズを指定する機能用の素材
・Pose = 主にControl Netのポーズ素材
・wildcard = プロンプトの単語帳。バリエーションを出すためのモノ。
他の設定などは、日本語翻訳して読んでください。
モデルの入手はまず、欲しいモデルタイプを選択。
(ここではLoRA)
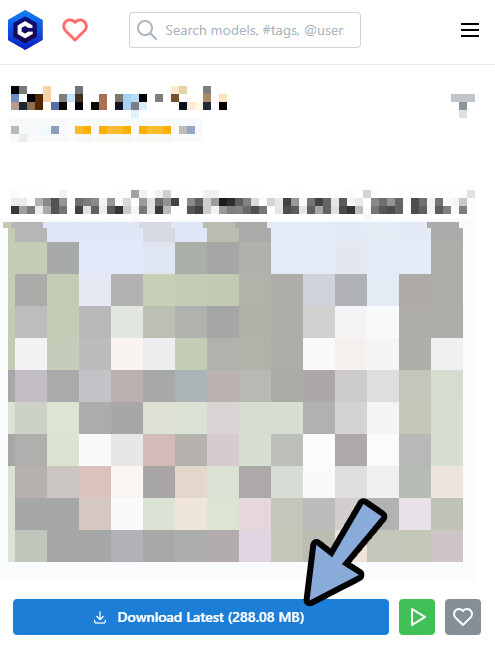
良さそうなものを見つけたらクリック。
ダウンロードから、DLする流れです。
以上が、基本的な使い方です。
DreamBoothは何処へ?
こちらの記事を見た方は「DreamBooth」が無い事に違和感を感じると思います。

DreamBoothは、モデルの構造全体を変える学習方法です。
…つまり、新しいモデルが生成されます。(.ckptファイルなど)

Check pointで配布されてる物が、新しい生成モデルです。
つまり、ここで配布されてます。
Check Point
Check Pointで配布されてる物は下記の2つ。
・2つ以上のモデルを合成したモノ(マージモデル)
・DreamBoothなどで追加学習したモノ
この2つは“新しい生成モデル”として使う事になります。
※生成モデルの拡張子 → [.ckpt や .safetensors]
DreamBooth+マージモデルを使う
ここでは、Check Pointとして下記の2つを使用します。
「Ligne Claire Anime」(おそらく、DreamBooth追加学習モデル)
「Nyan Mix」(おそらく、マージモデル)
Ligne Claire Animeをダウンロード。
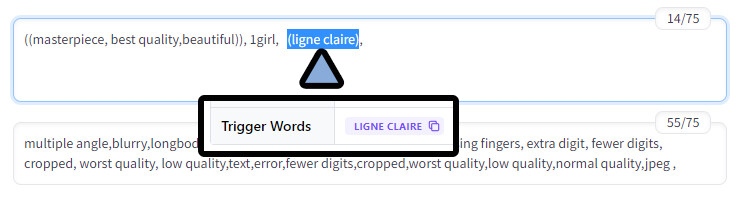
Trigger Wordsがある事を確認。
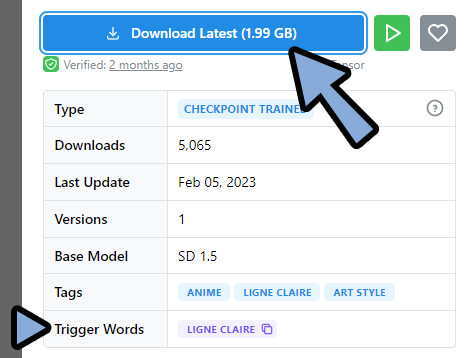
Trigger Words = 動作させるためにプロンプトに入れるワード。
おそらくこれが、DreamBoothで追加学習させたプロンプトです。
次に、Nyan Mixをダウンロード。
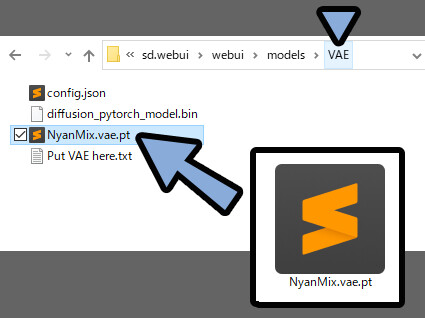
VAEがあるので、こちらもダウンロード。
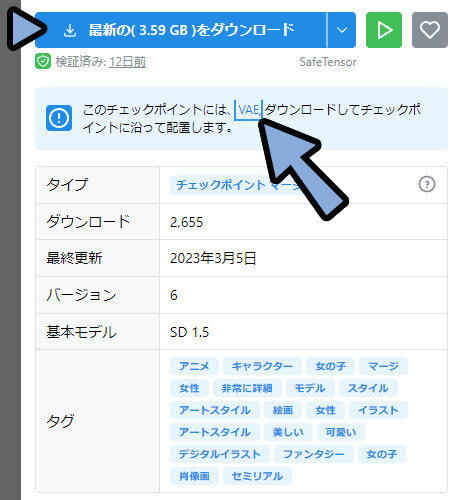
・Trigger Wordsが無い = 新しい概念が無い = マージモデルと推測。
・VAE = 画像認識の精度を上げるもの。
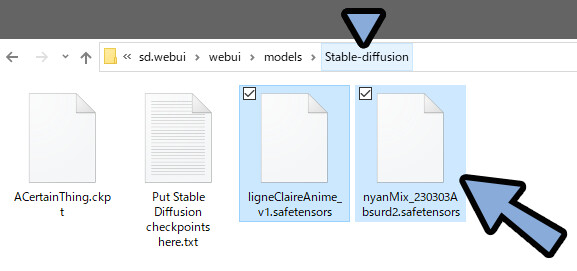
・VAEがあるモデルは、VAEを入れないと動かなくなる。ダウンロードしたモデルを、WEB UIに入れます。
「webui → models → Stable-diffusion」の中に入れます。
VAEがある場合は、こちらも入れます。
「webui → models → VAE」の中に入れます。
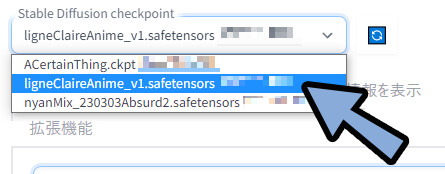
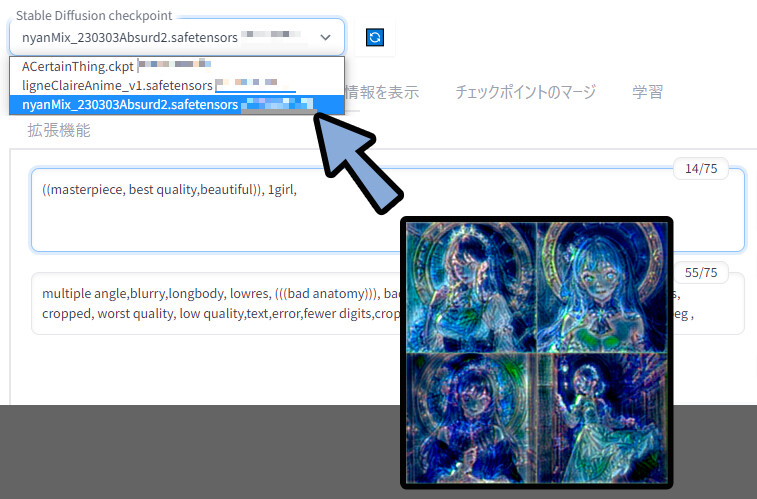
WEB UIを立ち上げ。
画面左上の「Stable Diffusion checkpoint」の更新ボタンをクリック。

追加したモデルが入ったことを確認。
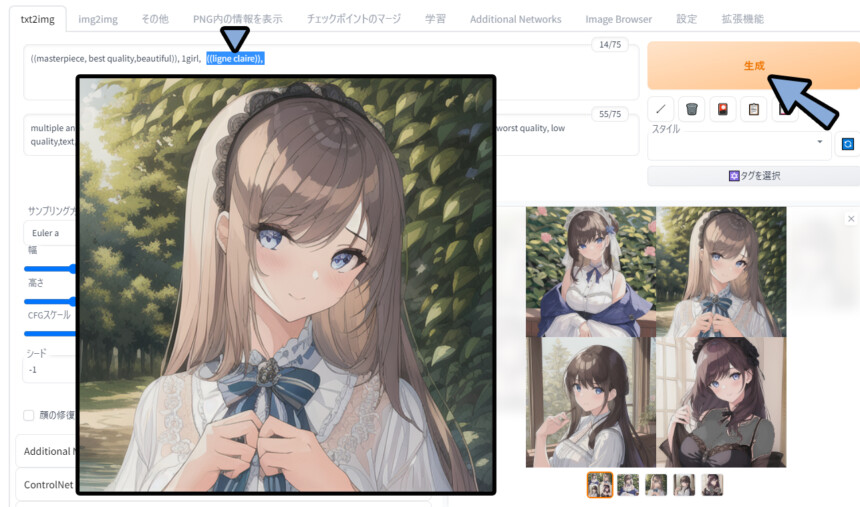
ここでは、まず「Ligne Claire Anime」から使います。
ligneClaireAnime_v1.safetensorsを選択。
適当なプロンプトを入力。
「Ligne Claire Anime」はTrigger Wordsがあります。
こちらも追加で入力。
使用プロンプトはこちら。
◆ポジ
((masterpiece, best quality,beautiful)), 1girl,   ((ligne claire)),

◆ネガ
multiple angle,blurry,longbody, lowres, (((bad anatomy))), bad hands, missing fingers, extra digit, fewer digits, cropped, worst quality, low quality,text,error,fewer digits,cropped,worst quality,low quality,normal quality,jpeg ,
すると、ちょっと分かりにくいですが、
配布モデルの表現が出ています。
(((( ))))まで増やして強調。
だいぶ配布モデルのサンプルに近くなりました。
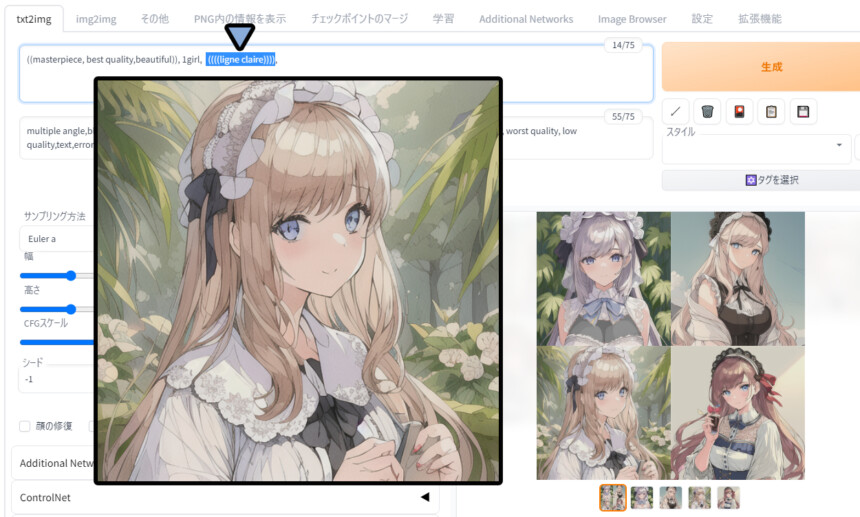
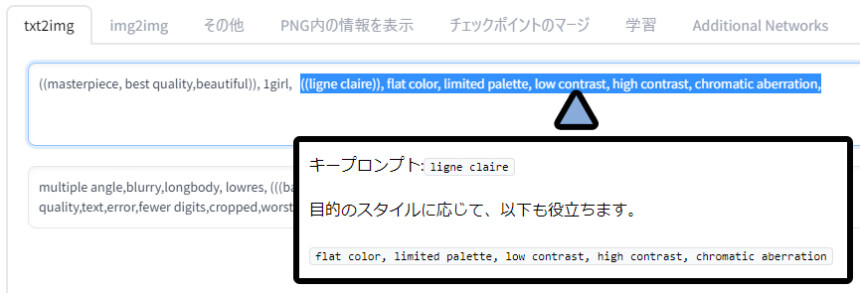
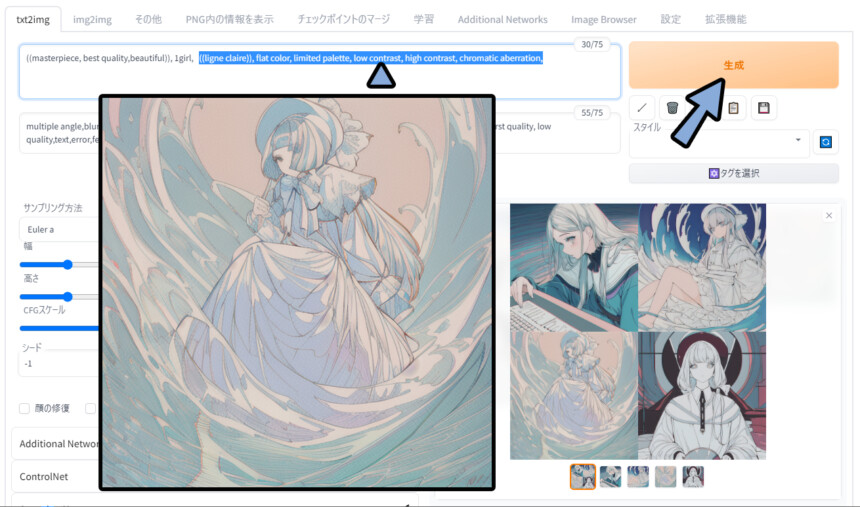
さらに、このモデルには推奨されているプロンプトがありました。
(( ))に戻した、こちらも追加で入力。
すると路線は違いますが、
こちらも、元のサンプルっぽい絵になりました。
次は、「Nyan Mix」を使います。
こちら、普通に使うと、バグります。
折角なので、Civitaiでエラー解決のヒントを得る方法を紹介しながら修正します。
Civitaiでエラー解決のヒントを得る
配布モデルによっては、普通に入れるとエラーが起こります。
「Nyan Mix」がそうなので、こちらのエラーを修正します。
エラーが出た場合、モデルの配布ページにアクセス。
下にスクロール。
すると、「Discussion(議論)」という項目があります。
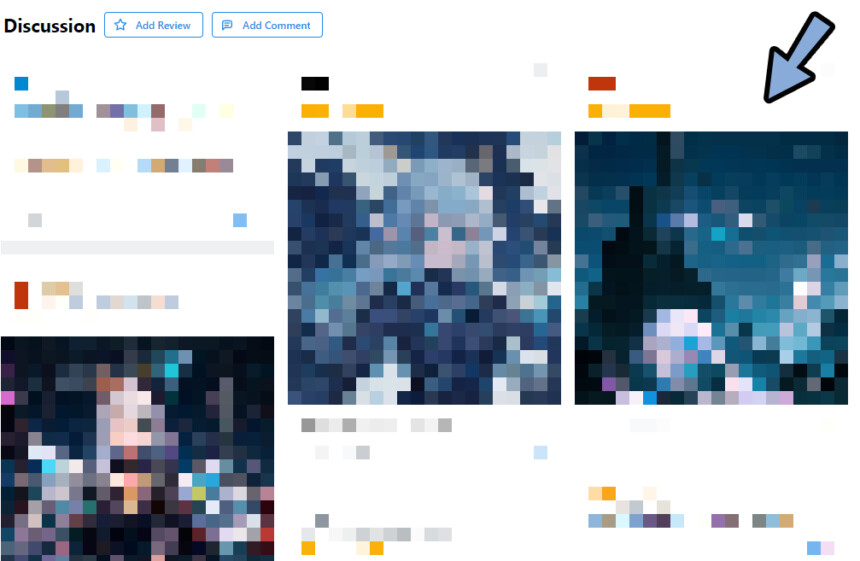
こちらで同じエラーが発生してる方が居ないか探します。
居たら「吹き出しマーク」をクリック。
※居なければ、自分で投稿。
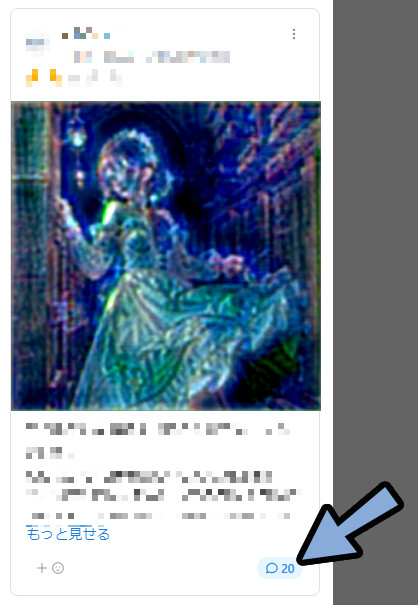
日本語に翻訳。
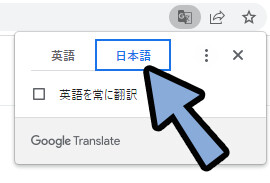
中身を読みます。
私はこれで、エラーが解決しました。
Nyanbre
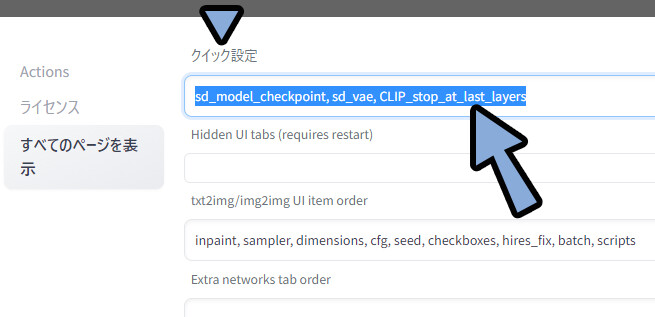
自動でこれを行うこともお勧めします。[設定] -> [ユーザーインターフェース] -> [クイック設定リスト] = “sd_model_checkpoint, sd_vae, CLIP_stop_at_last_layers”
https://civitai.com/models/14373/nyan-mix?reviewId=29205&modal=reviewThread (Google翻訳を使用)
(上部のドロップダウン メニューで VAE を選択できます)
これを行っていきます。
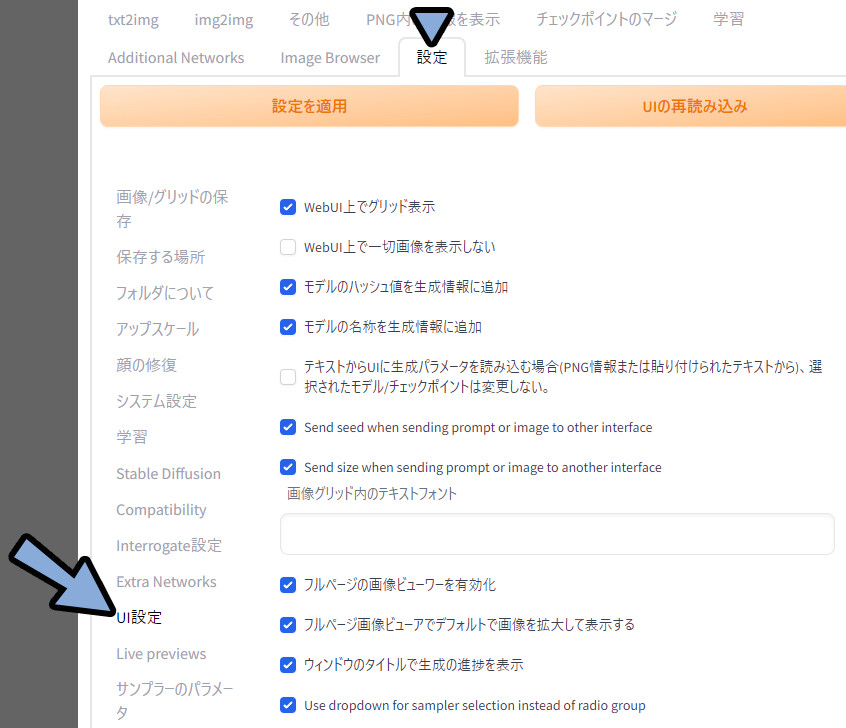
設定 → UI設定をクリック。
クイック設定に「sd_model_checkpoint, sd_vae, CLIP_stop_at_last_layers」を入力。
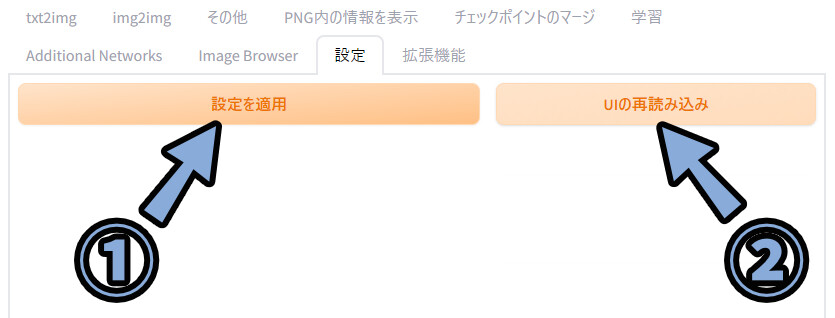
「設定を適応」 → 「UIの再読み込み」の順にクリック。
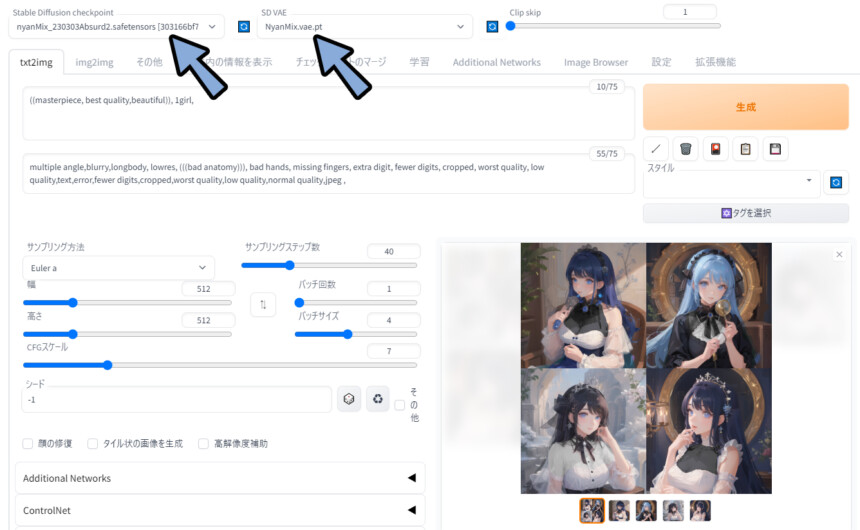
すると、画面上部にSD VAEという表示が出ます。
こちらの更新ボタンをクリック → Nyan Mix.vae.ptを選択。
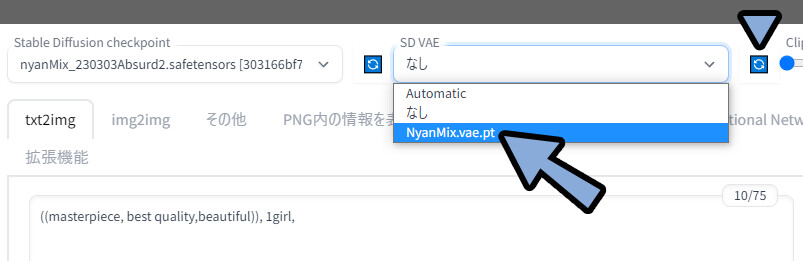
モデルとVAEが「Nyan Mix」になってる事を確認。
この状態で生成。
すると、エラーが治り、絵が表示されました。
以上が、Civitaiでエラー解決のヒントを得る方法です。
また、Nyan Mixにはこのような書き込みもありました。
直らない方はこちらもお試しください。
はい、モデルの説明にあります。「使い方 -> これを検討してください」 -> https://github.com/mcmonkeyprojects/sd-dynamic-thresholding.git
でも、automatic1111 の GUI 経由でインストールする方が簡単です (それを使用すると仮定して)
他のサンプラーも試しましたか? ? DPM++ SDE Karrasと同様(必要な手順が少ないため、これも優れています)
(上部のドロップダウン メニューで VAE を選択できます)
https://civitai.com/models/14373/nyan-mix?reviewId=29205&modal=reviewThread (Google翻訳を使用)
以上が、Check Pointの使い方です。
追加学習モデル
追加学習=キャラや画風を学んだデータを用意し、生成結果に影響を与えるもの。
DreamBooth以外は、別のファイルから読み込む形になります。
この記事ではCivitaiで配布されている下記の5つの使い方を紹介。
・LoRA
・LyCORIS(LoCon/ LoHA)
・Textual Inversion
・Hypernetwork
・Aesthetic Gradients
順番は普及度、使いやすさ、難易度を考慮し、
初めての方が、導入するのに良さそうな並べ替えました。
◆まず、WEB UIのアップデートをかけます。
追加モデルは先進的な機能です。
アップデートしないと動かないことがあります。
(特にLyCoRISのLoCon/LoHA)
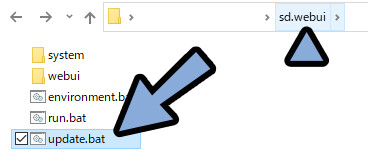
WEB UIを一度閉じてアップデート → 再起動。
これを済ましてから読み進めてください。
LoRA
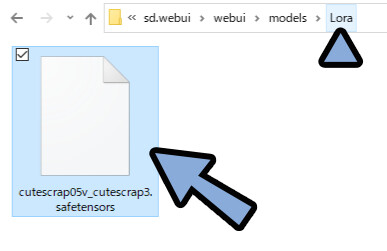
ここでは、LoRAとして「CuteScrap – 0.5v」を使用。
こちらをDL。
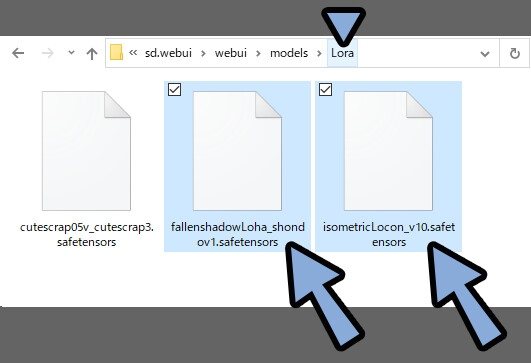
「sd.webui → webui → models → Lora」の中に入れます。
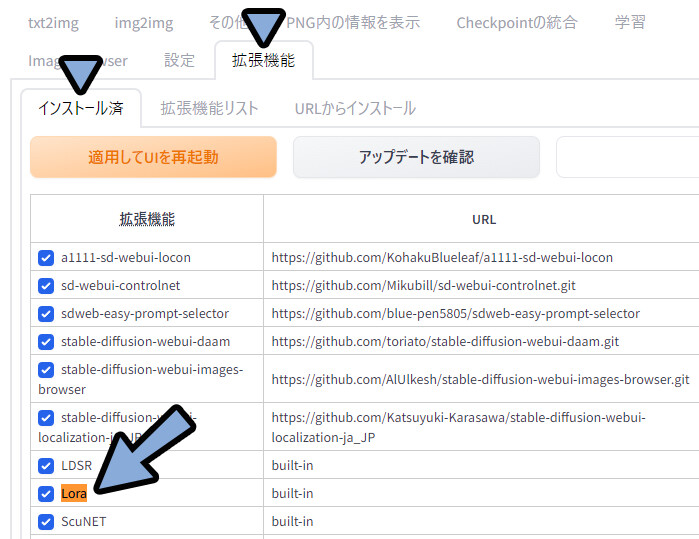
WEB UIに戻ります。
拡張機能 → インストール済み → LoRAにチェックが入ってる事を確認。
サンプリングステップ数を40ぐらいに設定。(実験用にやや少なめの設定)
パッチサイズを4に設定。

「🎴」マークをクリック。
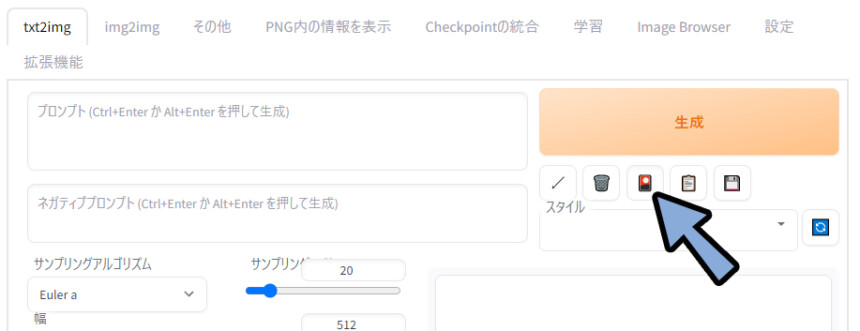
Lora → Refreshをクリック。
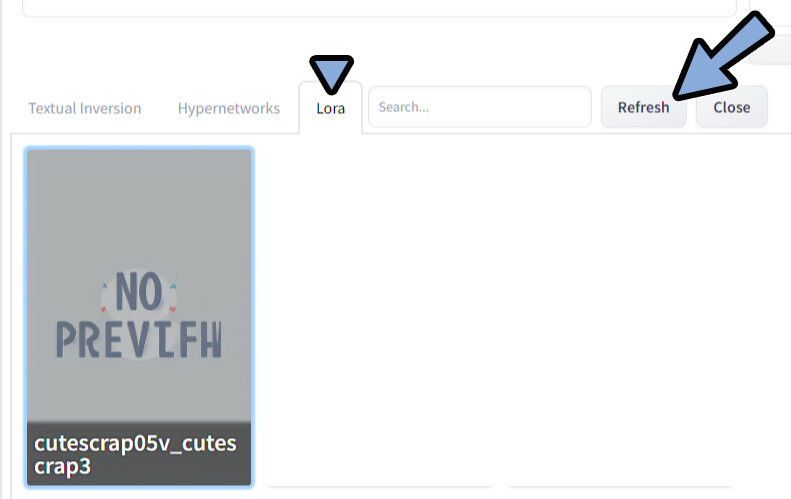
DLしたモデルをクリック。
すると、そのモデルを使うためのプロンプトが入ります。

あとは、その上から普通にプロンプトを
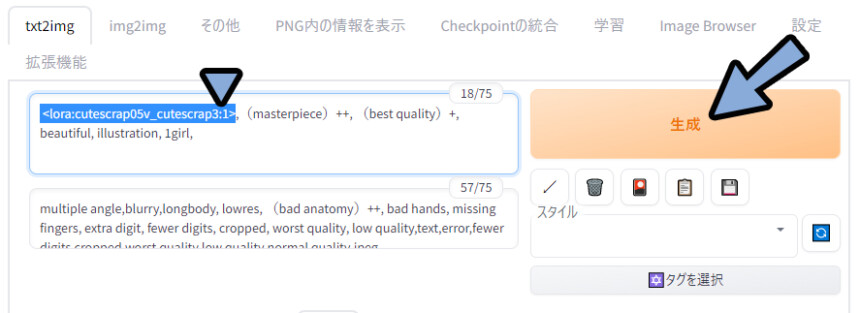
◆ポジ
<lora:cutescrap05v_cutescrap3:1>,(masterpiece)++, (best quality)+, beautiful, illustration, 1girl,
◆ネガ
multiple angle,blurry,longbody, lowres, (bad anatomy)++, bad hands, missing fingers, extra digit, fewer digits, cropped, worst quality, low quality,text,error,fewer digits,cropped,worst quality,low quality,normal quality,jpeg
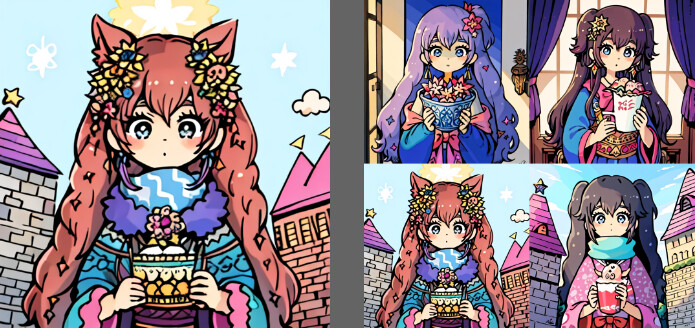
※()++で指定してるのは、単純にミスです。(NMDK使ってた頃の癖が抜けない)生成結果を確認、LoRAの影響が出てる事が分かります。
元が分かりやすいので助かります。
影響が分かりにくいモデルの場合は、
<lora:**** :1>の :1の数字を変えて強調してください。
・<lora:epoch-00**** :0.5> = 弱くする
・<lora:epoch-00**** :1.0> = 通常
・<lora:epoch-00**** :1.6> = 強くする
以上が、LoRAの使い方です。
<>系はプロンプトの影響範囲は見れない
プロンプトの影響範囲が見れる拡張機能があります。
…が、こちら<>系のプロンプトでは使えませんでした。
<>系のプロンプトは下記の3つ。
・LoRA
・LyCORIS(LoCon / LoHA)
・Hypernetwork
この3つで使えないので注意。
LyCORIS(LoCon / LoHA)
LoRAの進化系がLoConとLoHAです。
Civitaiでは何故かこの進化系を「LyCORIS」として表記してます。
こちらを使うには、この拡張機能が必要です。
なので「拡張機能の導入」と「LoCon/LoRAモデルの導入」の2つに分けて紹介します。
2023年3月16日時点で、LyCORISはかなり新しい機能です。
WEB UIを必ずアップデートしてください。
また、LoConやLoHAは動かないものもあります。
おそらく拡張機能の説明にある「cp 分解を伴う LoHa と LoCon はまだサポートされていません。」が原因。
◆拡張機能の導入
こちらのURLを選択。
Ctrl+Cでコピー。
https://github.com/KohakuBlueleaf/a1111-sd-webui-loconWEB UIに戻ります。
拡張機能 → URLからインストール → 拡張機能のリポジトリのURLを確認。
ここにCtrl+Vで先ほどのURLをペースト → インストール。
インストール済みに移動。
先ほど入れた拡張機能があるか確認。
確認後「適応してUIを再起動」を選択。
これで、拡張機能の導入が完了です。
◆LoCon/LoRAモデルの導入
ここでは、LoConとして「Isometric LoCon」を使用。
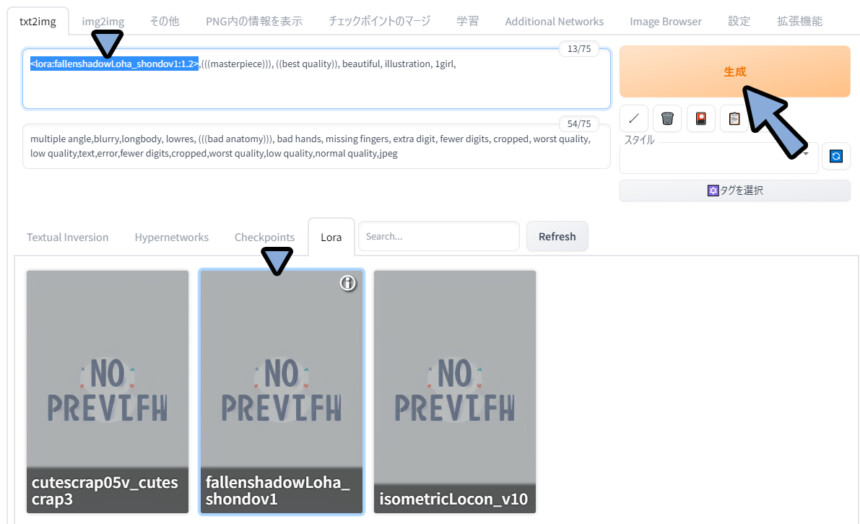
LoHAとして「FallenShadow LoHa model」を使用します。
この2つのモデルをDL。
「sd.webui → webui → models → Lora」の中に入れます。
LoConやLoHAはLoRAの進化系です。
なので、LoRAと同じフォルダで動きます。
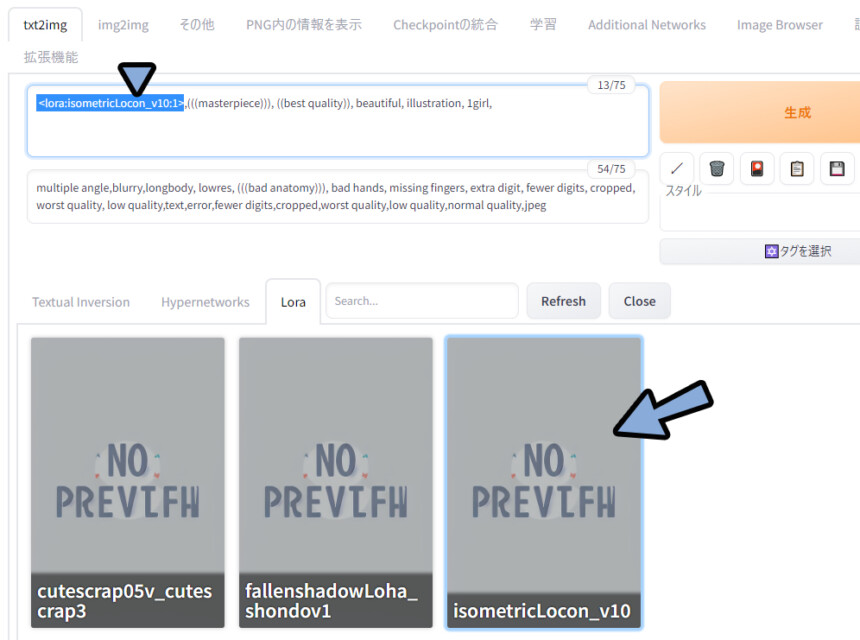
「🎴」マークをクリック。
Lora → Refreshをクリック。
すると、LoCon/LoHAの追加したモデルが出てきます。
こちらをクリックして、必要プロンプトを打ち込み。
あとは、普通にプロンプトを入力。
◆ポジ
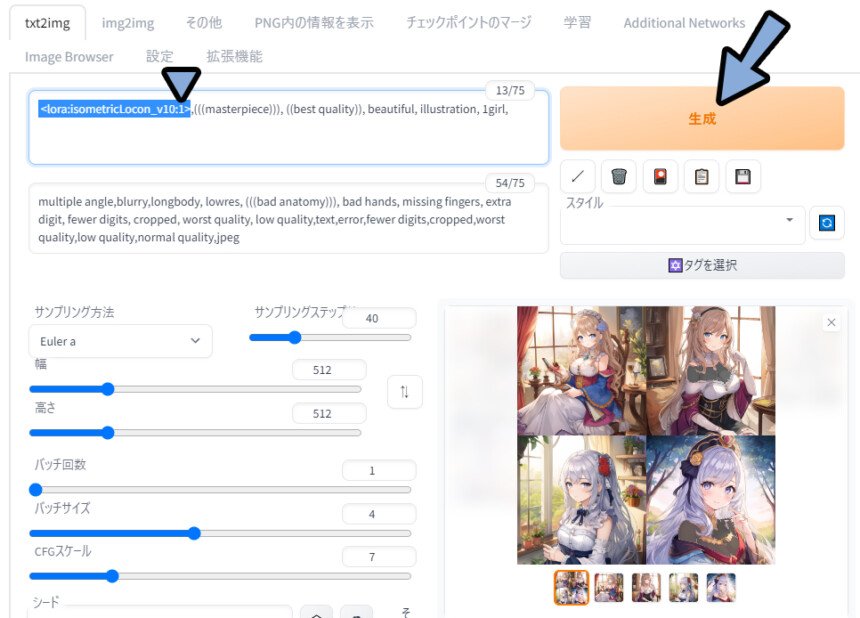
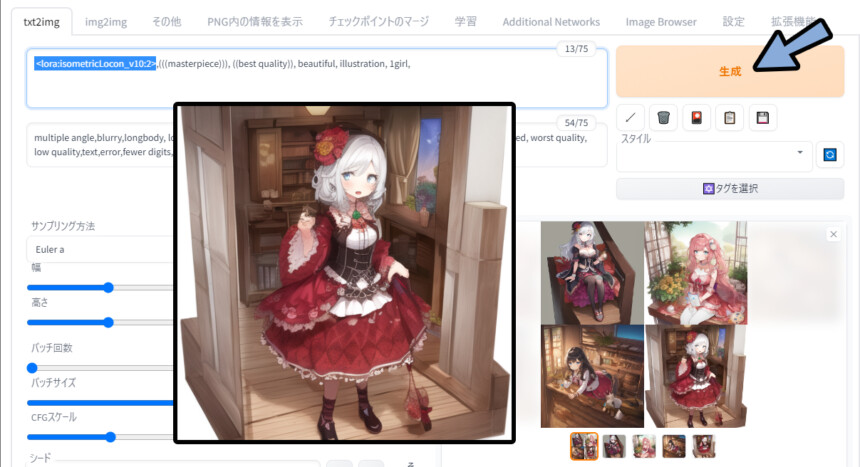
<lora:isometricLocon_v10:1>,(((masterpiece))), ((best quality)), beautiful, illustration, 1girl,
◆ネガ
multiple angle,blurry,longbody, lowres, (((bad anatomy))), bad hands, missing fingers, extra digit, fewer digits, cropped, worst quality, low quality,text,error,fewer digits,cropped,worst quality,low quality,normal quality,jpeg <lora:isometricLocon_v10:1>の場合… 変化が分かりにくいです。
そこで、<lora:isometricLocon_v10:2>にして強調。
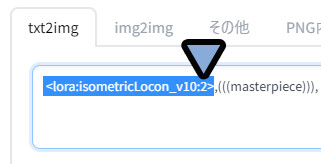
再度生成、するとLoConモデルの影響を強く感じれる絵ができました。
(上からのアングルで、ほぼ全身が映るのが、このモデルのポイント)
以上がLoConの使用です。
RoHAの使用
RoHAも同様の手順で使えます。
クリックでLoHAプロンプトを入力。
そして、普通にプロンプトを入れます。
◆ポジ
<lora:fallenshadowLoha_shondov1:1.2>,(((masterpiece))), ((best quality)), beautiful, illustration, 1girl,

◆ネガ
multiple angle,blurry,longbody, lowres, (((bad anatomy))), bad hands, missing fingers, extra digit, fewer digits, cropped, worst quality, low quality,text,error,fewer digits,cropped,worst quality,low quality,normal quality,jpeg
変化が分かりにくいので:2の強調を入れました。
前髪の形などに、学習モデルの影響を受けてる事が分かります。
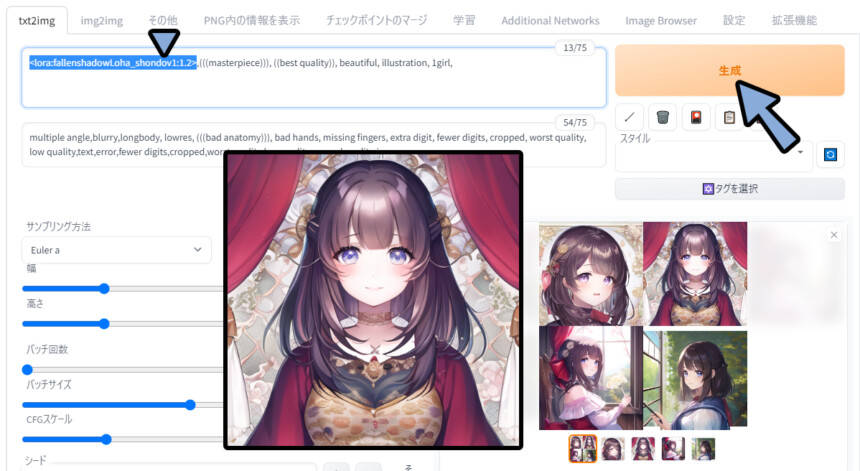
以上が、LyCORIS(LoCon / LoHA)の使用方法です。
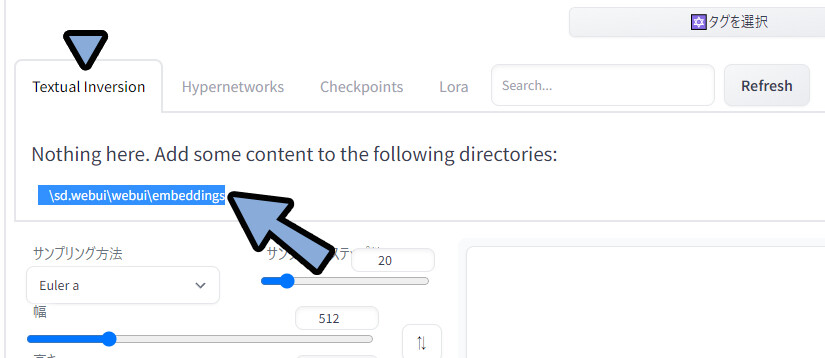
Textual Inversion
一部ではLoRAより性能が良いと言われているTextual Inversion。
これは拡張機能が不要です。
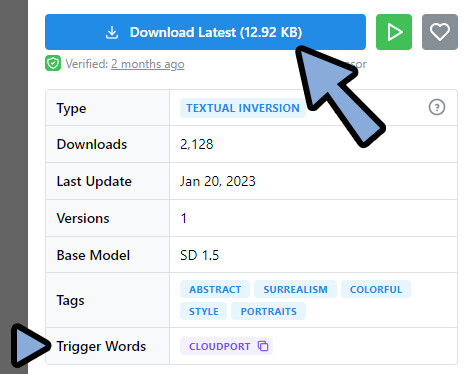
ここでは、Textual Inversionとして「CloudPort_V1.0」を使用。
このモデルをダウンロード。
ダウンロードの際に、Trigger Wordsがある事を確認。
WEB UIに戻ります。
「🎴」マークをクリック。
Textual Inversionをクリック。
ここのURLをコピー。
Windows+Eキーでエクスプローラーを表示。
アドレスの所にペースト → Enterキー。

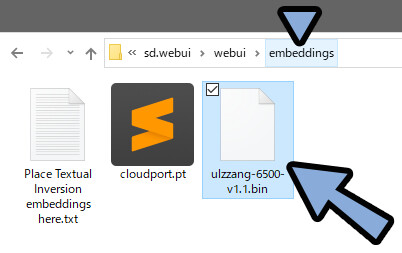
DLしたモデルを「sd.webui → webui → embeddings」に入れます。
※embeddings = Textual Inversionの別の呼び方のようです。
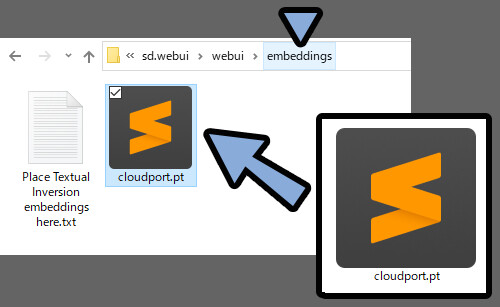
基本的な拡張子は「.pt」です。
が、「.bin」の事もあります。
両方とも同じ場所にいれて大丈夫です。
WEB UIに戻ります。
Textual Inversion → Refreshをクリック。
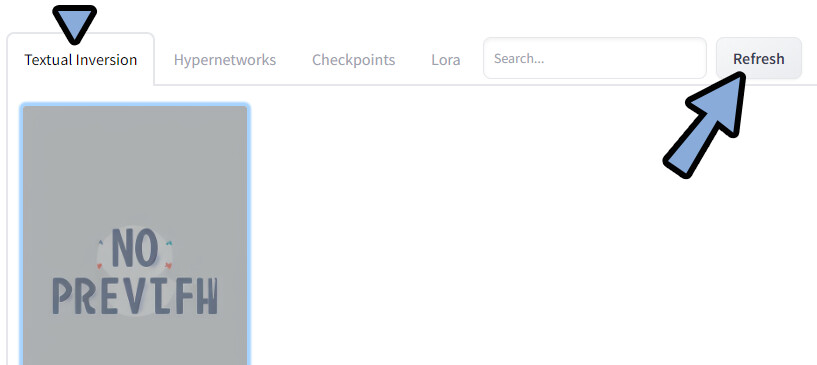
表示されたモデルを選択。
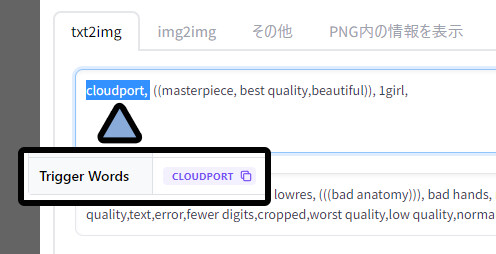
クリックすると使用に必要なプロンプトが出てきます。
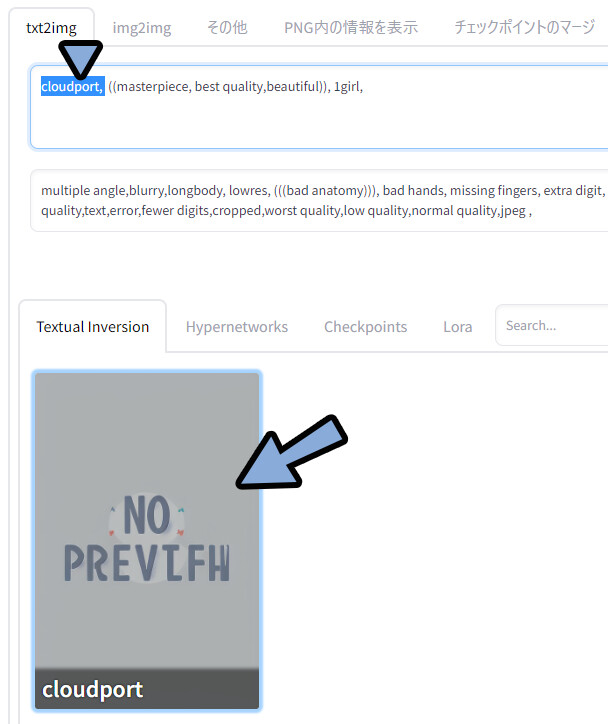
これが、動かすために必要なプロンプトです。(Trigger Words)
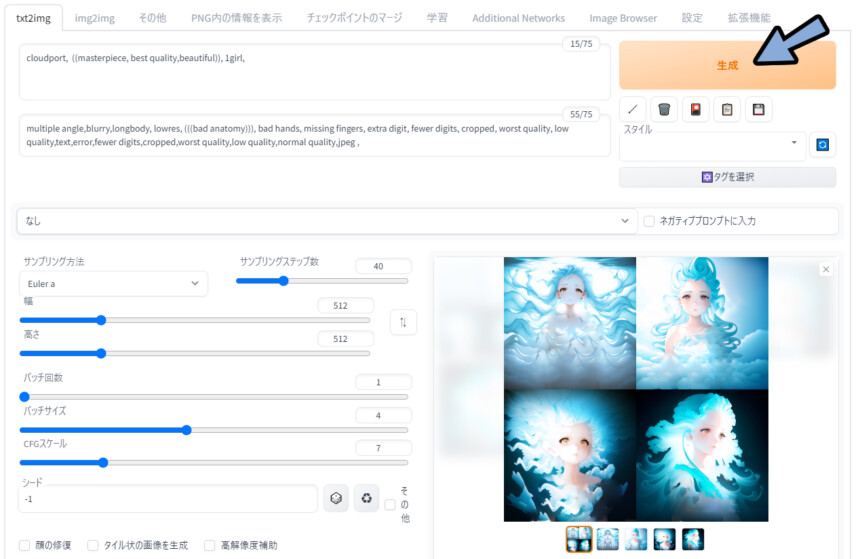
あとは、普通にプロンプトを入力 → 生成。
追加学習の影響を受けてる事を確認。(雲っぽい画風が目印)
◆ネガ
cloudport,  ((masterpiece, best quality,beautiful)), 1girl,

◆ポジ
multiple angle,blurry,longbody, lowres, (((bad anatomy))), bad hands, missing fingers, extra digit, fewer digits, cropped, worst quality, low quality,text,error,fewer digits,cropped,worst quality,low quality,normal quality,jpeg ,
以上がTextual Inversionの使い方です。
HyperNetwork
最近、下火になりつつある技術。
入れた感が分かりにくく、効果を実感しにくい。
おすすめはしないですが、
まとめ記事なので紹介。
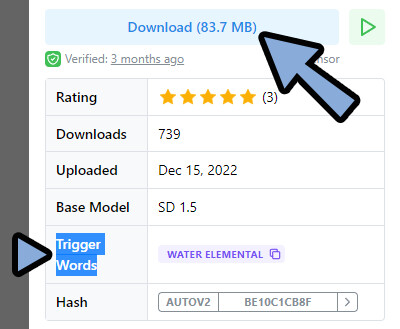
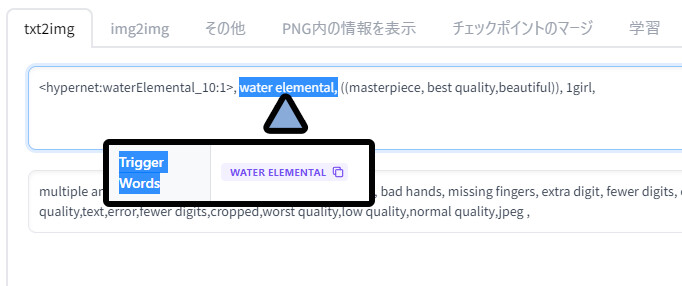
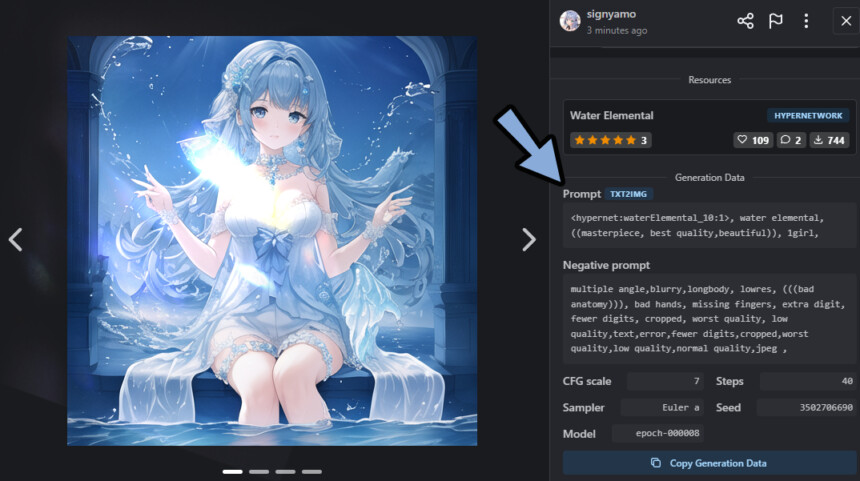
ここでは、HyperNetworkとして「Water Elemental」を使用。
こちらをDL。
DLの際、Trigger Wordsがあれば確認。(無い場合もあります)
WEB UIに戻ります。
「🎴」マークをクリック。
HyperNetworksをクリック。
ここにあるパスをコピー。
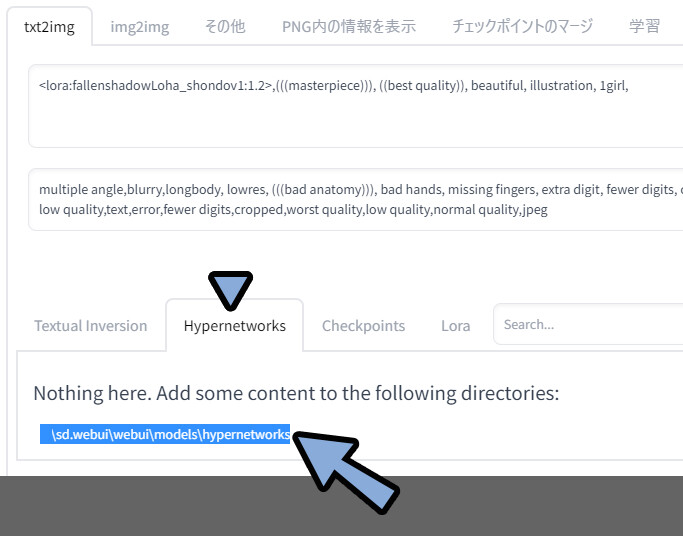
Windows+Eキーでエクスプローラーを表示。
アドレスの所にペースト → Enterキー。
DLしたモデルを「sd.webui → webui → models → hypernetworks」に入れます。
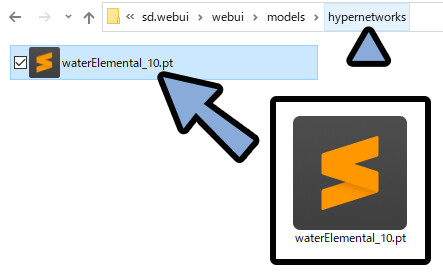
WEB UIに戻ります。
Refreshをクリック。
すると、DLしたモデルが表示されます。
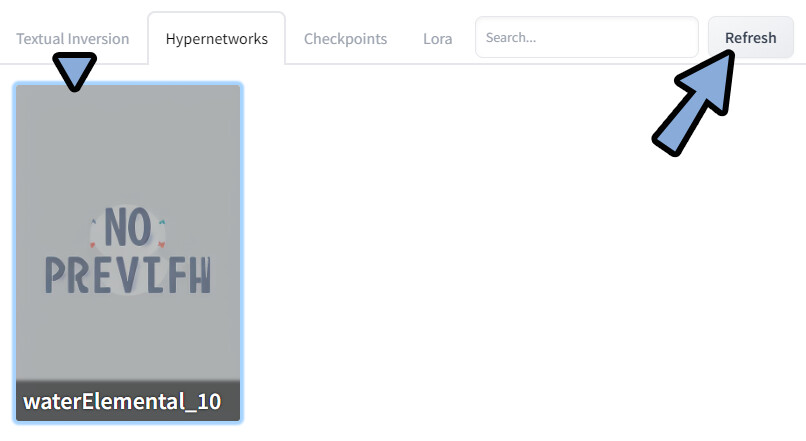
表示されたモデルをクリック。
追加学習モデルを使うためのプロンプトが入力されます。
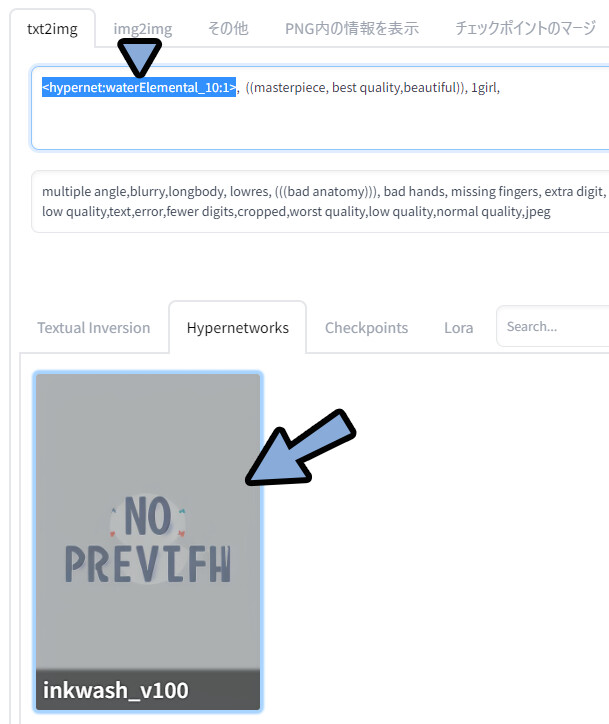
あとは…、あれば「Trigger Words」のプロンプトを入れます。
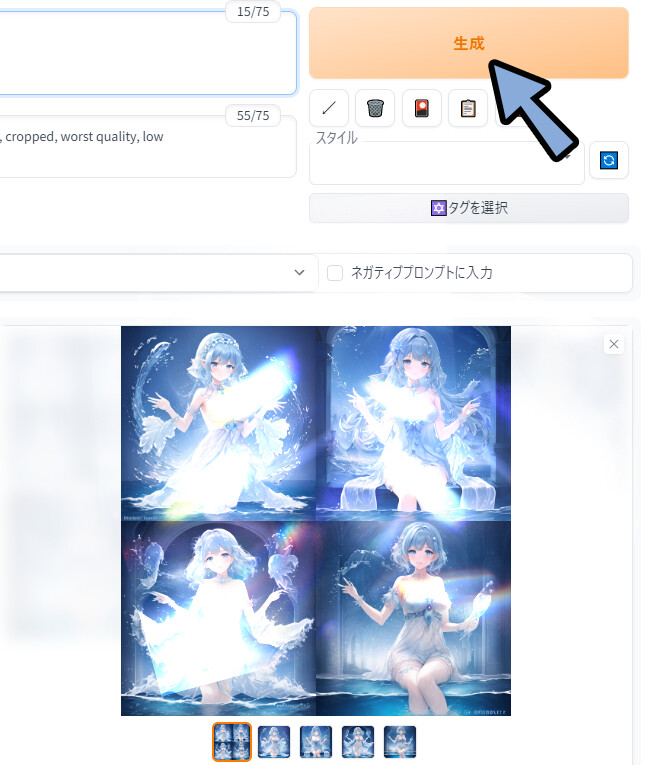
そして、これまで通りプロンプトを入れて生成。
◆ネガ
<hypernet:waterElemental_10:1>, water elemental, ((masterpiece, best quality,beautiful)), 1girl,

◆ポジ
multiple angle,blurry,longbody, lowres, (((bad anatomy))), bad hands, missing fingers, extra digit, fewer digits, cropped, worst quality, low quality,text,error,fewer digits,cropped,worst quality,low quality,normal quality,jpeg ,
すると… 学習モデルの影響を受けた絵が生成されます。
※広告の規約の問題で光りを加えてます。
原画を見たい方は、CiviaiにあるこのモデルのDiscussionを見てください。
「Trigger Words」が無くても動くのかの実験。
・<hypernet:waterElemental_10:4>にして強調。
・Trigger Wordsの「water elemental」を削除。
影響を受けてるようですが…
:4は強すぎて水の抽象画になりました。
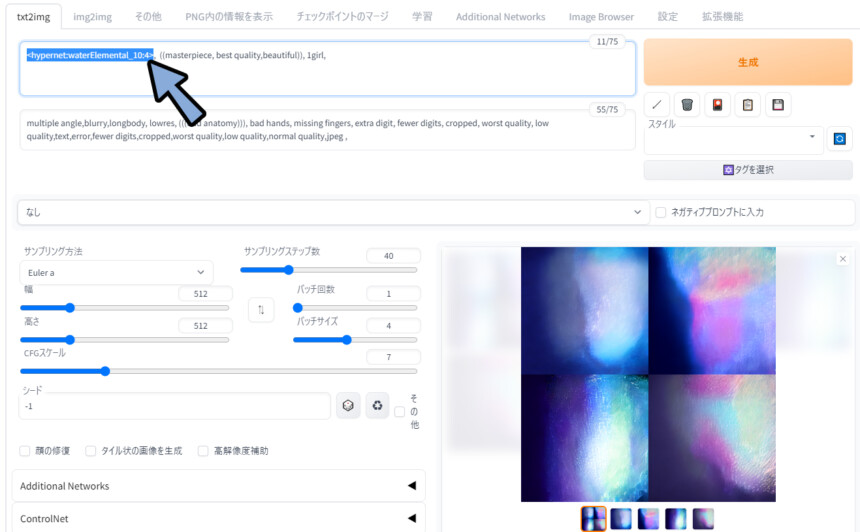
<hypernet:waterElemental_10:2>まで下げました。
良い感じに影響が入ってる事が分かります。

◆ネガ
<hypernet:waterElemental_10:2>,  ((masterpiece, best quality,beautiful)), 1girl,

◆ポジ
multiple angle,blurry,longbody, lowres, (((bad anatomy))), bad hands, missing fingers, extra digit, fewer digits, cropped, worst quality, low quality,text,error,fewer digits,cropped,worst quality,low quality,normal quality,jpeg ,
以上が、HyperNetworkの使い方です。
Aesthetic Gradients
これは、今はもう下火になった技術。
使用をおすすめしない。
まとめ記事なので仕方なく紹介します。
が…、ゲームにModとして登場した暴走機関車〇ーマスのような機能。
過去の遺産的なモノなので、使用はおすすめはしません。
こちらを使うには、この拡張機能が必要です。
なので「拡張機能の導入」と「モデルの導入」の2つに分けて紹介します。
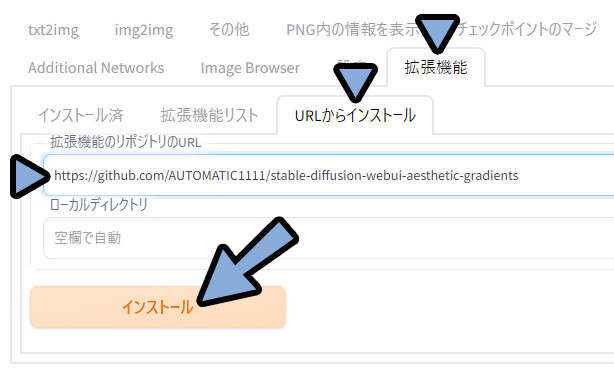
◆拡張機能の導入
こちらのURLをコピー。
https://github.com/AUTOMATIC1111/stable-diffusion-webui-aesthetic-gradientsWEB UIに戻ります。
拡張機能 → URLからインストール → 拡張機能のリポジトリのURLを確認。
ここに先ほどのURLをCtrl+Vでペースト → インストールを選択。
インストール済みを選択。
「stable-diffusion-webui-aesthetic-gradients」にチェックが入ってる事を確認。
適応してUIを再起動をクリック。
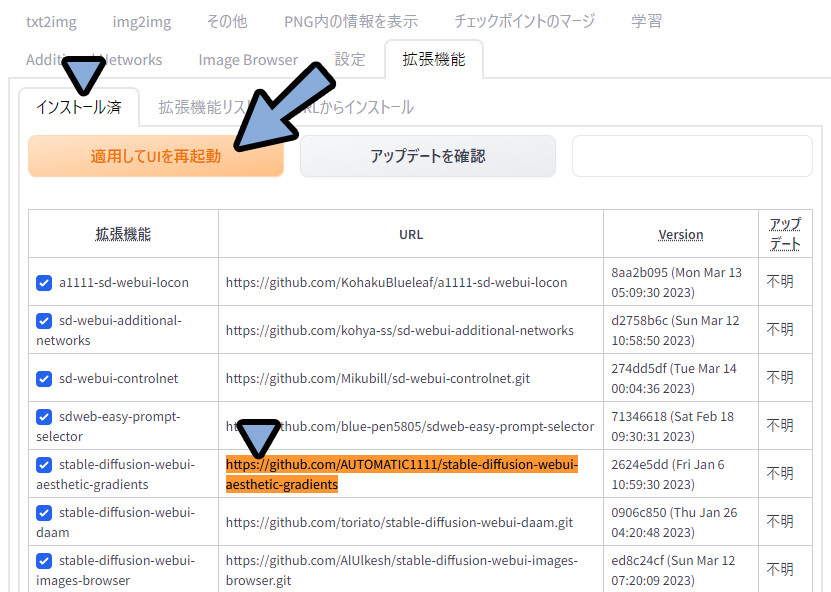
これで、拡張機能の導入が完了です。
◆Aesthetic Gradientsモデルの導入
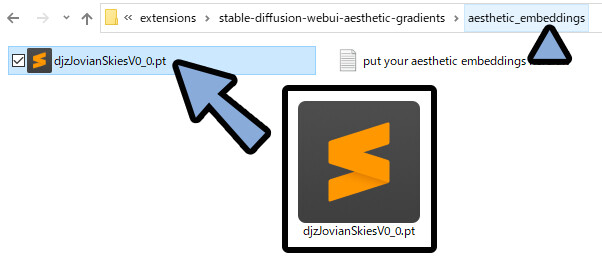
ここでは、Aesthetic Gradientsとして「djz Jovian Skies V0」を使用します。
こちらをDL。
「sd.webui → webui → extensions」を開きます。
ここの「stable-diffusion-webui-aesthetic-gradients」の中に入ります。
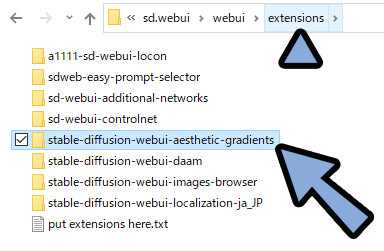
「stable-diffusion-webui-aesthetic-gradients → aesthetic_embeddings」を開きます。
ここに、DLした学習モデルを入れます。
WEB UIに戻ります。 txt2image左下を確認。
Open for Clip Aesthetic!を開きます。
更新ボタンをクリック → 先ほど入れたモデルを選択。
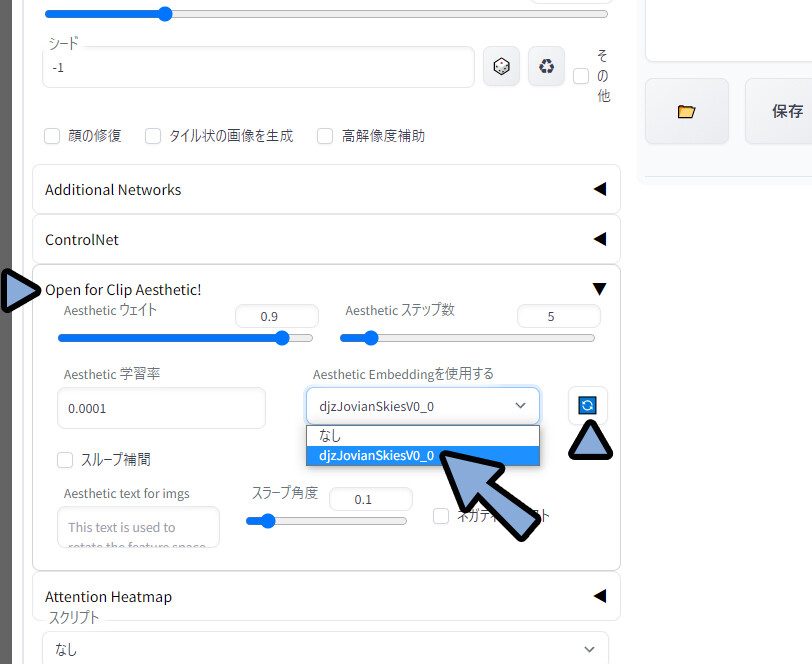
ウエイトとステップ数で、使うモデルの影響度合いを調整。
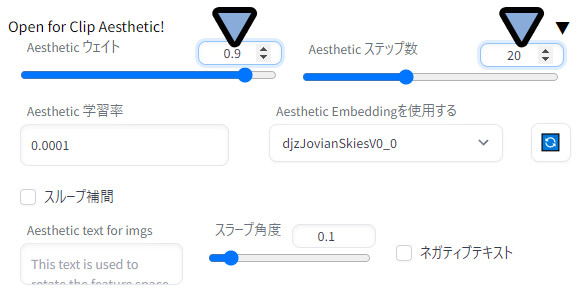
この状態で生成。
用意した学習モデルの影響を受けてる事を確認。
◆ネガ
((masterpiece, best quality,beautiful)), 1girl,

◆ポジ
multiple angle,blurry,longbody, lowres, (((bad anatomy))), bad hands, missing fingers, extra digit, fewer digits, cropped, worst quality, low quality,text,error,fewer digits,cropped,worst quality,low quality,normal quality,jpeg ,
以上が、Aesthetic Gradientsの使い方です。
wildcard
wildcardはバリエーションを出すための機能。
要するに、単語帳。
こちらを使うには、この拡張機能が必要です。
なので「拡張機能の導入」と「wildcard導入」の2つに分けて紹介します。
◆拡張機能の導入
こちらのURLをコピー。
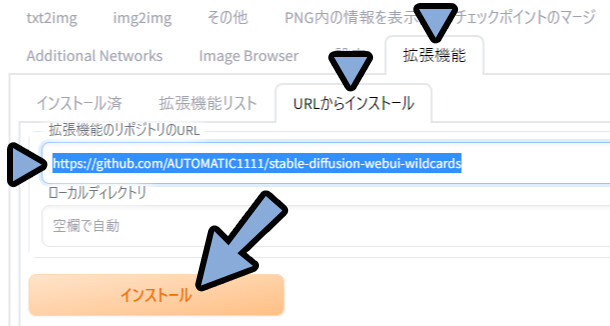
https://github.com/AUTOMATIC1111/stable-diffusion-webui-wildcardsWEB UIに戻ります。
拡張機能 → URLからインストール → 拡張機能のリポジトリのURLを確認。
ここに先ほどのURLをCtrl+Vでペースト → インストールを選択。
インストール済みを選択。
「stable-diffusion-webui-wildcards」にチェックが入ってる事を確認。
※再起動はまだしません。
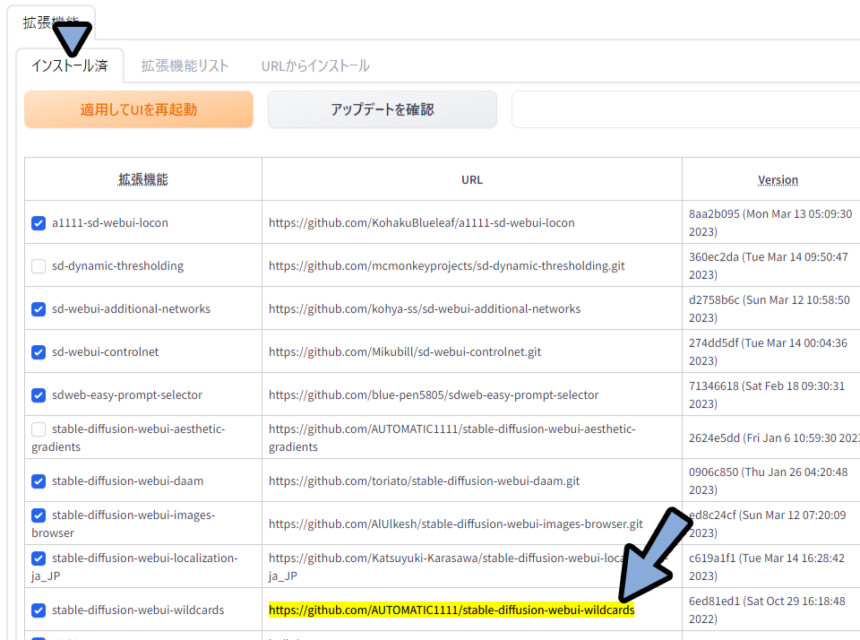
これで、拡張機能の導入が完了です。
◆wildcard導入
ここでは、wildcardとして「Hair wildcard pack」を使用します。
こちらをDL → .zipを展開。
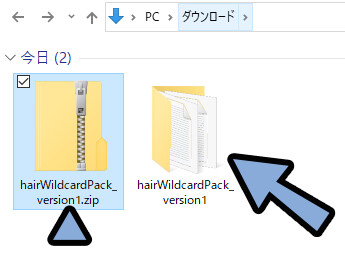
展開したファイルの中に入ります。
すると… .txtデータが入ってます。
こちらを開くとランダム入力されるプロンプトが確認できます。
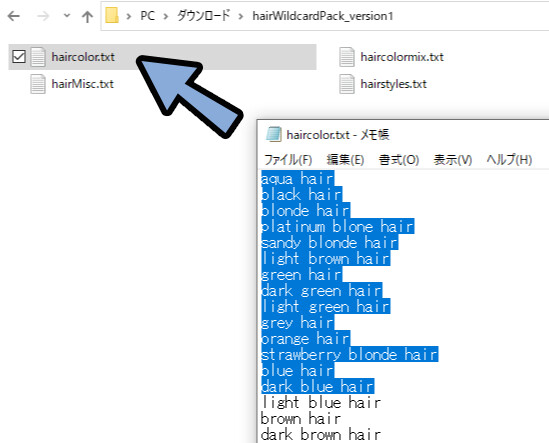
これは、普通に文字を羅列し、改行した.txtデータです。
お使いのPCのメモ帳で自作できます。
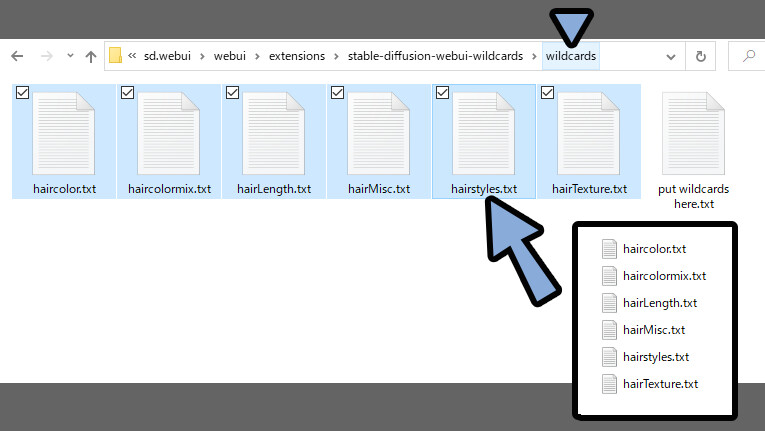
「sd.webui → webui → extensions → stable-diffusion-webui-wildcards → wildcards」
こちらを開きます。
ここに、DLした.txtファイルを全て入れます。
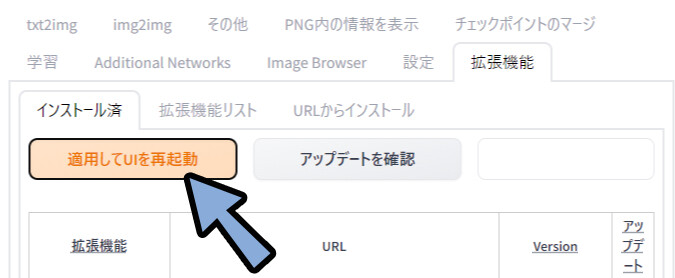
WEB UIに戻ります。
拡張機能 → インストール済み → 適用してUIを再起動をクリック。
これで、wildcardsを読み込ませます。
wildcardsの呼び出し方法は下記。
__ [[呼び出したい.txtの名前(.txt無しで入力)]] __
◆例
「haircolor.txt」なら → __haircolor__
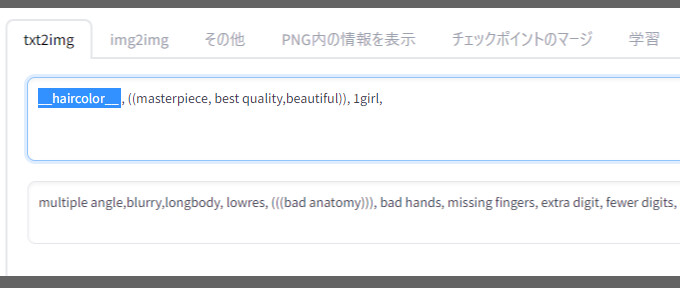
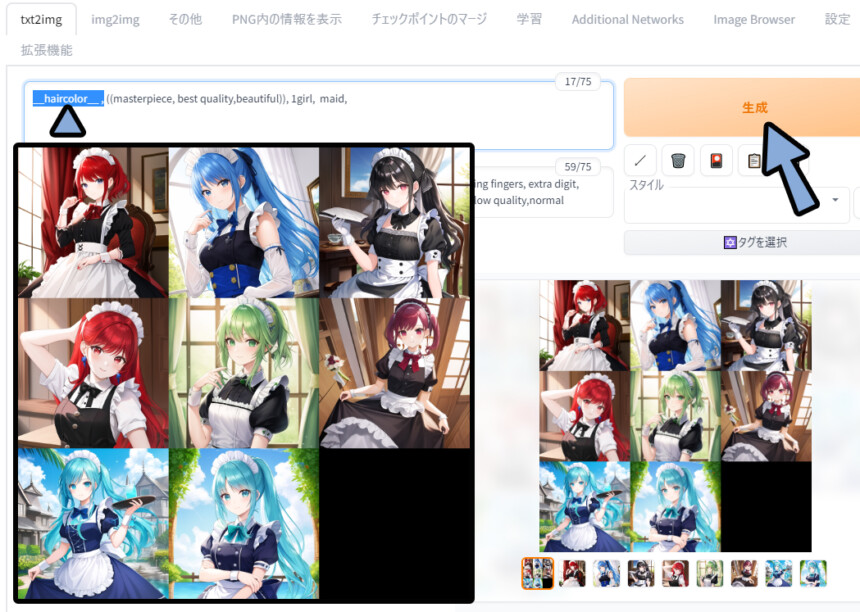
「hairLength.txt」なら → __hairLength__ここでは、__haircolor__のプロンプトを入れました。
これで「haircolor.txt」に入ってるプロンプトをランダムで呼び出せます。
=髪の色がランダムに変われば成功。

あとは、これまで通りのプロンプトを入れて生成。
◆ネガ
__haircolor__ , ((masterpiece, best quality,beautiful)), 1girl,  maid,

◆ポジ
nude, (cleavage), multiple angle,blurry,longbody, lowres, (((bad anatomy))), bad hands, missing fingers, extra digit, fewer digits, cropped, worst quality, low quality,text,error,fewer digits,cropped,worst quality,low quality,normal quality,jpeg ,
今回は8枚生成しました。
wildcardsの影響を受けてる事が分かります。
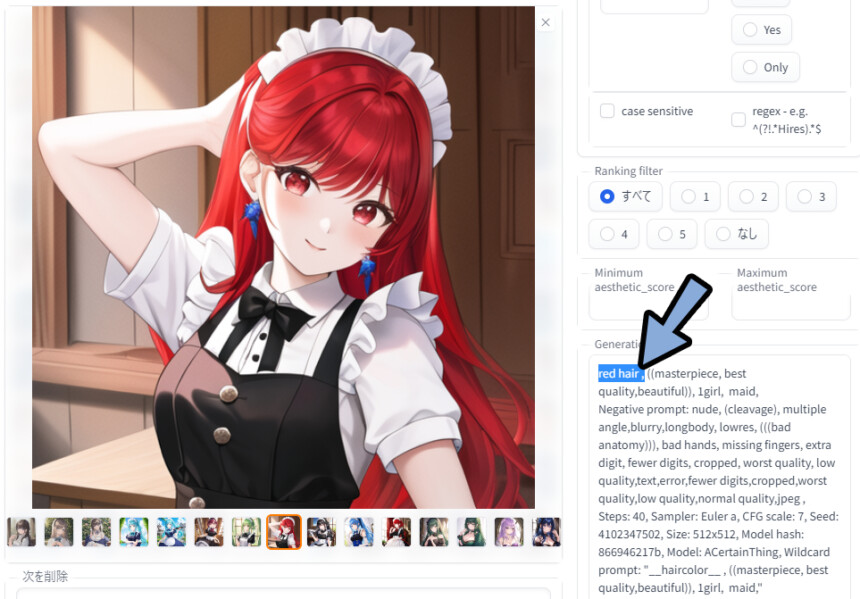
生成した絵のメタデータを確認。
すると… 「__haircolor__」の部分が「red Hair」や「light green hair」に置き換わったことが分かります。
以上がwildcardの使い方です。
Control Net + Posesについて
・Control Net=8つの方法で絵のポーズや構成を指定する方法。
・Poses = Control Netの1つの指定方法。棒人間でポーズを指定する機能。
これは、別の記事で解説しました。
Civitaiで用意されてる素材は”ただの画像”です。
なので別サイトでも取得したり、自作する事が可能。
また… ポーズは個人的には、使わないかな…という印象。
個人的には、Control NetのDepth最強。
ポーズ惜しい、微妙に上手く行かない。
これなら画像から画像生成していいのでは?
と思ってしまう。
基本は、自分が意図した絵を作るための機能。
素材を読み込むより、自作がおすすめ。
おすすめは下記の2つの記事でDepth画像を自作 → 生成。
CivitaiのPoses画像は大量に出てきて面白いですが…
解説すると長くなるのと、Civitaiで集める必然性が無いので割愛。
おまけ:Civitaiでプロンプトを学ぶ
Civitaiにある絵でプロンプトを確認できます。
絵は、Discussionや公式の説明をクリック。
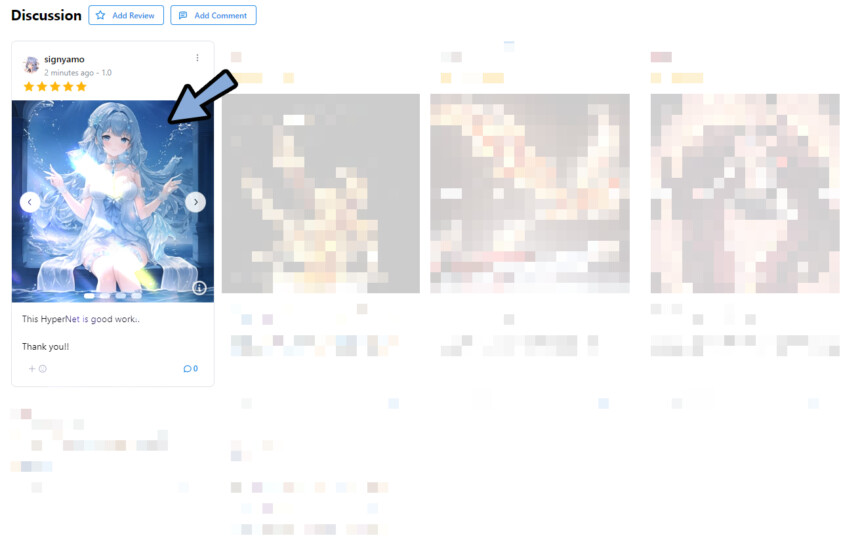
すると… 画面右側に生成情報が表示されます。
上手く行かない方は、こちらで原因を探ってください。
レビューを残して、後に繋ぐ
このDiscussionには、自分で絵付のコメントを残す事ができます。
「Add Review」をクリック。
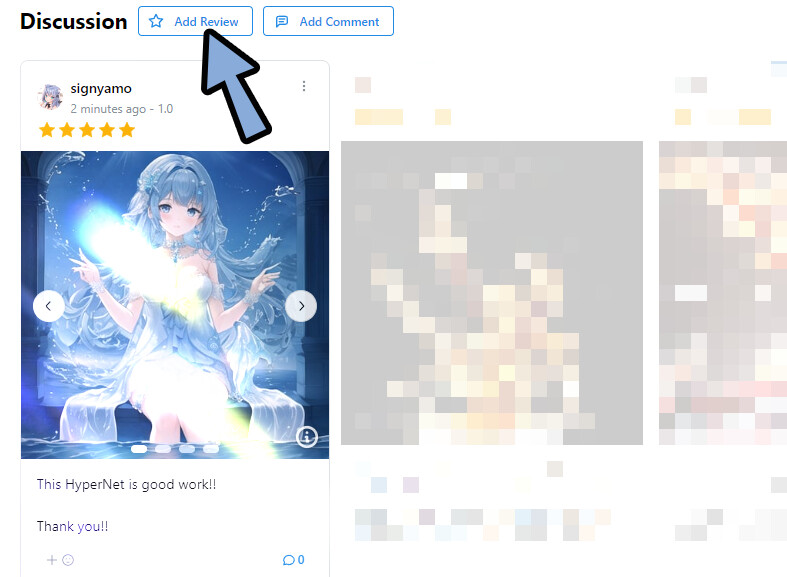
下記の4つを上から入力 → Saveをクリック。
・DLしたモデルの使用バージョン
・評価(★1~5)
・コメント(文字)
・画像(プレビュー、1枚目がサムネ)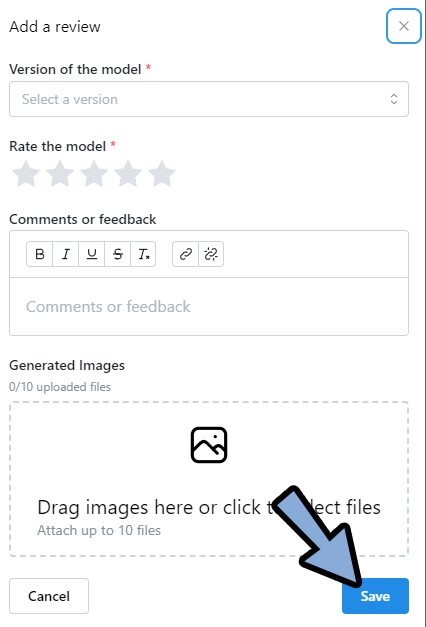
これで、後の人のために情報を残す事ができます。
任意ですが、やりたい方はやります。
まとめ
今回はCivitaiにあるAIモデルの使い方を紹介しました。
・CivitaiはAIイラストの追加学習モデルなどを配布してるサイト
・マージやDream Booth生成モデル、LoRAなどの追加追加学習モデルが配布されている
・導入手順は拡張機能を入れる → web uiのフォルダの正しい位置に配置が基本
・<>系のプロンプトは :1の数字を変えて強度を調整。
また、他にもWEB UIを使用した、AIイラストについて解説してます。
ぜひ、こちらもご覧ください。
コメント