はじめに
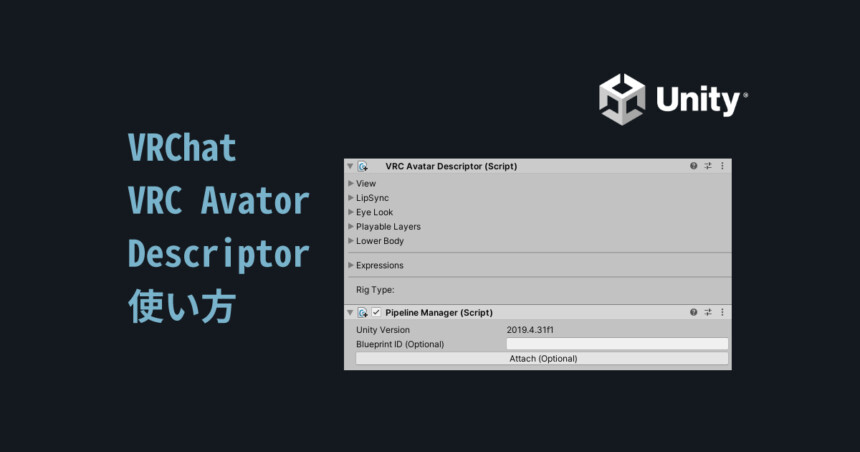
VRC AvatorDescriptorの使い方・設定方法を紹介します。
これはVRChatに3Dモデルをアバターとしてアップロードするために必要です。
自作や改変アバターを使いたい方、
購入したモデルがAvator3.0非対応の場合はご覧ください。
前提条件
この4つを前提に進めます。
・アバターをUnityに読み込み済み
・.fbxのInspectorは設定済み
・VRC Avatar Descriptorが未設定
・VRChat SDKは導入済み
アバターをUnityに読み込み済み
アバターをUnityに読み込む基本操作はこちらをご覧ください。
fbxのInspectorは設定済み
今回は説明の為にあえて.fbxをのモデルを使います。
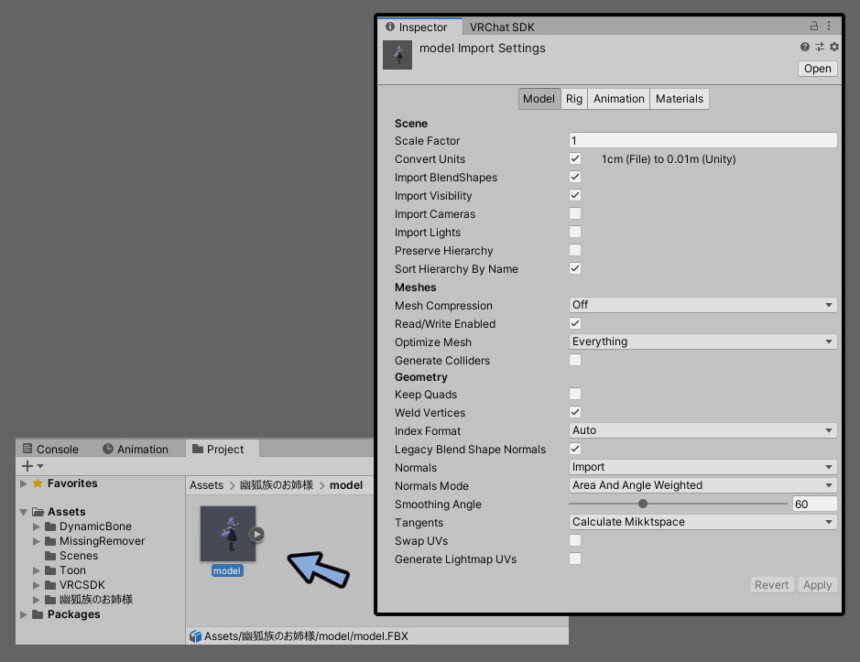
なので.fbxのInspectorは設定済みです。
.fbxの設定方法はこちらを参考してください。
VRC Avatar Descriptorが未設定
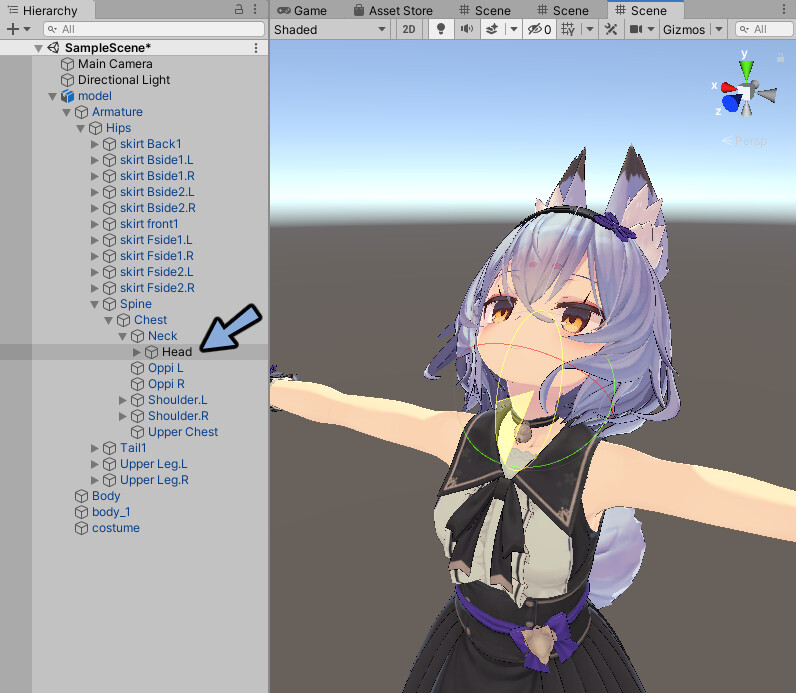
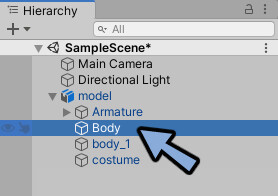
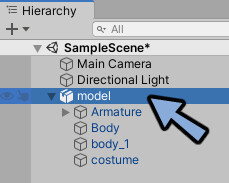
.fbxをHierarchyに読み込み。
クリックで選択。
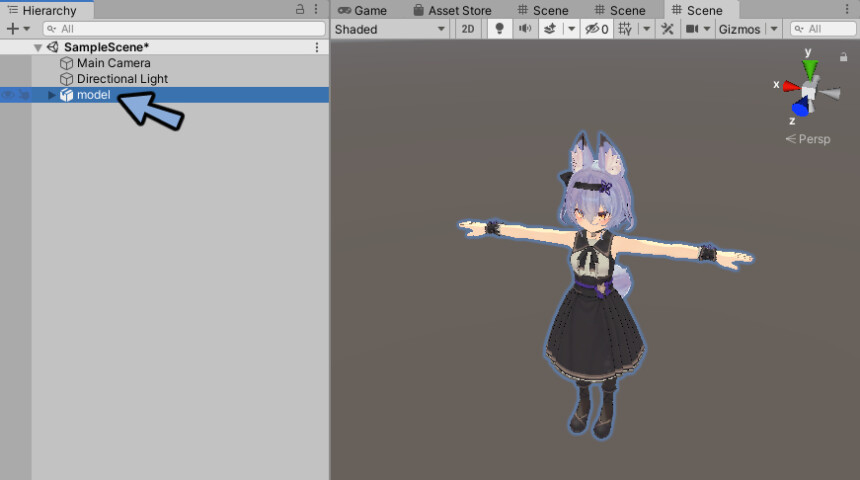
Inspectorを見ます。
VRC Avatar Descriptorが無いことを確認。
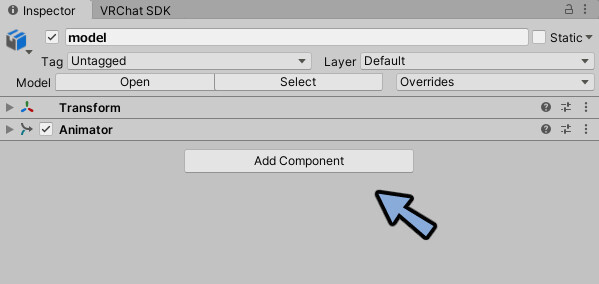
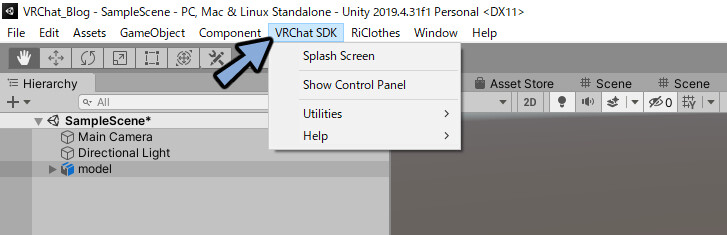
VRChat SDKは導入済み
VRChat SDKが入ってる事を確認。
今回はこの状態からスタートします。
VRC Avatar Descriptorの割り当て
Add Componentを選択。
検索欄にvrcと打ち込み。
VRC Avatar Descriptorを選択。
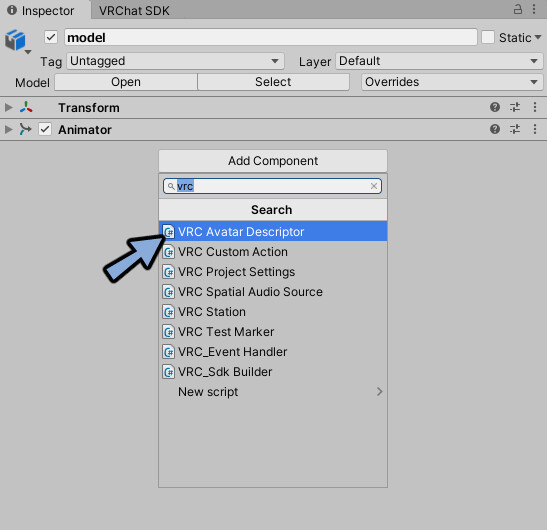
下記の2つが増えたことを確認します。
・VRC Avatar Descriptor (Script)
・Pipeline Manager (Script)
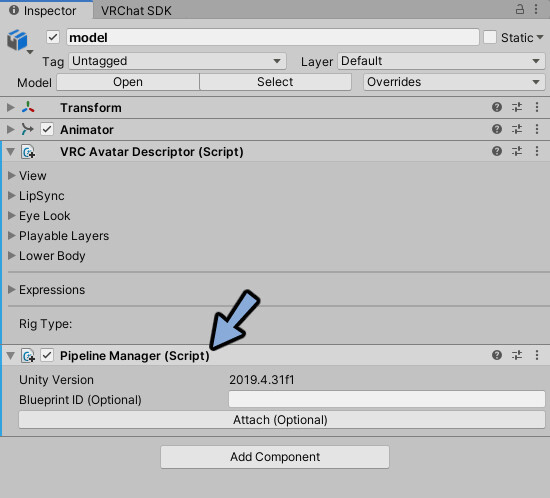
Pipeline Manegerは自動で追加されます。
これで割り当てが完了です。
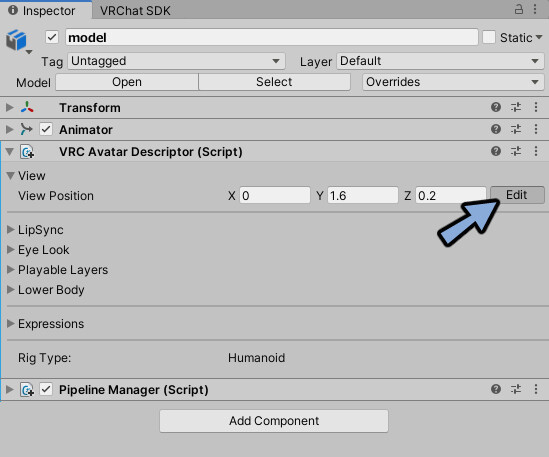
Viewの設定
Viewはビューポイント=自分の視点です。
VRC Avatar Descriptor → View → Editを選択。
Gizmosをクリック。
ビューポイントを表示。
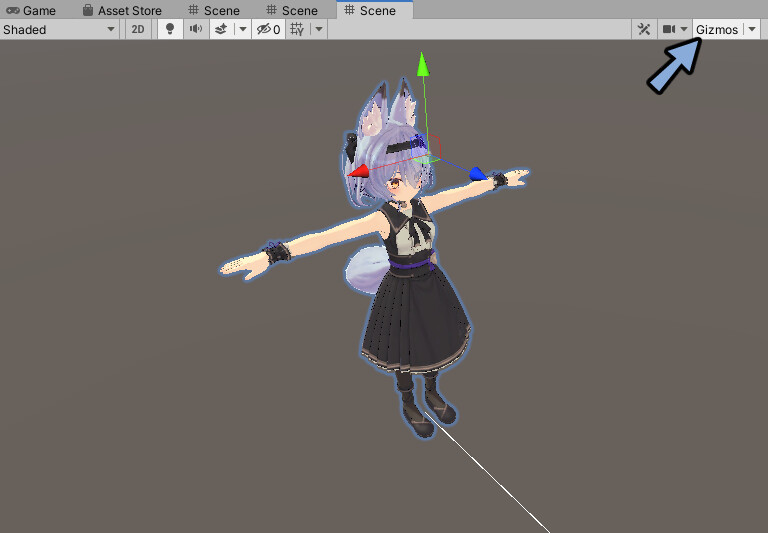
この丸い玉がVR上での視点です。
矢印などを使い移動。
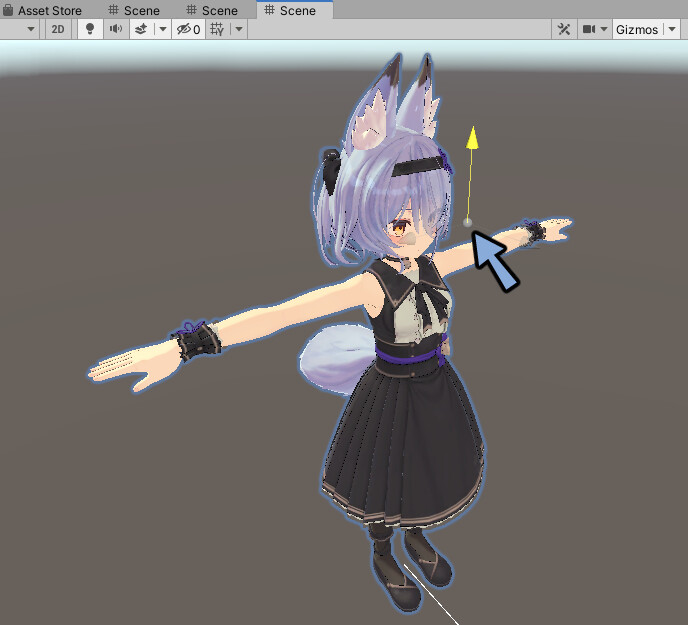
目と目の間の顔の中に入れます。
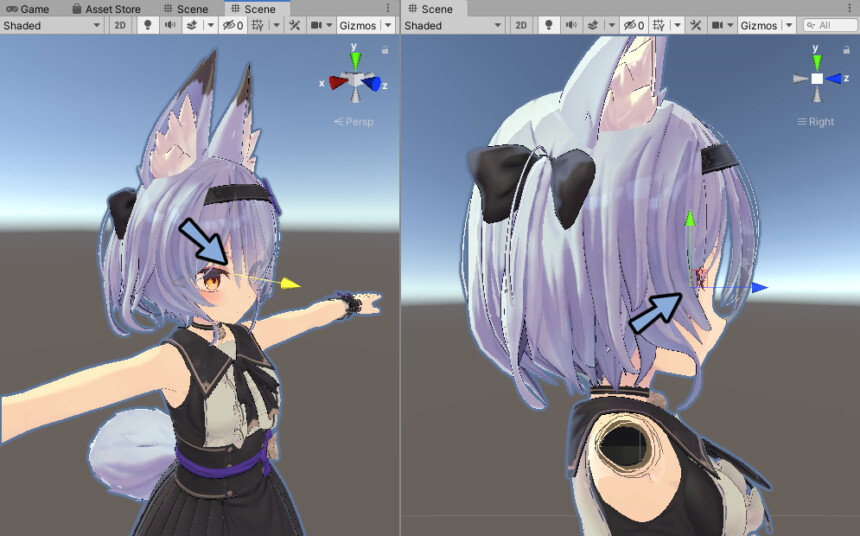
このビューポイントはHead以降のウエイト影響が設定されたメッシュが非表示になります。
なので埋もれても大丈夫です。
位置が決まればReturnを押します。
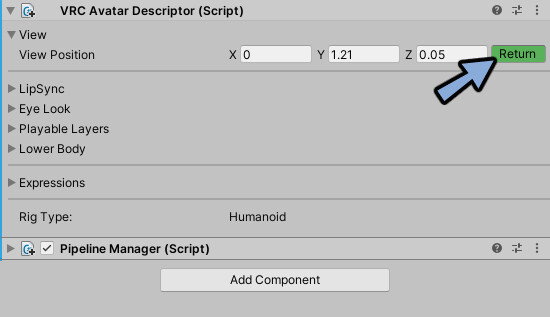
これでビューポイントの設定が完了です。
『ビューポイント』さえ設定すればVRChatにアップロードできます。
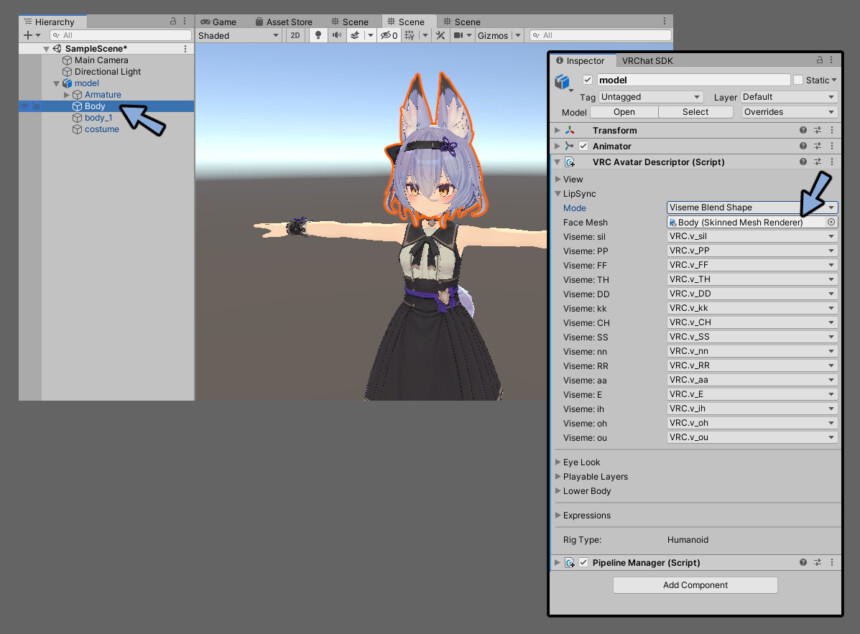
LipSyncの設定
LipSyncは声に合わせて口を動かす処理です。
VRC Avatar Descriptor → LipSync → Auto Detect!を選択。
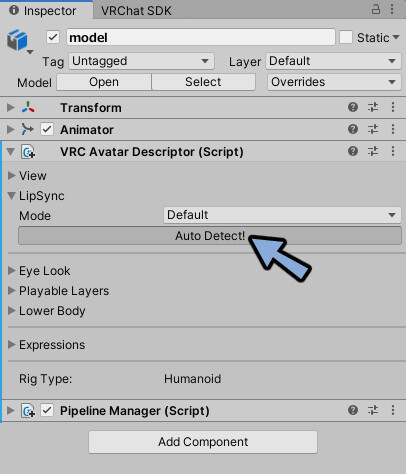
15個の口の動きのシェイプキーが入ってる場合は自動で設定されます。
大切なのはあいうえお(aa,ih,ou,E,oh)です。

あいうえおしかない場合は残りの10個はランダムで割り当ててください。
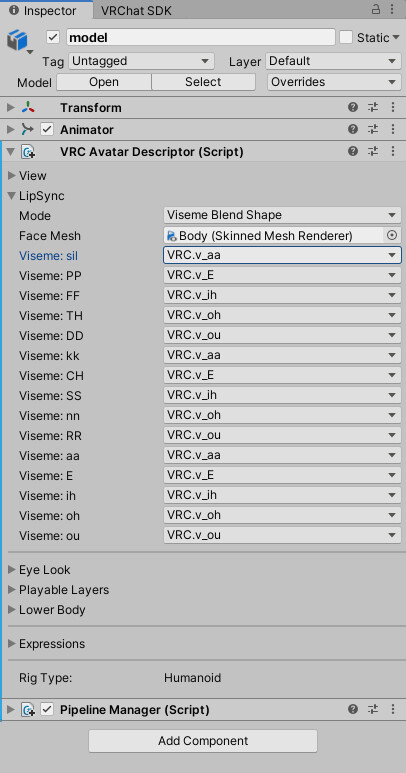
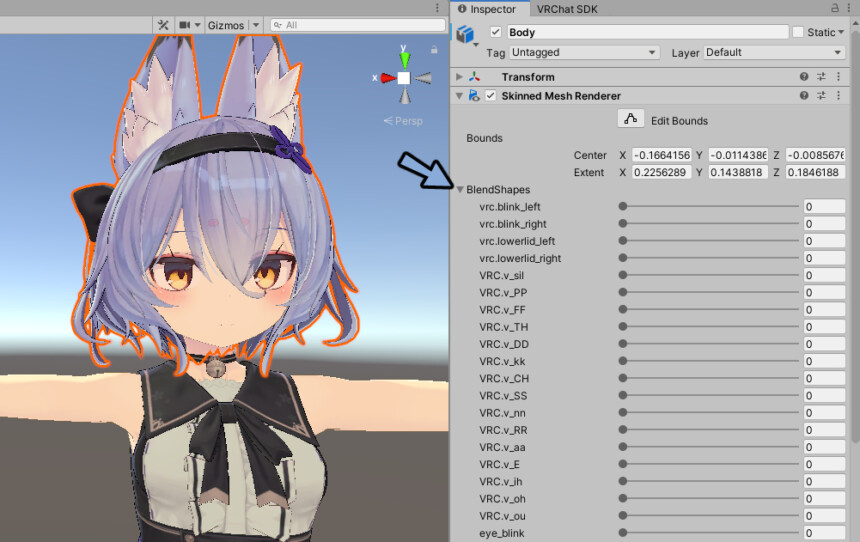
Face Meshをクリック。
Hierarchyで顔のメッシュになってる事を確認。
なって無ければ顔のメッシュを割り当て。
これでリップシンクの設定が完了です。
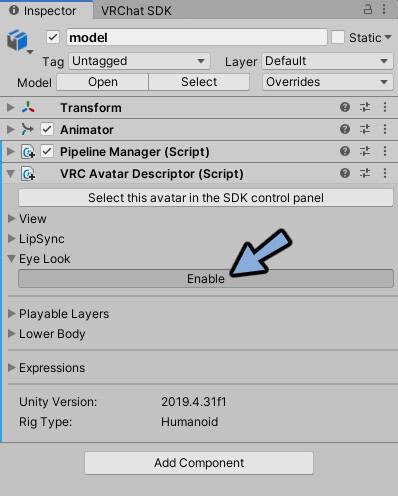
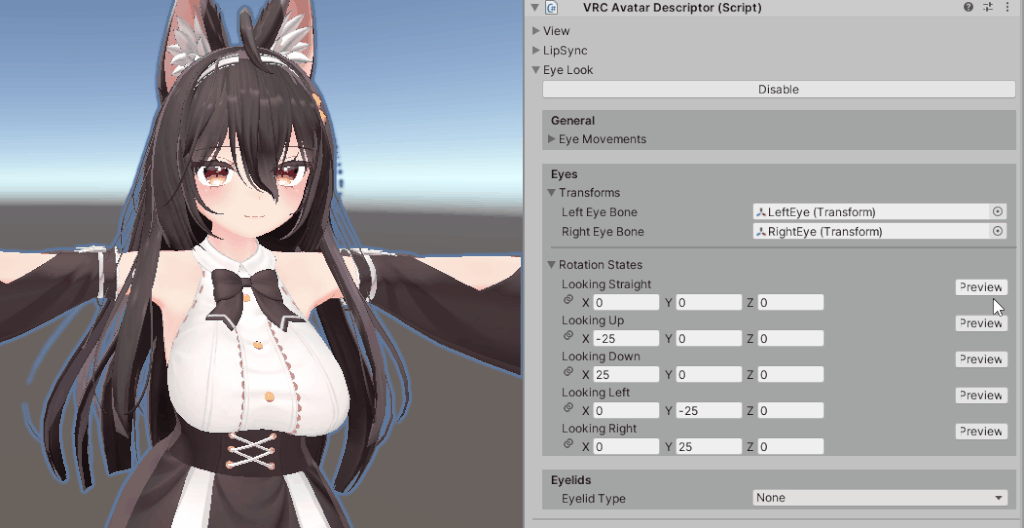
Eye Lookの設定
Eye Lookは3つの用途があります。
・他の人を見た時の目の動きの設定
・まばたきの設定
・上と下を見た時のまぶたの形の設定
この3つを下記の3つに分けて解説します。
・Eye Lookで目を動かすための設定
・他の人を見た時の目の動きの設定
・まばたき+上と下を見た時のまぶたの形の設定
Eye Lookで目を動かすための設定
Eye Lookを開きます。
Enableをクリック。
Generalを開きます。
ここはそのままで大丈夫です。
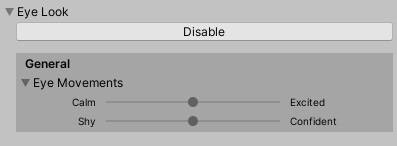
必要な方は下記を参考に設定してください。
▼Eye Movements
・瞬きの頻度:少ない ⇔ 多い
・ほかのプレイヤーを見る頻度:少ない ⇔ 多い
Eyes → Transformsより右目と左目のボーンを設定。
Hierarchyのボーンを開きドラッグ&ドロップで割り当て。
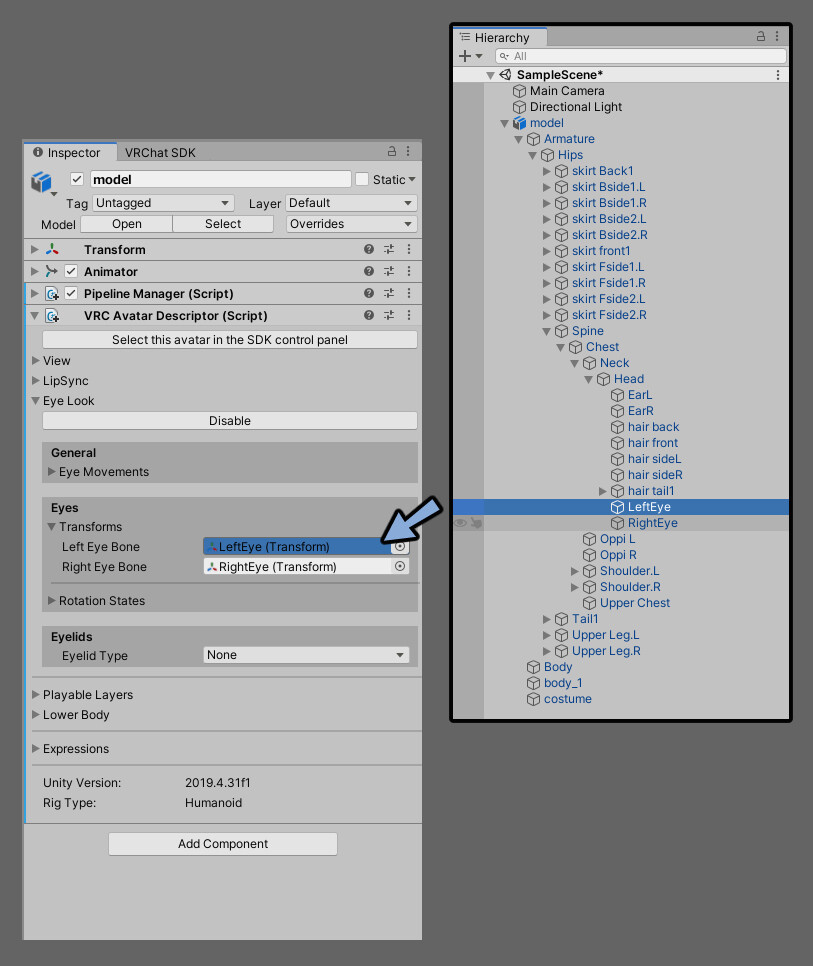
これで目を動かすための設定が完了です。
他の人を見た時の目の動きの設定
上部の再生ボタンを押してPlayモード。
Eyes → Rotation Statesを開き設定。
数値を動かすと目が動きます。
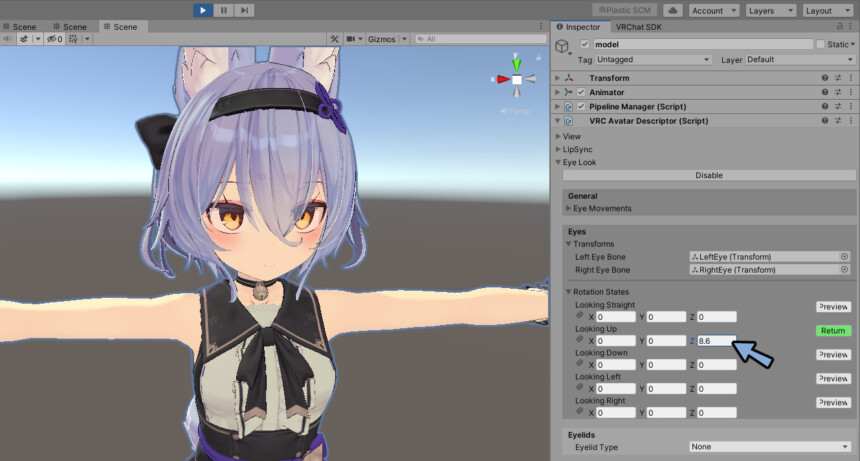
上から順に下記のように設定します。
・正面を見た状態
・上を見た状態
・下を見た状態
・左を見た状態(キャラ側の視点)
・右を見た状態(キャラ側の視点)
他のモデルでも動きを確認。
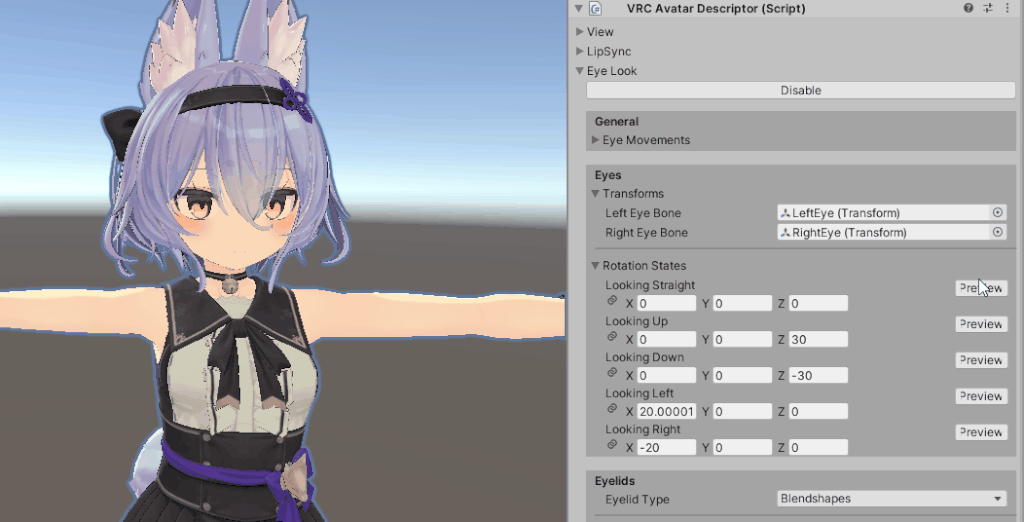
するとこのような設定で上手く行く事が分かります。
・数値はX,Y,Zのいずれか1つを動かす。
・上と下、右と左は同じ軸の数値を変更。
・右と左は同じ数値で+と-。
動く量はモデルそれぞれで違います。
大体の数値が確認できればスクショなどで保存。
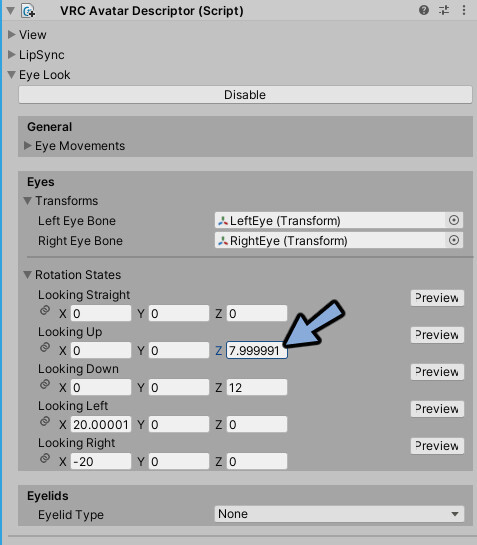
再生ボタンを押してPlay状態を解除。
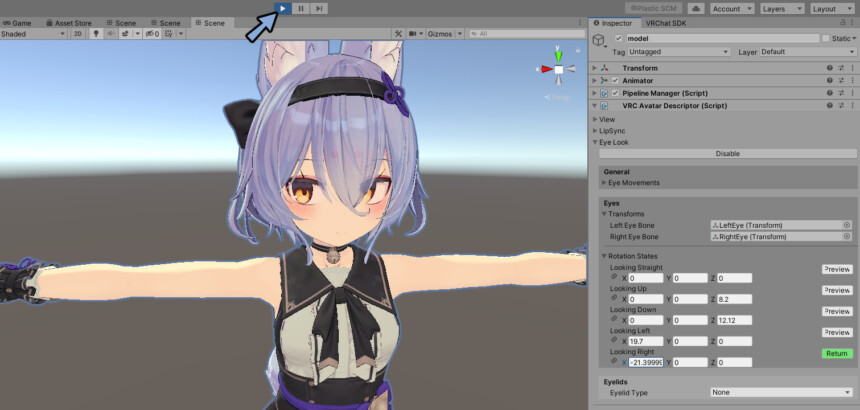
Play状態じゃない状態で数値を入れます。
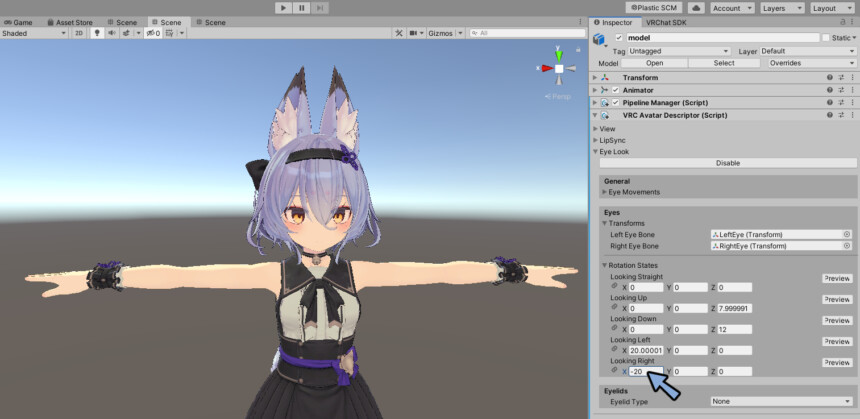
8や20を入れようとしたところ少数が出ました。
モデルによってはこのような挙動になります。
だいたい合ってるので気にせず進めます。
これで他の人を見た場合に目が動くようになりました。
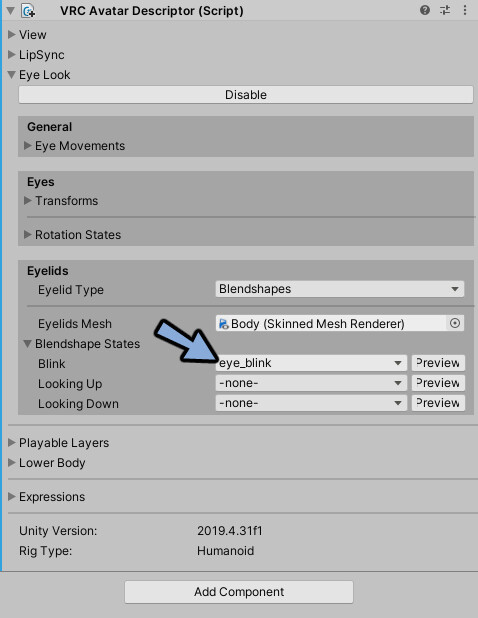
まばたき+上と下を見た時のまぶたの形の設定
Eyelidsはまばたきの設定です。
Looking UPとLooking Downで上と下を見た時の目の形も設定できます。
※上と下を見た時のまぶたの形の調整はほとんど使われません。
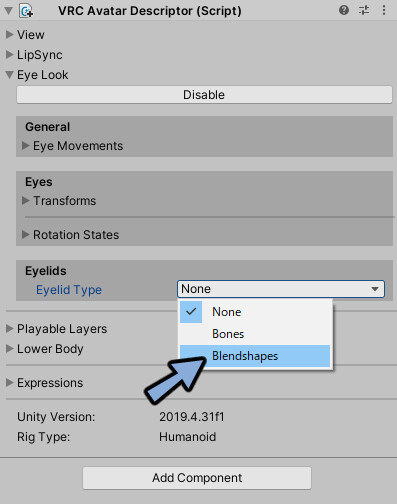
設定方法はEyelids TypeをNoneからBlendshapesに変更。
※ボーンでまばたきを制御してる場合はBonesを選択。(滅多に無いです)
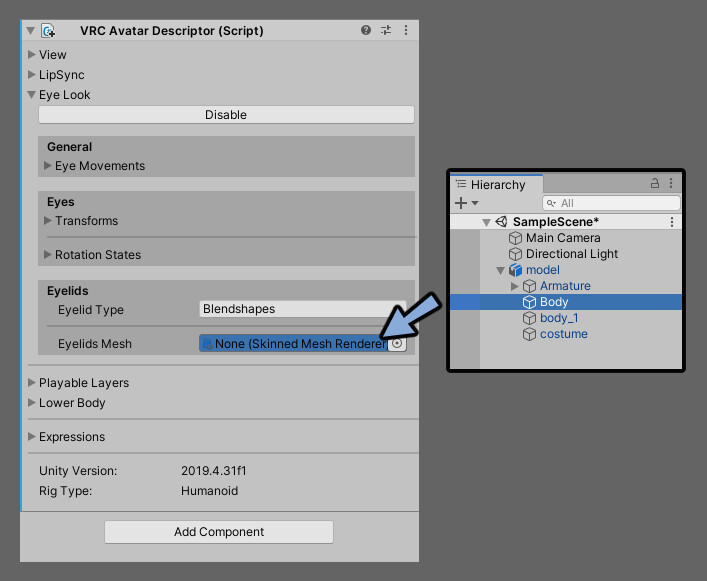
Hierarchyで顔のメッシュを確認。

Eyelids MeshがNoneになってる事を確認。
Hierarchyの顔のメッシュをドラッグ&ドロップ。
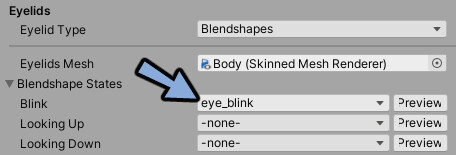
上から順に以下のシェイプキーを入れます。
・まばたきの動き
・上を見た時のまぶたの動き
・下を見た時のまぶたの動き
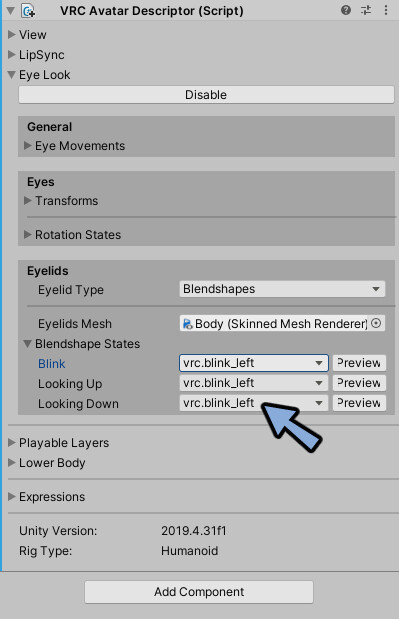
現在は自動で間違ったシェイプキーが割り当てられてます。
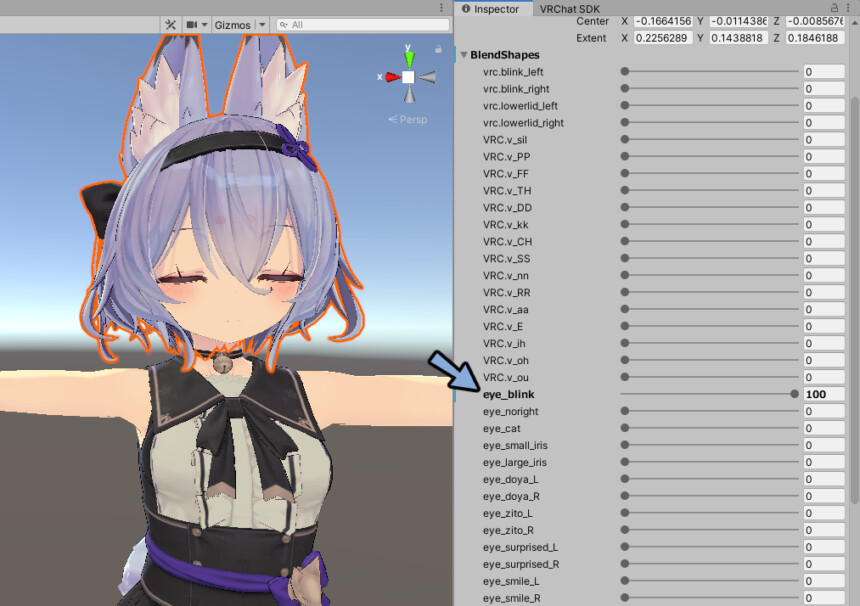
Hierarchyで顔のメッシュを選択。
Inspector → BlendShapesを開きます。
ここで両目閉じのまばたきのシェイプキーを探します。
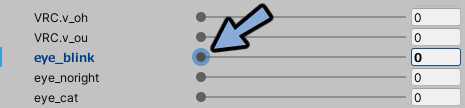
数値を動かして動作を確認。
※上と下向きのまぶたの差分はほとんどのモデルで無いです。
確認ができましたら数値を0に戻します。
Hierarchyでモデルの方をクリック。
Inspectorに戻ります。
Blinkにまばたきのシェイプキーを設定。
上と下向きはほとんどのモデルで無いので-none-に設定。
これでまばたきの設定が完了です。
また、まばたきはVRChat上の操作で表情を変えると干渉して形が崩れます。
その対処法はこちらで解説。
(上級者向けの記事です。事前に複数の表情設定の記事などを見てから進めることをおすすめします。)
以上でまばたき+上と下を見た時のまぶたの形の設定が完了です。
Lower Bodyの設定
1つ飛ばしてLower Bodyです。
これは特別な事をしない限り2つともチェックが入った状態で大丈夫です。
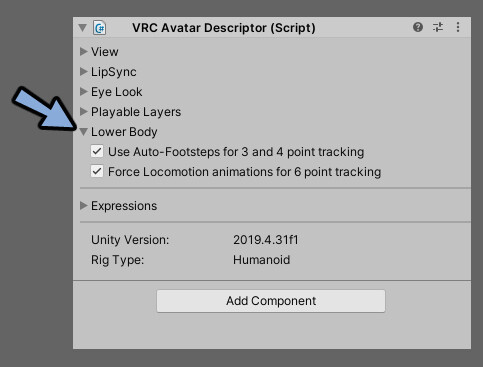
・床に対して足の動きを入れるかどうか。(3~4点トラッキング時)
・移動時のアニメーション再生するかどうか。(フルトラ時)
Playable LayersとExpressionsの設定
この2つはアバターの表情などを制御する項目です。
・Playable Layers = 動かすための仕組み
・Expressions = 動作を円盤のメニューで引き出す仕組み
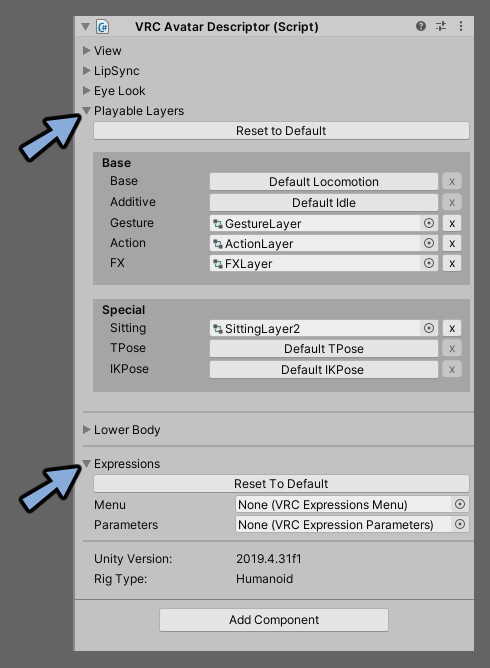
とても長くなるので別記事でまとめました。
Playable Layersの使い方
Expressionsの使い方(=ラジアルメニュー)

こちらをご覧ください。
まとめ
今回はVRC AvatorDescriptorの使い方を紹介しました。
Avatar3.0は奥が深くこの記事で紹介できなかったものもいくつかあります。
全ての操作方法を知りたい方はこちらをご覧ください。
ここで全ての関連記事へのリンクを張ってます。
– 宣伝 –
Boothで3Dモデルを売ってます。
よろしければこちらもチェックしてみてください。


コメント
参考にさせていただきました。
ありがとうございます。
ただ、一点誤字がありまして、
正 VRC Avat(a)r Descriptor
↓
誤 VRC Avat(o)r Descriptor
に途中からなっています。
修正できるようでしたら、よろしくお願いします。
ありがとうございます。 直しました。