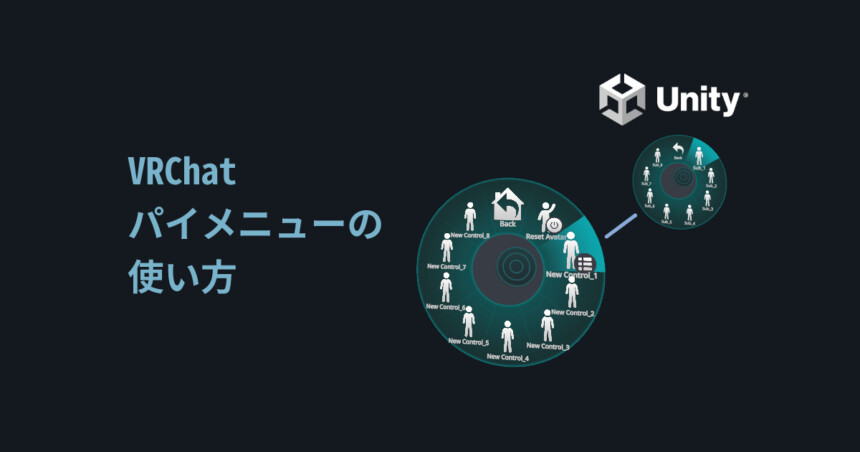
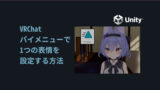
はじめに
今回はVRChatのパイメニューの追加方法を解説します。
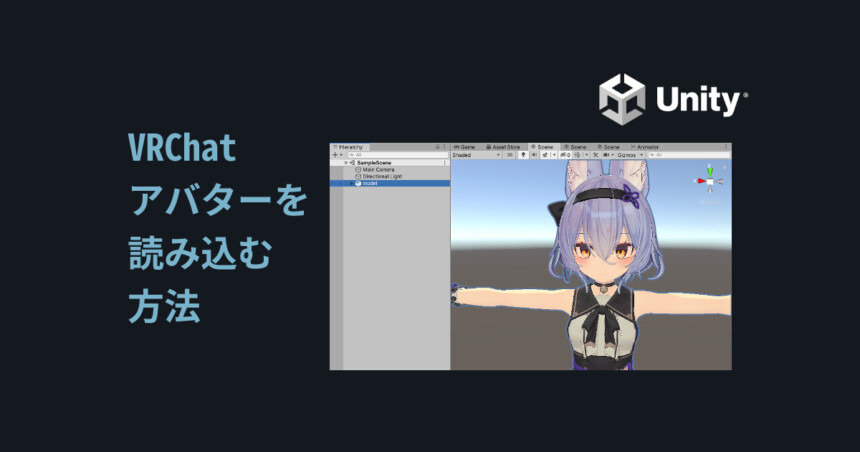
VRChat SDK3が入ってる+VRChatにアバターをアップする知識がある事を前提に始めます。
パイメニューの作り方
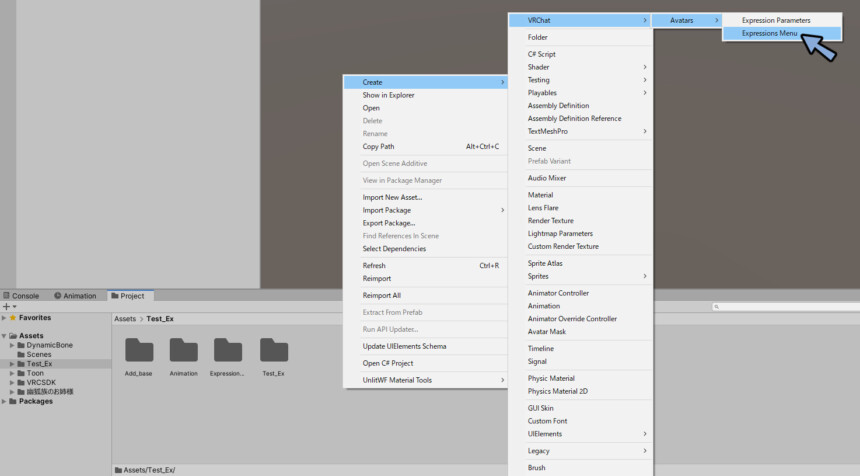
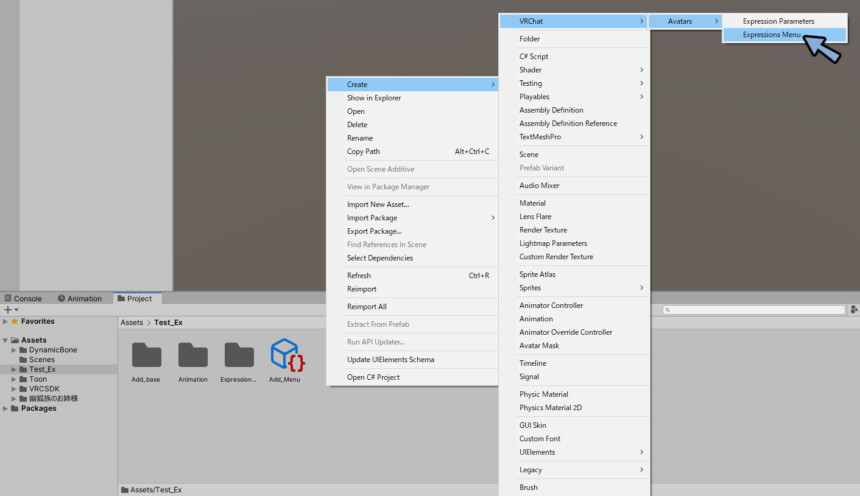
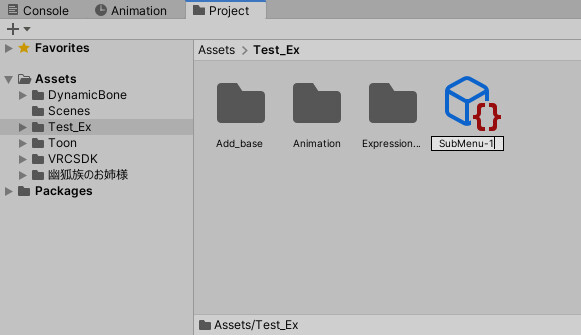
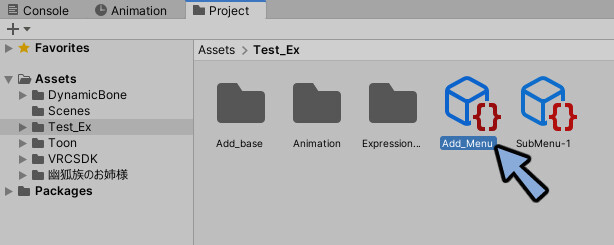
Projectを右クリック。
Create → VRChat → Aavatars → Expressions Menuを選択。
右クリック → Rename。
Add_Menuに名前を変更。
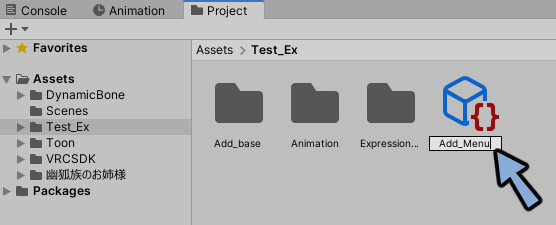
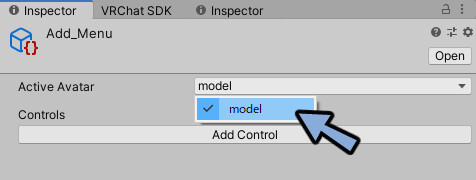
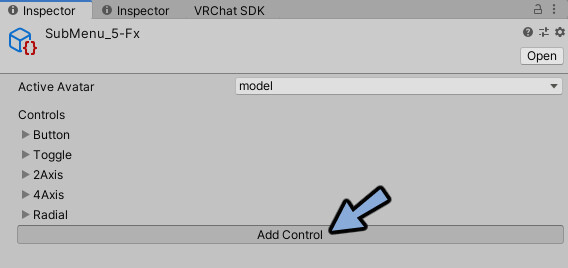
Add_Menuをクリックして選択。
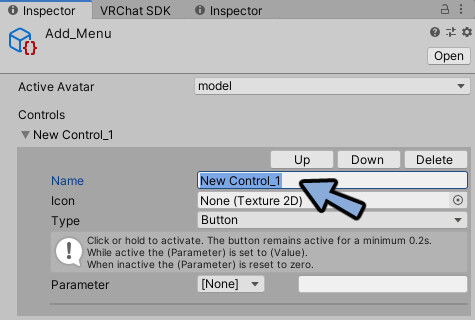
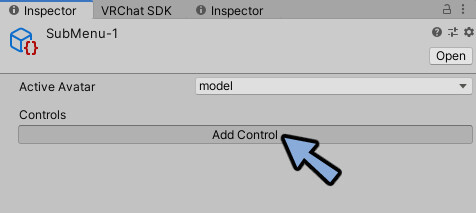
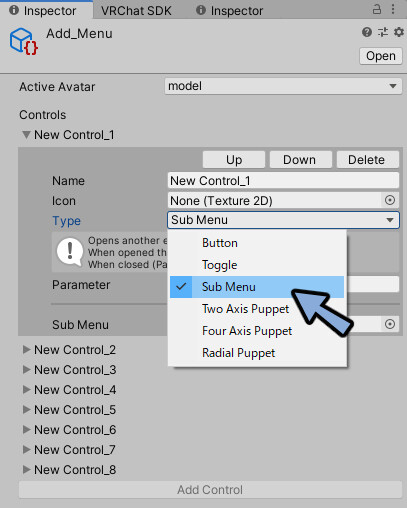
Inspectorを見ます。
Active Avatarで使いたいアバターを選択。
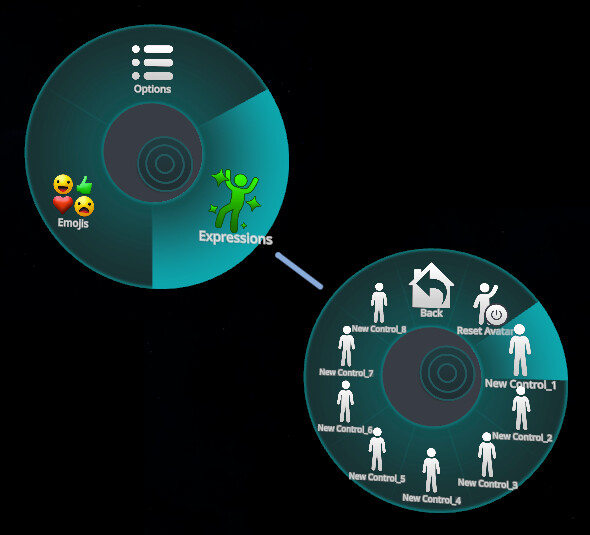
Add Controlを押します。
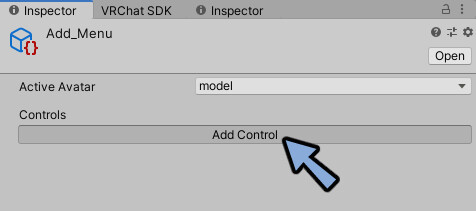
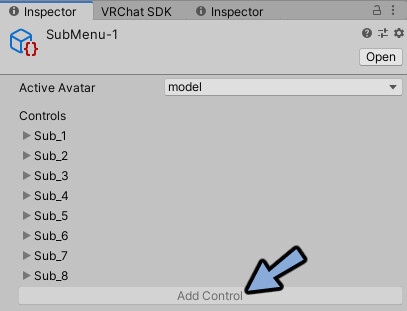
すると新しいコントロールができます。
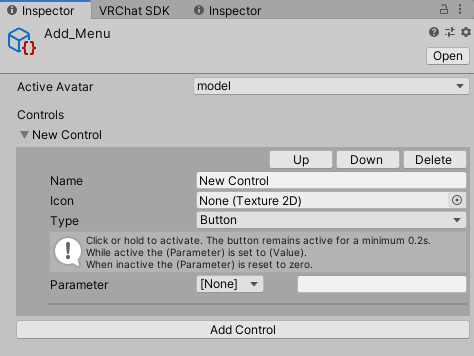
これがパイメニューの1つの枠です。
コントロールはNameで名前を変更できます。
メニューの最大数について
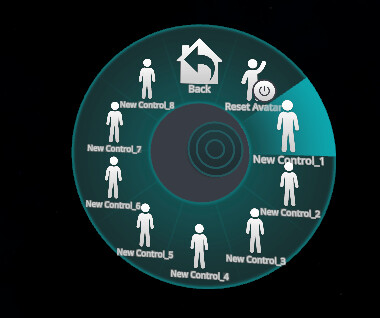
1つのメニューに対して8個までコントロールを追加できます。

VRChatだとBackとResetの項目が増えるので10個にまります。
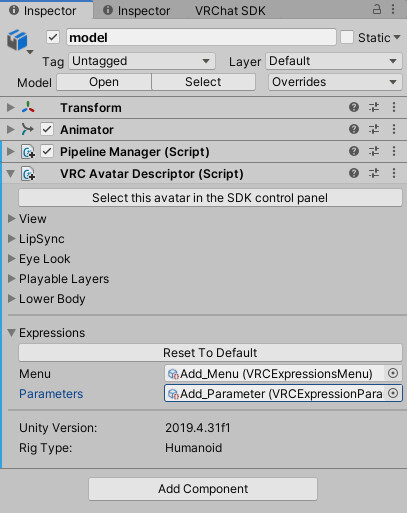
VRChatモデルへの割り当て
Hierarchyで割り当てたいモデルを選択。
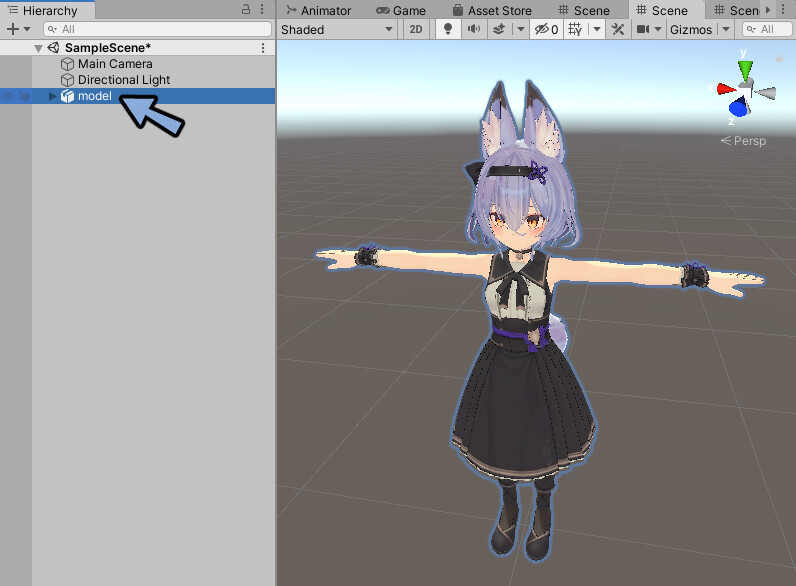
Inspectorを見ます。
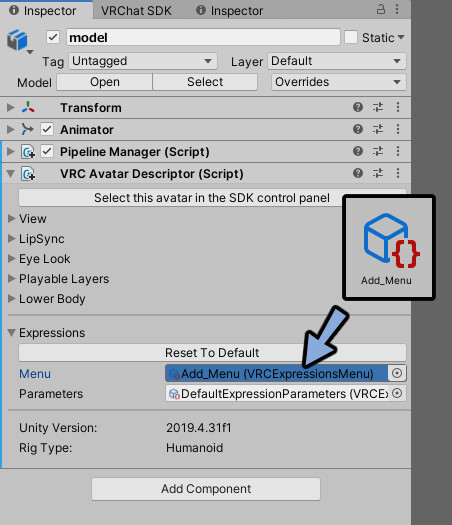
VRC Avatar Descriptor → Expressionsを開きます。
MenuにAdd_Menuを割り当てます。
この状態でVRChatにアップロード。
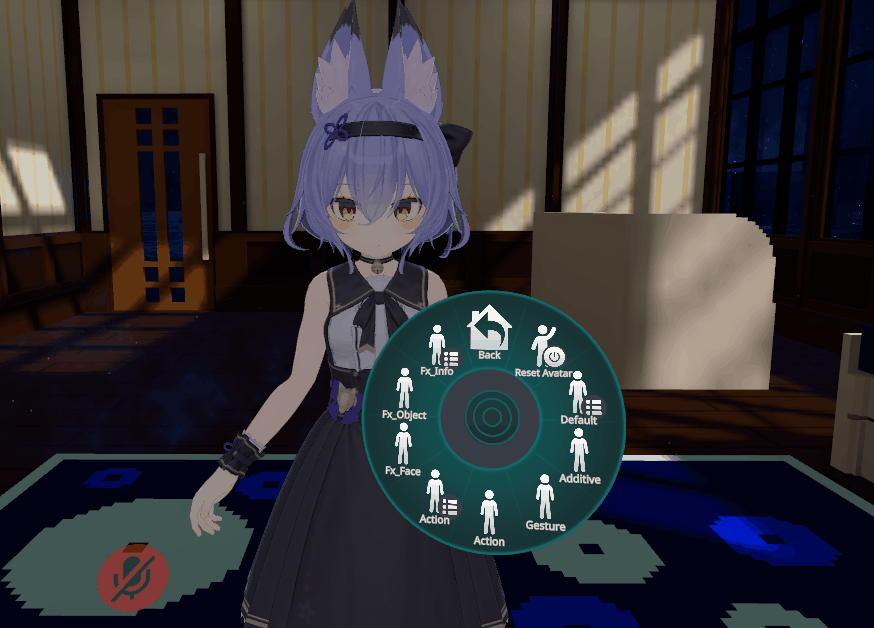
VRChat上でメニューを開きます。
Expressionsを開きます。
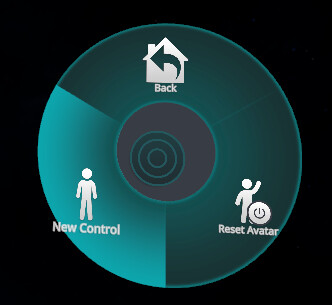
すると追加したパイメニューが出てきます。
動作はしません。
何も割り当てて無いからです。
以上でVRChatモデルへの割り当てが完了です。
8個以上のメニューの作り方
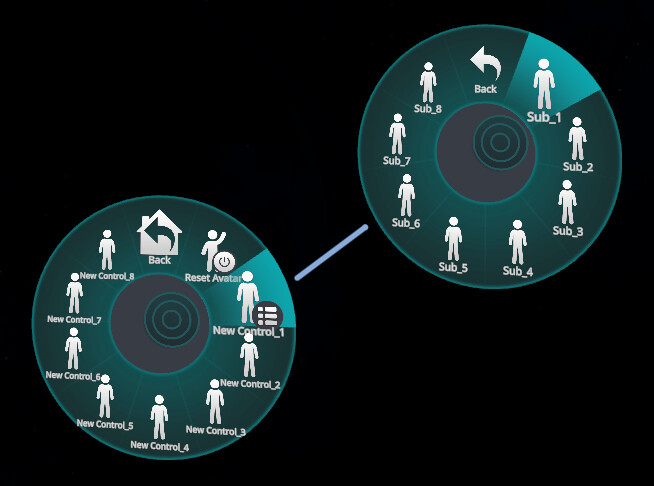
メニューの中にもう1つメニューを入れる事で8個以上の処理を設定できます。
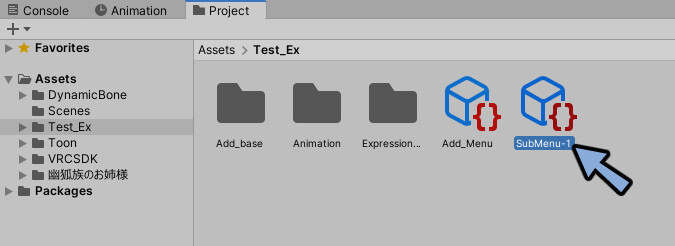
Create → VRChat → Aavatars → Expressions Menuを選択。
SubMenu-1に名前を変更。
SubMenu-1をクリックして選択。
Inspectorを確認。
Add Controlでコントロールを追加。
こちらも同様に8個まで作りれます。
名前はSub1~8としました。
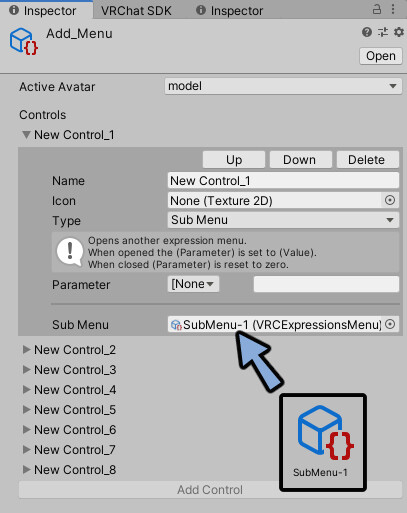
最初に制作したメニューをクリックして選択。
Inspectorを確認。
任意のメニューを開きます。
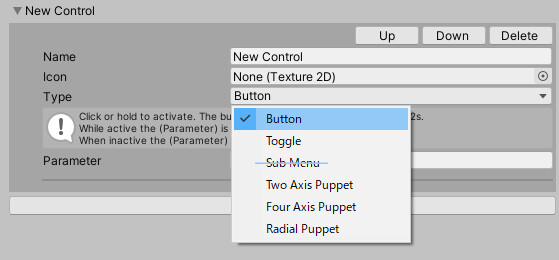
TypeをSub Menuに変更。
Sub Menuの所に制作したメニューをドラッグ&ドロップで割り当て。
VRChatにアップロード。
すると8個以上のメニューを使うことができます。
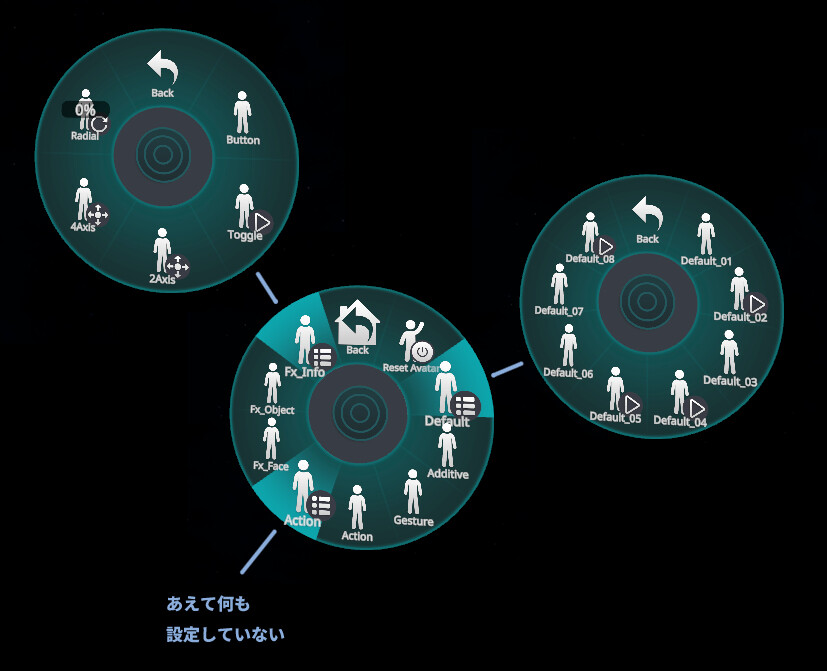
メニュー制作の実習
こちらのようなMenuを制作してください。
今後の講座の説明の為に必要になります。

構造はこのようなものになります。
Projecctで制作したMenuは3つです。
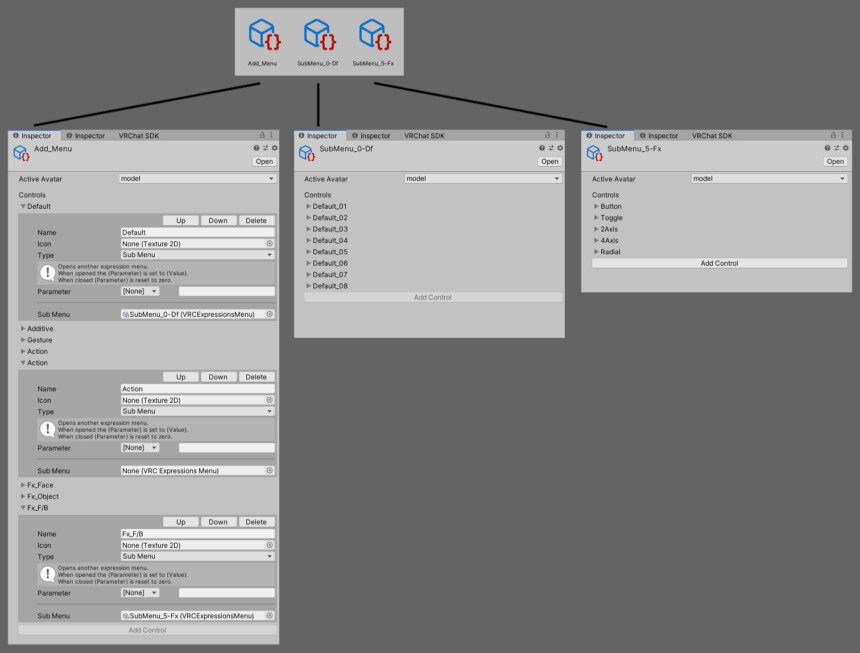
名前とサブメニューを適切に使えればできます。
テスト問題のような感覚で制作してください。
動作の割り当て
最初から意図した動作を割り当てるのは大変です。
これだけの項目の理解と設定が必要になります。

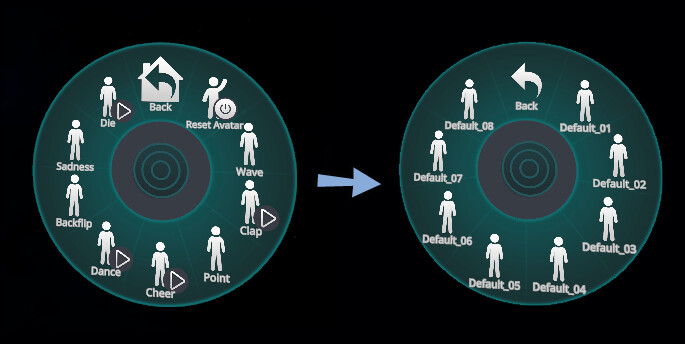
なのでまず、VRChatのデフォルトのアクションを割り当てる方法を解説します。
動作を割り当てたいメニューを選択。(SubMenu_Dfを使用)
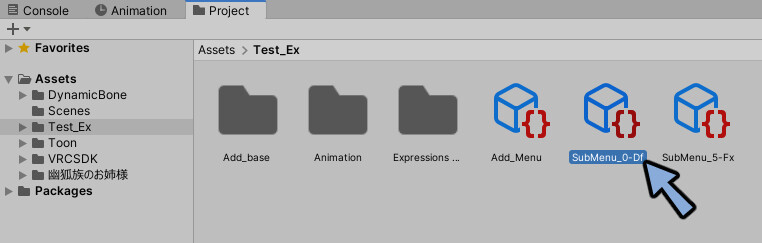
Inspectorを確認。
Parameterの[None]を選択。
VRCEmote,Intを選択。
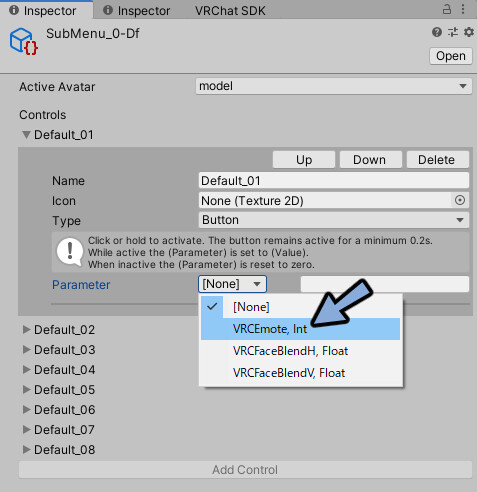
Valueを対応するコントロールの数に設定。
これを1~8まで繰り返します。
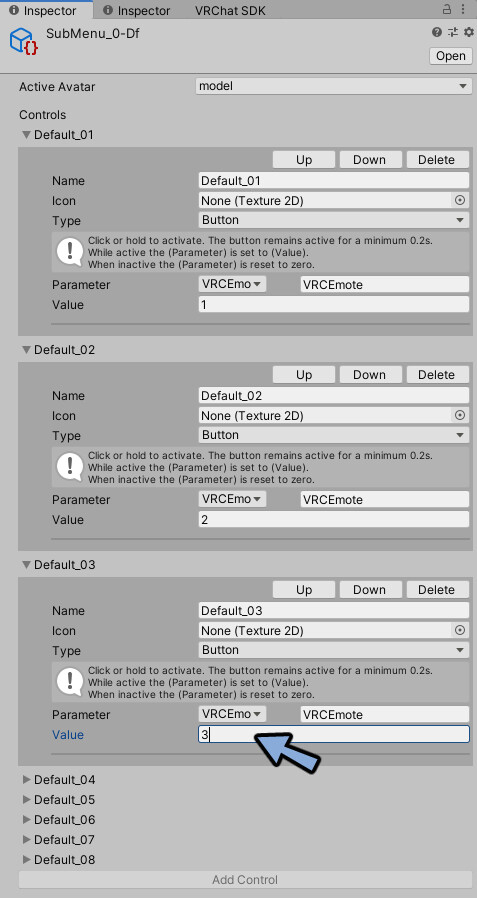
これで動作の設定が完了です。
VRChatにアップロード。
これで動作の割り当てが完了です。

ボタンの形を合わせる
メニューの動作にはボタンの形のような違いがあります。
具体的にはこんなイメージです。


出典:amazon.com
これが適切に設定されてないと正しい動作になりません。

初期のメニューを比較してみると▶マークが無いことが確認できます。
▶なしが左側のボタン。(押してる時だけ動作する=Button)
▶ありが右側のボタン。(押すたびにON/OFFの切り替え=Toggle)
なのでこの▶マークを付けます。
出典:amazon.com
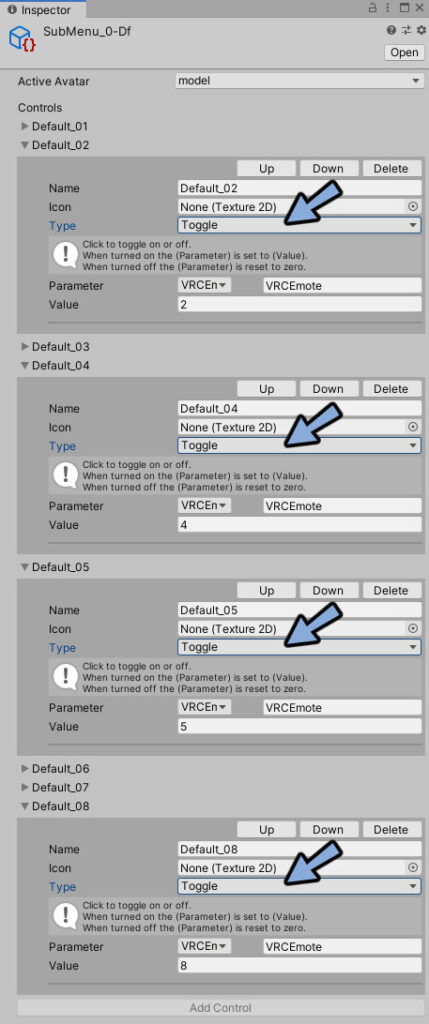
2,4,5,8のコントロールを開きます。
TypeをすべてToggleに変更。
VRChatに再アップロード。
すると▶マークが付きます。
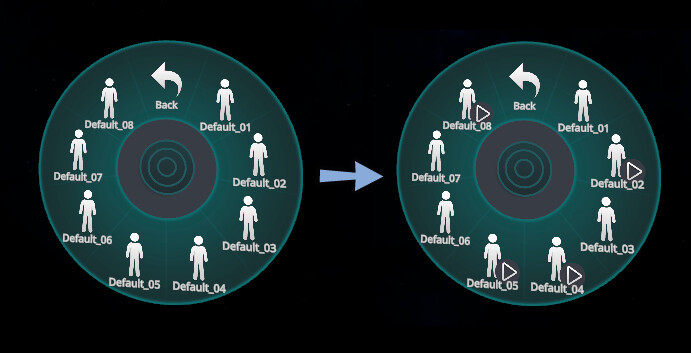
デフォルトのメニューと同じ位置に▶が付いてます。
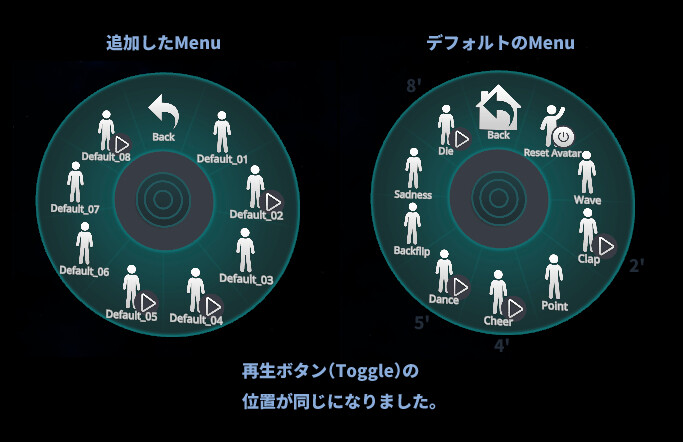
これで正しい動作になります。
ボタンの形(詳細)
動作に影響を与えるボタンは主に5種類あります。(SubMenuを除外)
詳しく知りたい方はこちらをご覧ください。
ここからは5つのボタンの設定方法とVRChatでの挙動を紹介します。
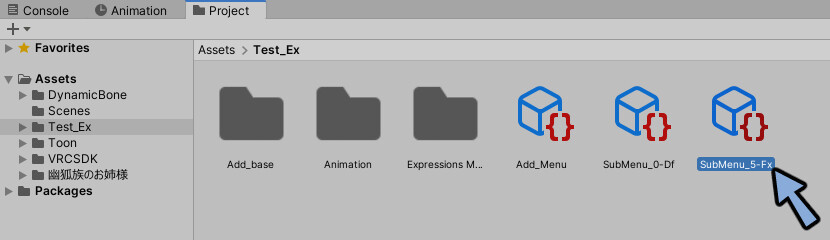
SubMenu_5-Fxを使います。
Tpyeをコントローラー名に合わせたものに変更します。
2AxisにはTow Axis Puppetを設定。
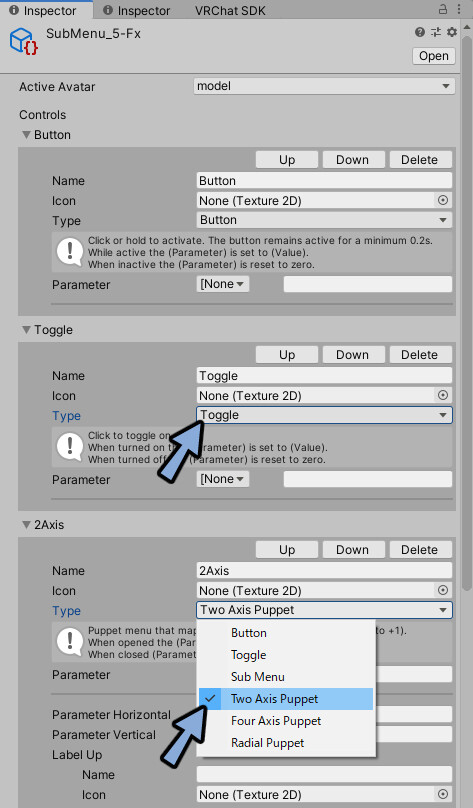
4AxisにはFour Axis Puppetを設定。
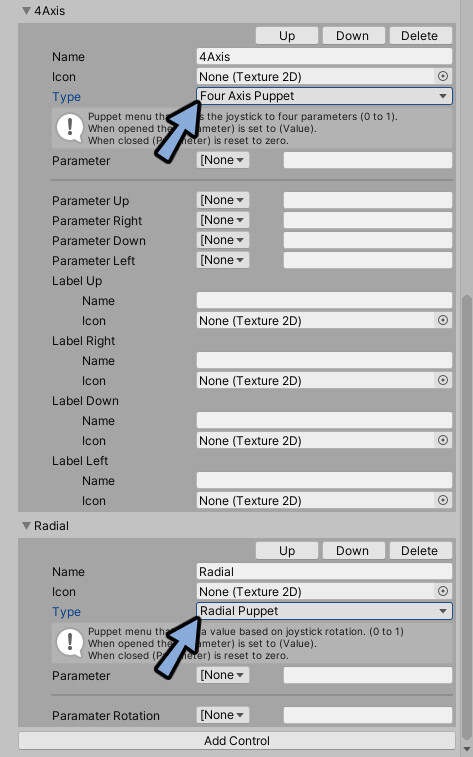
するとボタンの形が変わります。
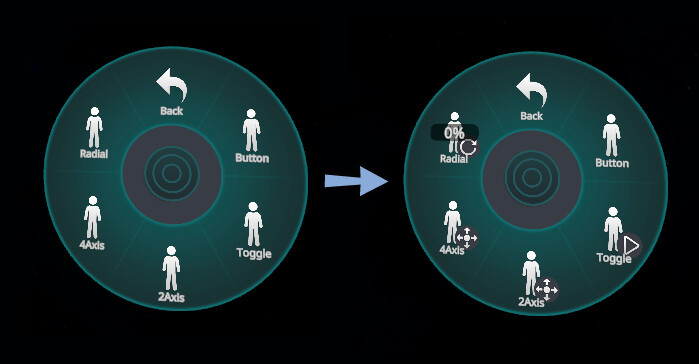
Buttonが一番左のボタン。
Toggleが左から2番目のボタン。
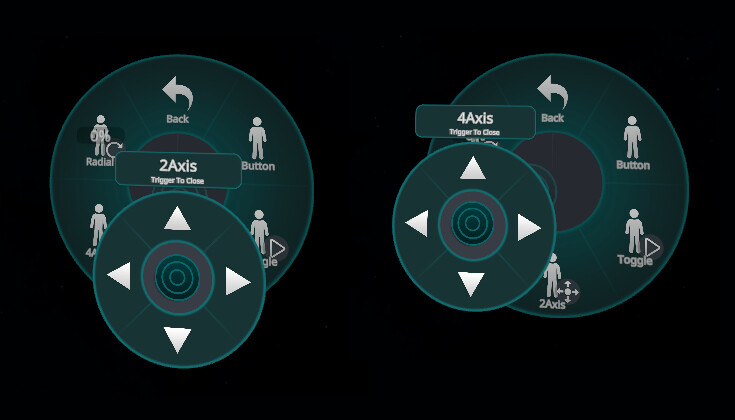
2と4Axisが左から3番目のボタン。
Radialが一番右のボタン。というイメージです。
出典:amazon.com
ButtonとToggleはオンとオフ等の瞬発的な変化を作るもの。
Radialがボリュームの方な滑らかな変形を作るもの。
この2つだけ覚えれば大丈夫です。
2と4Axisは少し複雑なので猛者向けです。
使用はおすすめしません。
基本はButton、Toggle、Radialの3つで十分です。
…が、使いたい方はこちらをご覧ください。

アイコンの変更
説明用にSubMenu_5-Fxにコントロールを追加。
Icon横の◎ボタンをクリック。

Assetsの中にVRChat側が用意した素材が入ってます。
任意の画像素材を選択。
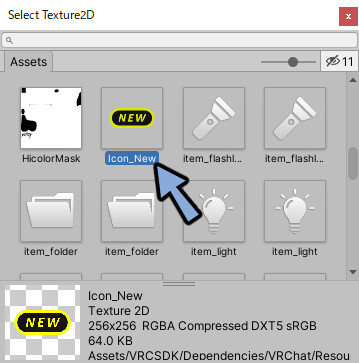
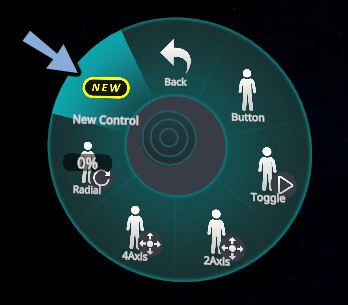
Iconに割り当てられたことを確認。
VRChatにアップロード。
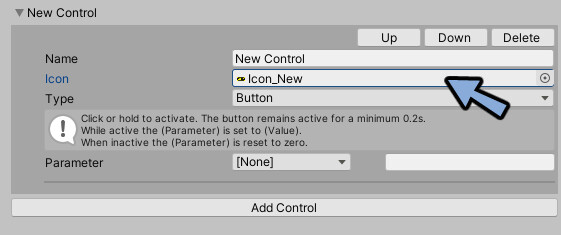
これでアイコンの変更が完了です。
コントロールの削除
コントロール右上のDeleteを選択。
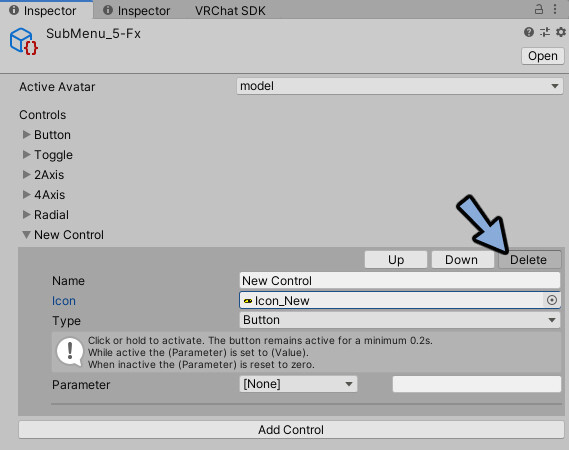
これで削除が完了です。

今後の為の設定(Parameter)
今後パイメニューを動かすためにParameterが必要になります。
Parameterを制作して設定してください。
Projectを右クリック。
Create → VRChat → Aavatars → Expressions Parametersを選択。
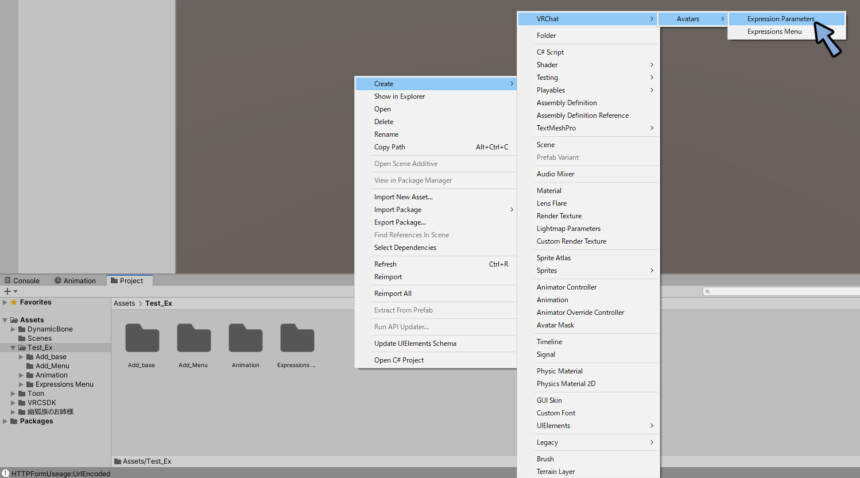
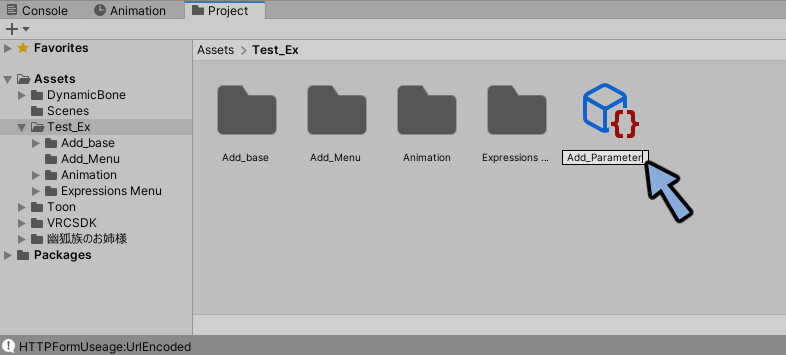
Add_Parameterという名前に変更。
Hierarchyで割り当てるモデルを選択。
Inspectorを確認。
VRC Avatar Descriptor → Expressionsを開きます。
ParametersにAdd_Parameterを割り当て。
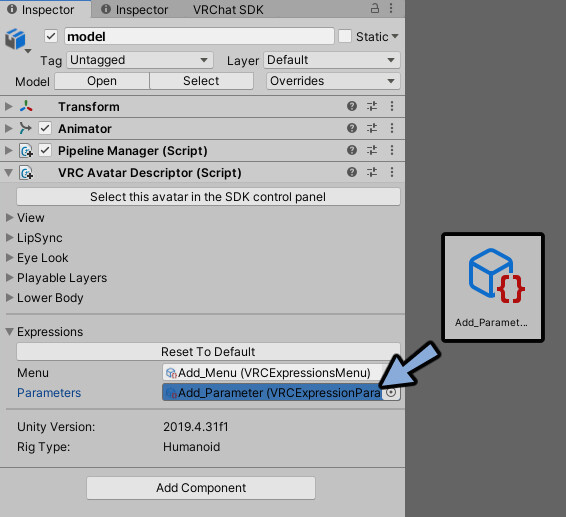
これでParameterの設定が完了です。
まとめ
VRChatのパイメニューの作り方について解説しました。
今回の実習通り行えばこちらのようなパイメニューが制作されたと思います。
このパイメニューを使って”任意の動作を設定する方法”と”必要になる概念”はこちらで解説。
ぜひこちらもご覧ください。
ーーー必要になる概念ーーー
VRC AvatorDescriptorの使い方
Playable Layersの使い方
Layerの違いについて
パイメニューのTypeについて(ボタンの形)
ーーー任意の動作設定方法ーーー
呼吸アニメーションを設定(Additive Layer)
エモートの設定(Action Layer)
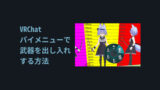
物の出し入れ(Fx Layer)
表情追加(Fx Layer)
ぜひこちらもご覧ください。
コメント